
Glass mosaic tiles are one of those craft materials that look intimidating at first but quickly become addictive once you start working with them. The way they catch light, shifting from translucent to brilliant depending on the angle, gives finished projects a depth and richness that painted surfaces simply cannot replicate. Whether you are working with tiny 1cm tesserae or larger 2×2 inch glass tiles, the creative possibilities are genuinely endless. And the best part? You do not need formal art training or expensive equipment to create something beautiful. A pair of tile nippers, some mosaic adhesive, unsanded grout, and a weekend afternoon is all it takes to get started.
What makes glass mosaic craft so satisfying for home decor specifically is how the finished pieces interact with light throughout the day. A mosaic mirror frame catches morning sun differently than afternoon light. A mosaic garden pot glows in evening light in a way that a painted pot never could. These are not just crafts — they are light responsive objects that change subtly with their environment. This article covers fifteen specific glass mosaic tile craft ideas, from beginner friendly projects that take a few hours to more ambitious weekend pieces that reward patience with genuinely stunning results. Every idea includes practical guidance on materials, technique, and styling so you can execute it with confidence.
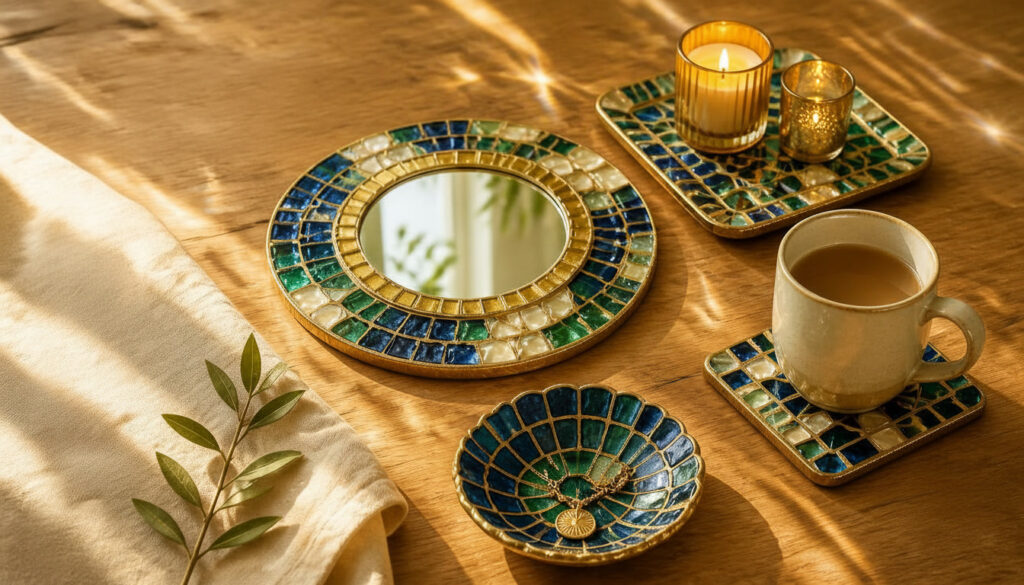
1. Glass Mosaic Mirror Frame for a Sparkling Bedroom Accent
A glass mosaic mirror frame is one of the most rewarding beginner mosaic projects because the mirror itself adds to the visual impact — every tile reflects light twice, once directly and once in the mirror surface behind it. Start with a plain wooden mirror frame at least two inches wide. Wider frames give you more surface to work with and make the mosaic pattern more readable. For a bedroom, a mix of warm champagne, soft rose gold, and clear iridescent glass tiles creates a romantic, luminous effect that suits a dressing area or above a console table beautifully.
Apply your tiles using a dedicated mosaic adhesive rather than standard craft glue — mosaic adhesive is specifically formulated to bond glass to wood without yellowing or losing grip over time. Work in small sections, placing tiles in a consistent pattern with even gaps between them. A random, varied placement of different tile sizes creates an organic, pebbled texture. A deliberate geometric arrangement — concentric rows, a chevron border, alternating colors — creates something more structured and graphic. Neither approach is wrong. The choice depends entirely on the aesthetic you are building toward.
Once your adhesive has cured fully, typically 24 hours — grout the frame using unsanded grout in a color that complements your tile palette. White grout makes tiles appear more separated and individual. Grey grout unifies the surface and creates less visual contrast. Dark charcoal grout makes colorful tiles pop dramatically and is particularly effective with jewel toned glass. Apply grout with a rubber float, press it firmly into all the gaps, and wipe the surface clean with a damp sponge before it dries fully. Polish the finished tiles with a dry cloth once the grout has cured. The result is a mirror frame that looks genuinely gallery quality.
2. Mosaic Glass Tile Garden Pot for Outdoor Color
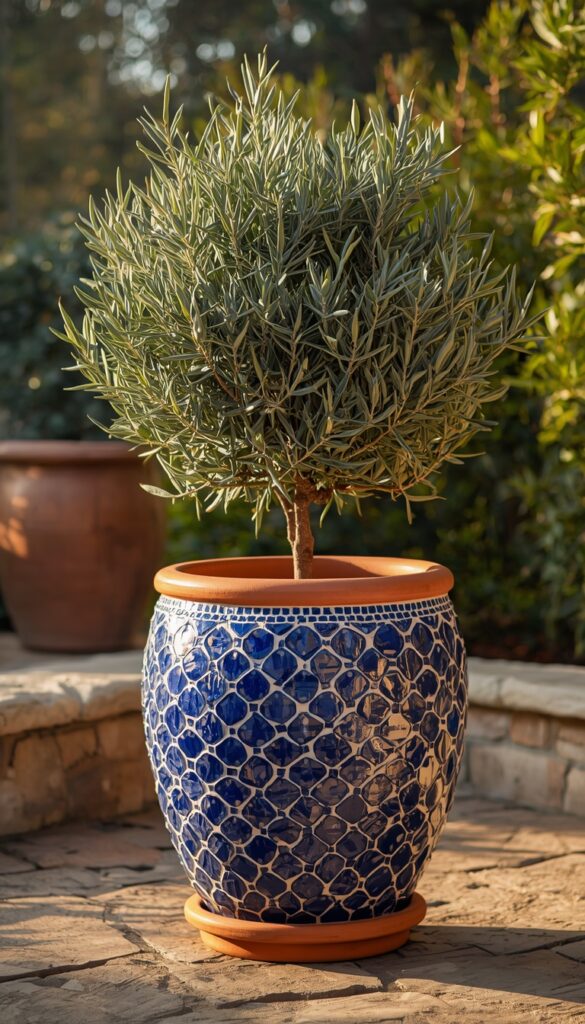
A plain terracotta garden pot covered in glass mosaic tiles becomes an outdoor decorative object that holds its own as a design piece — not just a vessel for plants. The key to successful outdoor mosaic pots is choosing the right materials from the start. Standard craft glass tiles are not all rated for outdoor use — freeze and thaw cycles, UV exposure, and moisture can cause cheaper tiles to crack, lift, or fade. Look specifically for vitreous glass tiles or stained glass tesserae, which are fired at higher temperatures and are naturally frost resistant and UV stable. These hold up through real outdoor conditions without degrading.
For the adhesive, use a water resistant mosaic adhesive or mix your own using a combination of tile adhesive and PVA glue. Standard indoor mosaic adhesive absorbs moisture and eventually releases tiles when exposed to rain. The grout also matters — use an exterior rated sanded grout for garden pots rather than the unsanded variety used indoors. Sanded grout has a coarser texture and significantly better resistance to moisture infiltration. Seal the finished grout with a penetrating outdoor grout sealer after curing for an extra layer of protection, particularly if you live in a climate with harsh winters.
Terracotta pots have a curved surface that makes mosaic application more challenging than flat panels. Embrace the curve by using smaller tiles — 1cm or 1.5cm — which conform more easily to the rounded surface without gaps at the edges. Work in horizontal bands around the pot rather than trying to tile large sections at once, allowing each band to cure before progressing to the next. This prevents tiles from sliding on the curved surface before the adhesive grips. A bold, simple color story — cobalt blue tiles with white grout, deep emerald with gold grout, warm terracotta tiles on a cream background — reads best outdoors where you are viewing the pot from a distance.
3. Glass Tile Mosaic Tray for a Styled Coffee Table
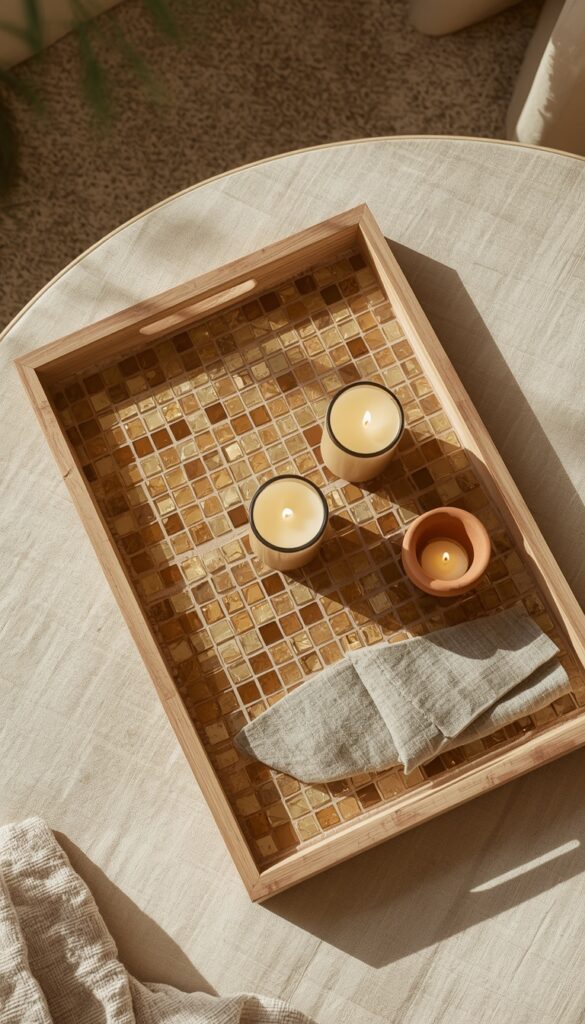
A decorative tray covered in glass mosaic tiles is a project that sits perfectly at the intersection of functional and beautiful. The finished tray can hold candles, a small plant, remotes, or simply sit as a styled object on a coffee table or ottoman. Unlike most mosaic surfaces, a tray has a flat, accessible working area and no complex curves or edges to navigate — which makes it an ideal second project after a simpler tile experiment. Choose a plain wooden tray with a recessed center panel so the tiled surface sits flush rather than proud of the tray edges.
Glass tiles for a coffee table tray should be chosen with the room’s color palette in mind. A living room with warm neutrals — cream, caramel, warm grey — suits a tray in amber, champagne, and bronze glass tiles. A room with cool tones — slate, navy, white — calls for tiles in icy blue, clear, and silver. For a maximalist room, a tray in deep jewel tones — sapphire, emerald, amethyst — adds a deliberately rich contrast to a neutral setting. Whatever palette you choose, limit yourself to three to four tile colors maximum. More than that and the surface starts to look scattered rather than designed.
The grouting color on a coffee table tray is worth thinking about carefully because you will see it up close every day. A mid tone grey grout works with almost every tile palette and reads as deliberately neutral — it does not compete with the tile colors but adds definition between them. Warm putty colored grout suits amber and gold tile palettes particularly well. After grouting and sealing, apply a coat of clear furniture wax to the grout lines — this step is often skipped but makes a real difference on a surface that will be touched and used regularly, adding both a subtle sheen and extra stain resistance.
4. Mosaic Glass Number House Sign for Kerb Appeal

A glass mosaic house number sign is a home decor project that adds genuine character to the exterior of a house while serving a practical purpose. Start with a piece of exterior grade slate, a thick concrete stepping stone, or a sealed wooden board as your base. Slate is the most visually sophisticated choice — its natural dark grey surface contrasts beautifully with bright glass tiles and needs no painting or priming before tiling. Cut or purchase your house number stencil to the correct size for your base, then tile around and within the number shape using glass tiles in a bold, high contrast color against a neutral mosaic background.
The number itself benefits from using a single, consistent tile color applied in a deliberate fill pattern — all tiles running in the same direction within the number shape for the most readable result. The background field can be more random and textural — a varied placement of similarly toned neutral tiles creates visual interest without competing with the number. White or cream background tiles with cobalt or terracotta numbers. Deep charcoal background with gold or copper number tiles. The contrast between number and background is what makes the sign readable from a distance, so do not let the colors become too similar in tone even if you want a subtle palette.
Mount the finished sign using exterior grade adhesive or drill and plug fixings appropriate to your wall surface. Before fixing permanently, hold the sign against the wall and assess the grout color in context — what reads well on your workbench may look different against painted brick, stone, or rendered wall surfaces. A dark charcoal grout that looks crisp against your tiles in the studio might disappear against a dark brick wall, making the sign read as a single colored block rather than a mosaic. Test grout colors before committing by placing dry grout powder against the tile and wall surface in daylight — this takes five minutes and saves considerable disappointment.
5. Glass Mosaic Candle Lantern for Warm Evening Light

Covering a plain glass lantern or a simple metal lantern frame in glass mosaic tiles creates an evening light object that is genuinely magical when a candle burns inside it. The stained glass effect — warm light pushing through colored glass tiles — transforms a basic lantern into something that looks like it belongs in a luxury boutique. This project works best with transparent or translucent glass tiles rather than opaque ones, because only the transparent and translucent varieties allow light to pass through and create that characteristic glow. Opaque tiles block the light and produce a much flatter result.
For a metal lantern frame, use an epoxy based adhesive rather than standard mosaic adhesive — epoxy bonds glass tiles to metal significantly more securely and handles the temperature fluctuation that lanterns experience as candles heat and cool the metal frame. Apply tiles to the flat glass panels of the lantern if it has them, or to the metal frame sections themselves if it is an open style. Leave the corner uprights and top and bottom frame sections free of tiles — tiling only the flat panel sections keeps the lantern looking clean and intentional rather than encrusted.
Color selection for a mosaic lantern is where you can be genuinely expressive. Warm amber, honey, and gold tiles produce a firelight effect that feels deeply cozy in a living room or outdoor dining setting. Deep ruby and burgundy tiles create a dramatic, jewel-like glow. Cool blue and green tiles produce an underwater, almost ethereal light quality. Mix tile sizes within the lantern panels for more visual texture — use a base of 2cm tiles with occasional smaller accent tiles in a contrasting color pressed into the gaps for a richly detailed surface that reads beautifully when the candle is lit.
6. Mosaic Glass Tile Stepping Stones for a Garden Path
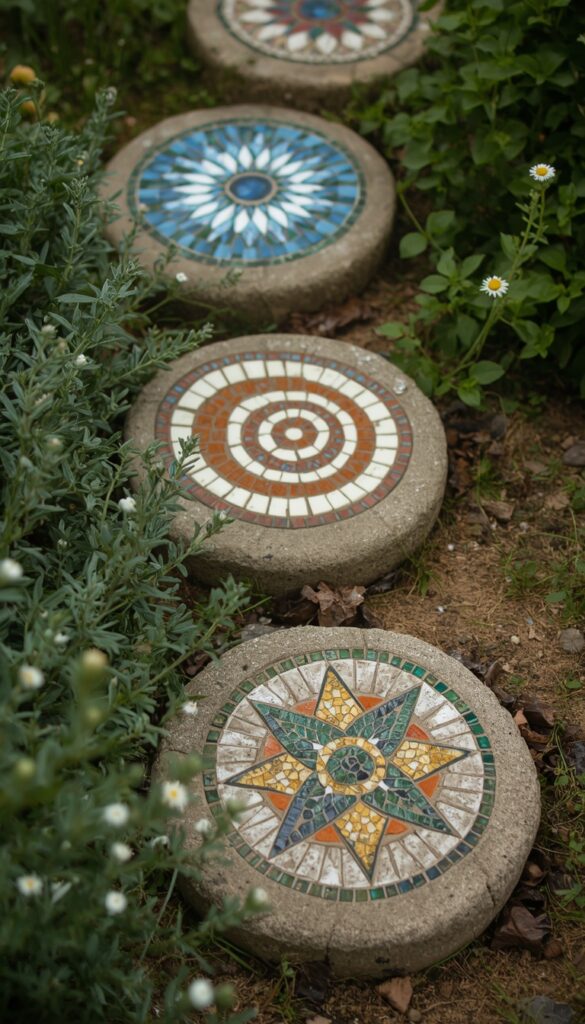
Glass mosaic stepping stones are a garden craft project that genuinely improves with age — the grout weathers slightly, the glass tiles develop a natural patina in some colors, and the stones settle into the garden environment in a way that makes them look like they have always been there. Cast your own stepping stone using ready mix concrete in a plastic mold, or purchase plain concrete stepping stones as your base. Allow cast stones to cure for a full week before tiling — fresh concrete is still off gassing and the surface chemistry can interfere with adhesive bonding if you tile too early.
Use vitreous glass tiles specifically for stepping stones — these are the frost resistant, harder wearing variety designed for pools and exterior applications. Standard art glass tiles are too fragile for a surface that will be walked on and subjected to outdoor weather. Design each stone as a complete composition — a simple sun motif, a spiral, a geometric star, a floral medallion — rather than continuing a pattern across multiple stones. Individual composed designs give each stone its own identity and make the garden path feel more like a collection of art objects than a tiled walkway.
The grout for outdoor stepping stones should be sanded and sealed with an exterior penetrating sealer after full curing. Mix the grout slightly thicker than the manufacturer’s standard instructions — a stiffer grout mixture fills the gaps between tiles more completely and is less prone to cracking as the concrete base expands and contracts with temperature changes. Press the grout into gaps firmly with a rubber float and work it in two directions across the surface. Clean excess grout carefully with a just damp sponge — oversaturating the grout surface during cleanup can weaken the finished joints, particularly in areas of fine detail.
7. Glass Tile Mosaic Kitchen Backsplash Accent Panel
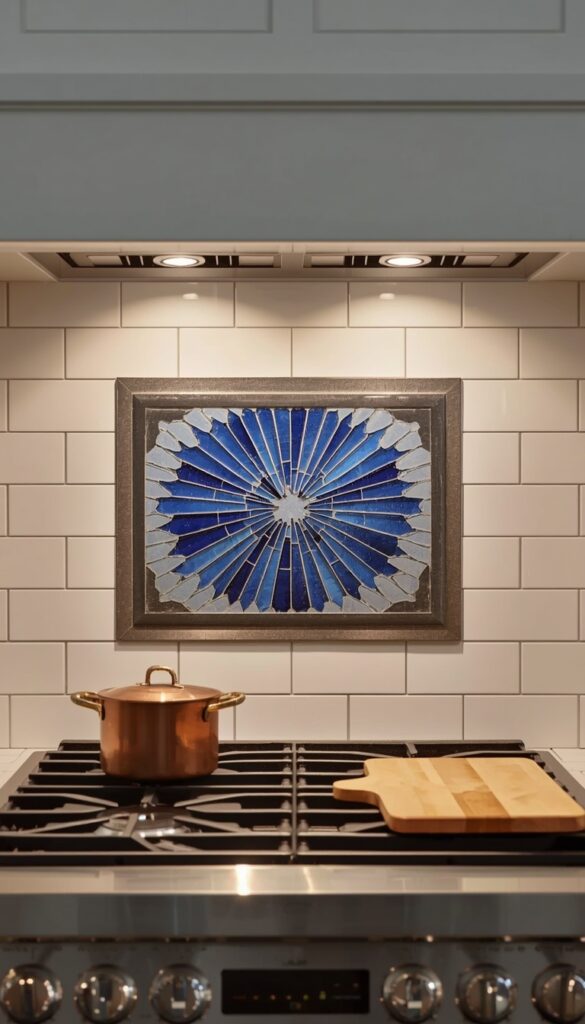
A small mosaic glass tile accent panel installed as part of a kitchen backsplash — rather than as the entire backsplash — is a way to introduce handmade, artisan quality into a kitchen without the cost or complexity of a full mosaic installation. Plan the panel as a deliberate focal point — directly behind the stove, centered above the sink, or as a narrow band running along the top edge of a standard tile backsplash. A panel measuring roughly 18 inches wide and 12 inches tall is large enough to make a visual impact without overwhelming the space or requiring excessive tiling time.
Design the panel as a complete composition that works at backsplash scale. Abstract geometric patterns — concentric diamonds, radiating sunburst designs, interlocking hexagons — read well at this scale and photograph beautifully in kitchen settings. Floral or botanical designs work too, but require more careful tile cutting to render curves convincingly. For a kitchen environment specifically, choose tiles rated for wet area use and use a waterproof tile adhesive and grout. Kitchen backsplashes experience steam, heat, moisture, and occasional splashing — materials not rated for wet environments will deteriorate relatively quickly in this context.
Install the mosaic panel onto the wall using the same adhesive and grouting process as standard kitchen tiles, but allow extra time for the mosaic to dry before grouting because the irregular height variations across hand placed mosaic tiles mean some sections of adhesive take longer to fully cure. Seal the finished grout with a kitchen grade grout sealer before the kitchen goes back into use — unsealed grout in a kitchen environment absorbs cooking oils and food residue relatively quickly, and re-staining once the grout has absorbed oil is difficult to reverse without regrouting entirely.
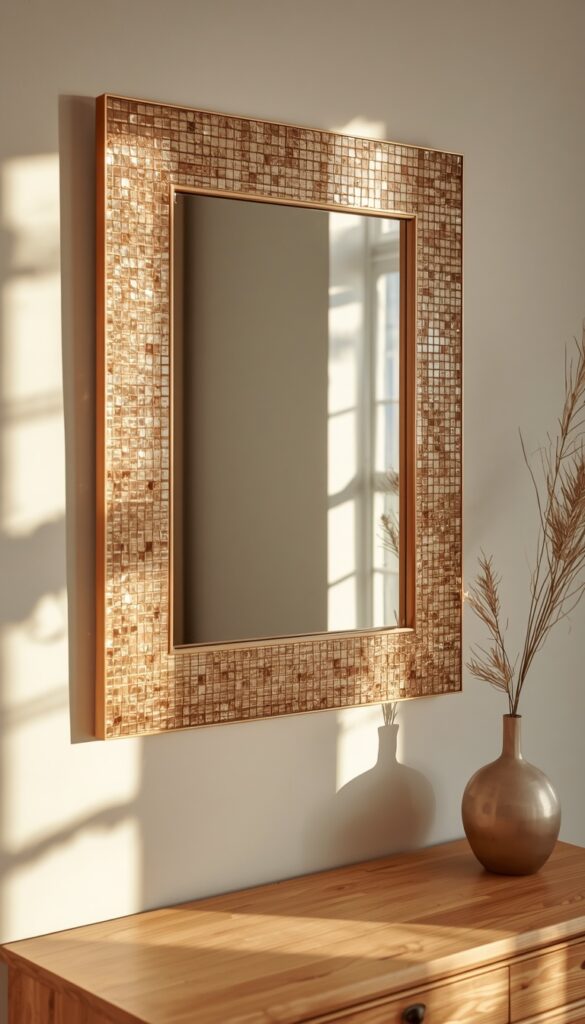
8. Mosaic Glass Picture Frame for Personalised Wall Art
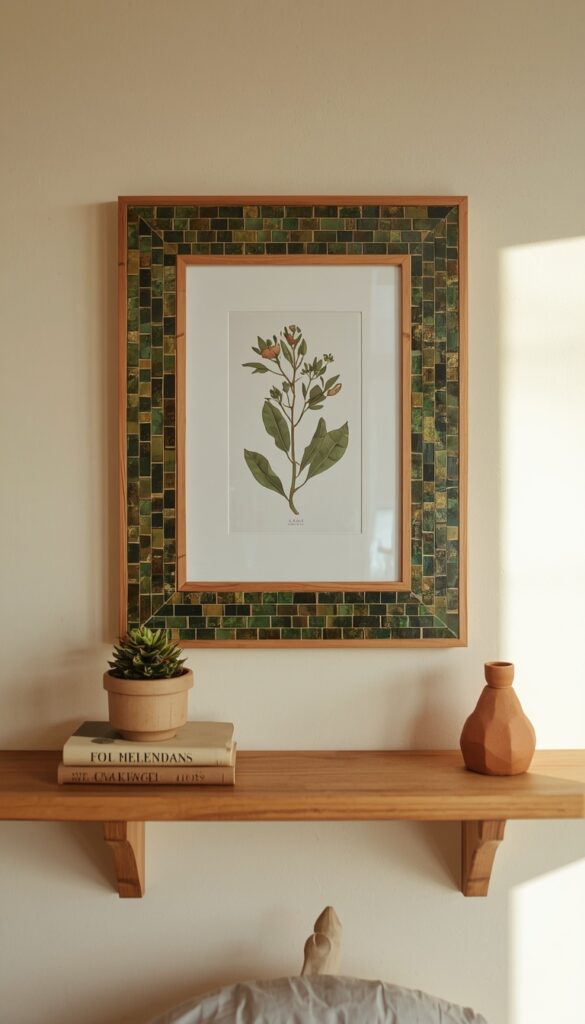
A plain wooden picture frame transformed with glass mosaic tiles becomes a decorative object that is as interesting as whatever it holds. Unlike store bought decorative frames, a mosaic frame carries a handmade quality and a personal color story that connects it specifically to your space. Choose frames with a flat face at least 1.5 inches wide — narrower than that and the mosaic surface becomes too cramped to read as a pattern rather than a confused texture. Thrift stores are an excellent source of wide, solid wood frames in good structural condition that cost far less than new craft frames.
The design approach for a mosaic picture frame depends on what the frame will display. For a family photograph, choose tile colors that pull from the dominant tones in the photo — a beach photograph suits a frame in seafoam, sand, and white glass tiles. A botanical print looks beautiful in a frame tiled with deep forest green, moss, and gold tiles. For a mirror — which changes its own content with the viewer — a more abstract, pattern driven tile arrangement works better than one keyed to a specific image palette. Think of the frame as a complement to its contents, not a competition.
Corner treatment is the detail that separates a polished mosaic frame from an amateur one. At each corner, either miter the tile pattern so it turns the corner cleanly — cutting tiles at 45 degrees to create a neat diagonal join — or treat the corners as deliberate accent points with a different tile color, size, or arrangement that marks the corner visually. The worst outcome is tiles that run up to a corner and then simply stop with an awkward gap or a half tile that does not fit. Plan your tile layout from the corners inward rather than from the middle outward, and the corners will always resolve cleanly regardless of the exact frame dimensions.
9. Glass Mosaic Outdoor Table Top for Patio Style

A mosaic glass tile outdoor table top is one of the most impressive scale contact paper furniture projects you can take on, and one that genuinely transforms outdoor entertaining. Start with a solid base — a concrete table top, a thick wooden table top that has been sealed against moisture, or a steel mesh table top already designed for mosaic application. Avoid thin plywood or MDF as a base for an outdoor table — moisture infiltration over time will cause delamination that lifts the entire mosaic surface regardless of how well it was applied.
Design an outdoor table top as you would design a rug — with a central field, a surrounding border, and corners that resolve cleanly. A bold geometric central medallion in a mix of blue and white glass tiles, surrounded by a solid colored border in deep cobalt, creates a table top that looks like traditional Moroccan tilework and suits almost any garden or terrace setting. A random, impressionistic arrangement of mixed Mediterranean tones — terracotta, cobalt, white, sage green — creates something more organic and relaxed. Choose the design approach that matches the overall aesthetic of your outdoor space rather than selecting a tile pattern in isolation from its context.
Grout an outdoor table top with exterior sanded grout and seal it thoroughly with a two part epoxy grout sealer rather than a standard penetrating sealer — epoxy grout sealers create a surface level barrier that significantly outperforms penetrating sealers in outdoor table conditions where spilled drinks, food, and cleaning products make regular contact with the grout surface. An outdoor mosaic table, properly constructed and sealed, will last for decades. Improperly sealed or constructed, it will begin deteriorating within one to two seasons. The preparation work at the beginning of this project is more important than the aesthetic decisions.
10. Mosaic Glass Tile Flower Pot Saucer for Indoor Plants
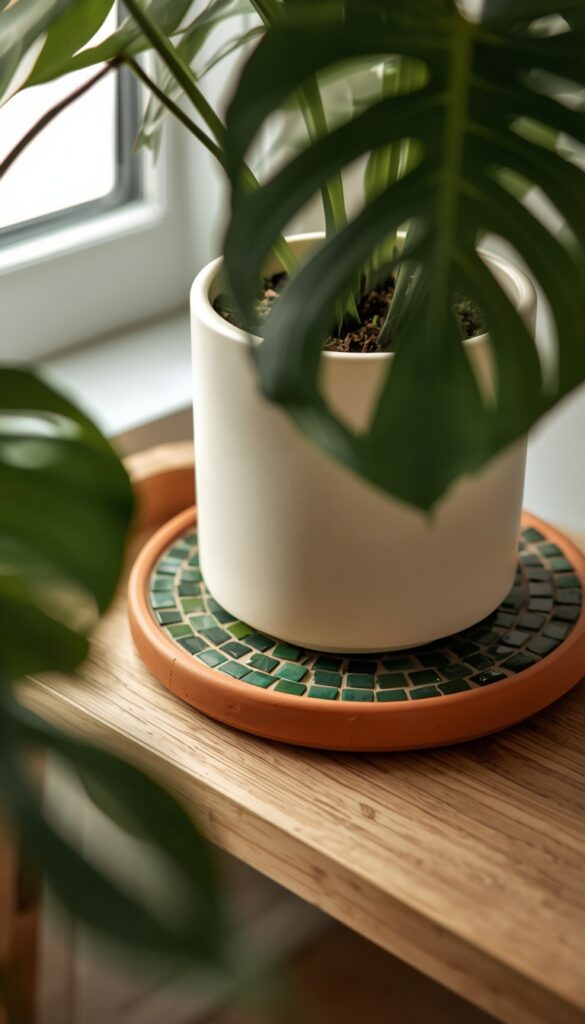
A plain terracotta or plastic plant saucer covered in glass mosaic tiles becomes a decorative base that elevates the entire plant display — particularly useful when your pots are plain and your shelf or surface needs visual interest. Saucers are small enough to complete in a single afternoon session, which makes them ideal for building mosaic skills and confidence before tackling larger projects. Their flat working surface means almost no tile cutting is required if you use small 1cm tiles, which can be placed in the curved interior and straight exterior wall of the saucer with minimal adjustment.
For indoor plant saucers specifically, choose tile colors that complement the foliage rather than the pot — which can be swapped, while the saucer stays. Deep emerald and forest green tiles suit almost any plant with green foliage. Warm copper and rust tones create a beautiful contrast with the grey green of succulents and cacti. White and silver tiles suit flowering plants and create a clean, contemporary plant display aesthetic. The interior of the saucer — the flat bottom section — is the most visible area, so focus your most considered tile placement there and allow the exterior wall to be more random.
Seal the interior of a mosaic plant saucer with a waterproof grout sealer before the saucer goes into use — plant saucers collect standing water every time you water, and unsealed grout will absorb that water, eventually causing the adhesive beneath the tiles to soften and tiles to lift. Apply two coats of sealer to the interior grout lines specifically, allowing the first coat to dry fully before applying the second. Once sealed, the saucer is effectively waterproof and can handle regular watering without degradation. Replace the sealer annually for saucers used with plants that need frequent watering.
11. Glass Mosaic Wall Clock for a Handmade Statement Piece
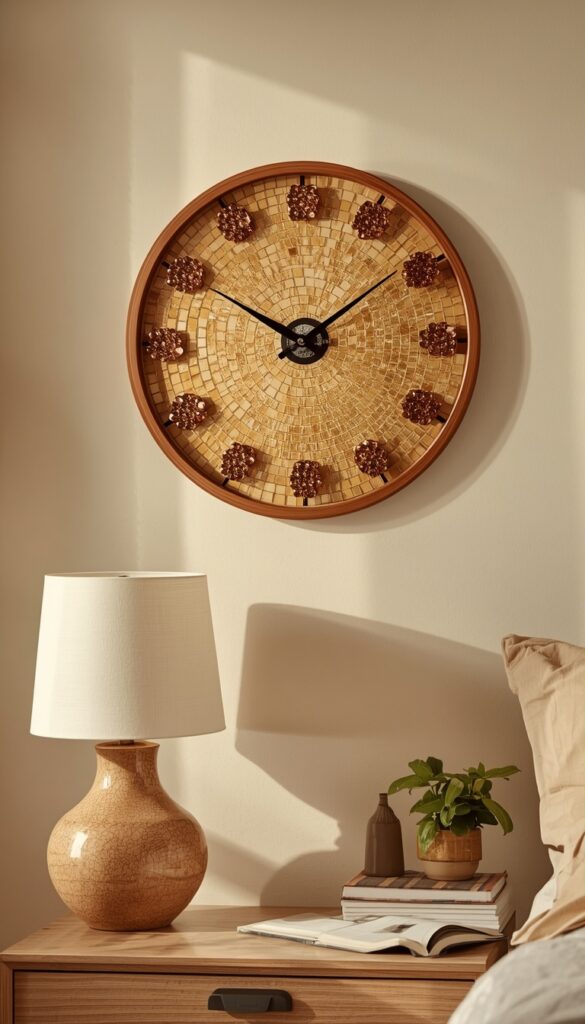
A wall clock with a mosaic glass tile face is a functional home decor piece that reads as a genuine art object — partly because the reflective quality of glass tiles makes the clock face dynamic rather than static. Purchase a plain wooden clock face blank with a pre-drilled center hole for the clock mechanism, or repurpose a large wooden disc as your base. The clock mechanism itself is inexpensive and widely available — a basic quartz movement with hands, available in different shaft lengths depending on the thickness of your mosaic surface, is all you need for the functional element.
Design the clock face with the twelve hour positions marked before you begin tiling — either with small pencil marks or by placing a single distinctive accent tile at each hour position first, then building the mosaic field around them. Hour markers do not need to be numerals. A single contrasting color tile at each position, or a small cluster of gold tiles at the 3, 6, 9, and 12 positions, reads clearly as a clock face without numerals. For a bedroom clock, use a warm, softly glowing tile palette that reads gently rather than boldly — this is a piece you will look at in half light as well as daylight.
The clock hands need to sit slightly proud of the mosaic surface to sweep without catching on tile edges. When ordering your clock mechanism, choose a shaft length that is at least 3mm longer than the combined thickness of your base plus your mosaic surface — this ensures the hands clear the tiles comfortably. A common mistake is ordering a mechanism for the base thickness alone without accounting for the added height of the tiles and grout, which results in hands that drag against the mosaic surface and eventually stop the clock. Verify this measurement before starting the project rather than discovering the problem after the mosaic is complete.
12. Mosaic Glass Tile Coaster Set for a Thoughtful Gift
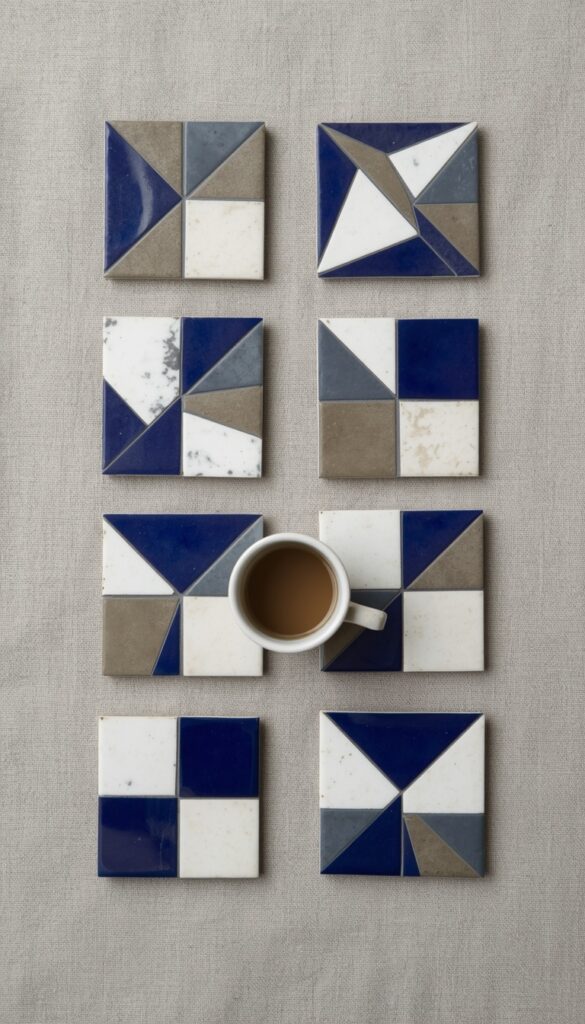
A set of glass mosaic coasters is one of the most practical and most appreciated handmade gifts in the home decor craft space. Each coaster is a small, contained composition that takes about 30 minutes to tile and 24 hours to cure — meaning a set of six can be completed comfortably over a single weekend. Use 10cm square cork tiles or thick wooden discs as your base — both materials are light, provide a stable tiling surface, and give the coaster a soft base that does not scratch furniture. Cork specifically is ideal because it provides natural grip and insulation simultaneously.
Design each coaster in the set as a variation on a single visual theme rather than making each one entirely different or all of them identical. All six coasters in the same two colors but each with a different geometric pattern creates a set that is cohesive enough to look designed but varied enough to be interesting. All six in the same pattern but in different colorways creates something more playful and maximalist. The worst outcome for a coaster set is six completely unrelated coasters that happen to be the same size — without a connecting visual thread, the set looks like mismatched individual pieces rather than a designed collection.
Finish all coasters with a thorough application of waterproof grout sealer to protect the grout from drink spills and condensation. Glass tiles are inherently water resistant, but unsealed grout is porous and will stain quickly on a coaster surface. Apply felt pads to the underside of each coaster — four small round felt pads in the corners protect table surfaces from the slight roughness of the cork or wood base and prevent the coaster from sliding when someone sets a glass down on it. Package the finished set in a simple wooden or card box with a piece of tissue paper for a gift presentation that looks completely professional.
13. Glass Tile Mosaic Jewelry Dish for a Dressing Table
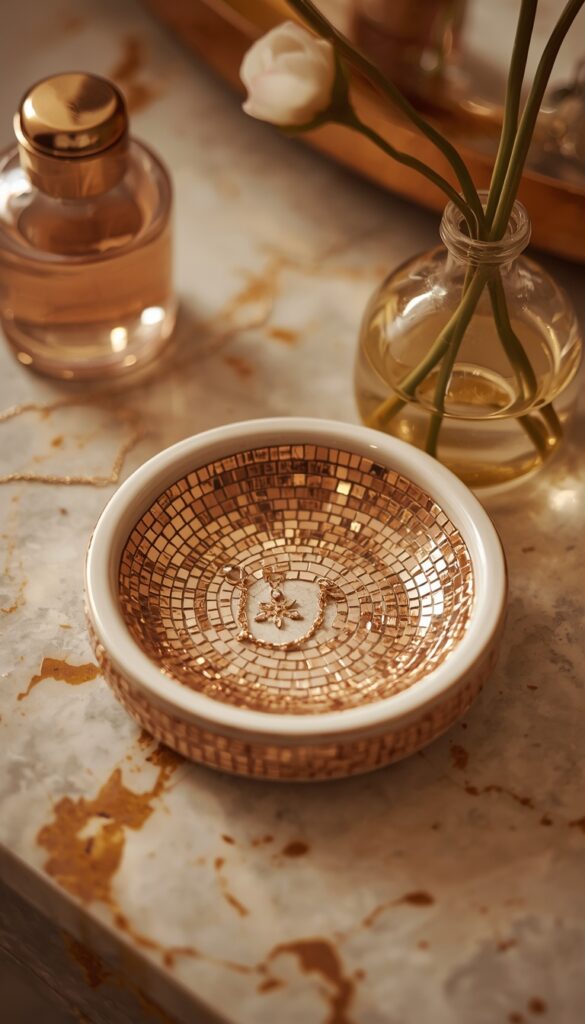
A small ceramic dish or shallow wooden tray covered in glass mosaic tiles makes an exquisite jewelry holder for a dressing table — the kind of piece that elevates the everyday ritual of putting on or removing jewelry. The reflective quality of glass tiles in a jewelry dish is particularly appropriate because it creates a visual connection between the sparkle of the dish and the sparkle of whatever jewelry rests in it. Use the smallest available glass tiles for this project — 5mm or 8mm tesserae — because the small scale of a jewelry dish means larger tiles look awkward and leave insufficient room for a pattern.
Gold, rose gold, and champagne glass tiles suit a jewelry dish beautifully and create an opulent, boutique quality surface. Pair them with tiny mirror tile accents — 5mm mirror tesserae are available from specialist mosaic suppliers — for a surface that catches light from every angle. The combination of colored glass tiles and mirror tiles in a jewelry dish creates something that genuinely sparkles under a dressing table lamp. For a more graphic, contemporary look, use black and white glass tiles in a simple geometric pattern that lets the jewelry become the color element against a neutral mosaic field.
Line the interior of the jewelry dish with a color grout that enhances rather than dulls the tile palette — gold or warm sand colored grout suits champagne and rose gold tiles far better than standard grey, which creates a cold and slightly flat appearance. Mosaic grout comes in a surprisingly wide range of colors from specialist suppliers — far wider than the standard grey and white available at hardware stores. Choosing the right grout color for a small, closely viewed piece like a jewelry dish makes a meaningful difference to the final quality of the result. Seal the finished grout with clear sealer to protect it from hand cream, perfume, and jewellery cleaning solution.
14. Mosaic Glass Tile Plant Stand Top for Indoor Botanicals
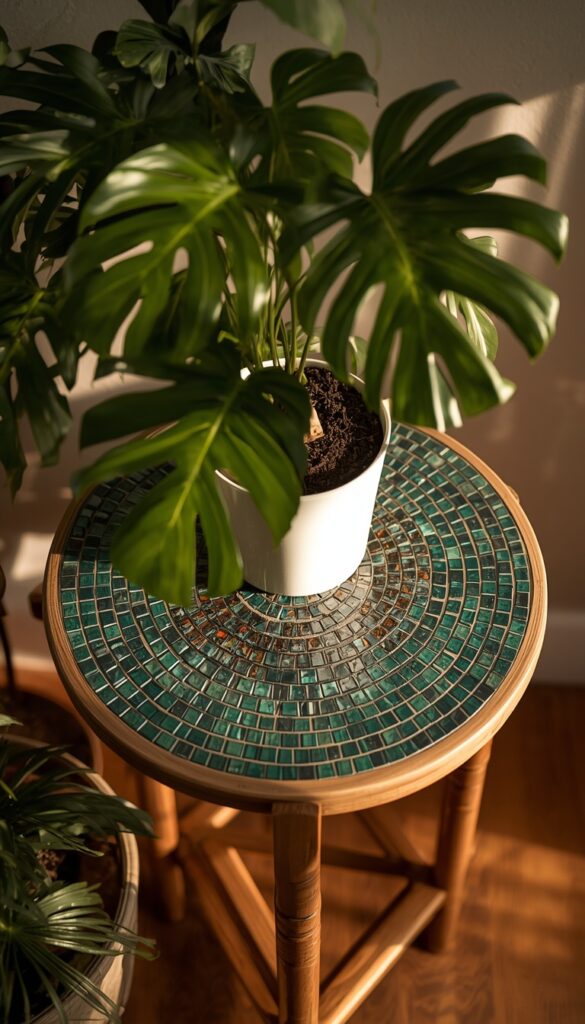
A plain wooden or metal plant stand with a circular or square top surface is a wonderful candidate for a glass mosaic tile update — the finished piece functions as a plant pedestal, a small side table, and a decorative object simultaneously. Plant stands sit at viewing height in a room, which means the mosaic top is seen at close range and benefits from careful, detailed tile placement. This is a project where extra time spent planning and placing tiles before committing to adhesive pays dividends in the finished quality.
For a circular plant stand top, design from the center outward — begin with a small central motif, then build concentric rings of tiles around it, adjusting tile size and color with each ring to create a mandala-like composition. This approach naturally fills a circular surface completely and gives every section of the design a logical relationship to every other section. For a square top, design from the outer border inward — establish a clean tile border first, then fill the central field. Both approaches produce a clean, composed result that reads as designed rather than filled.
Choose tile colors that complement the plants you will display on the stand. A stand intended to hold trailing pothos or a lush monstera suits a tile palette in deep jewel tones — deep teal, forest green, warm amber — that creates a rich, botanical atmosphere. A stand for delicate flowering plants or succulents suits softer, more neutral tones that do not compete with the plant’s own color. Finish the mosaic with an indoor grout sealer and buff the tile surface with a furniture wax for a subtle protective sheen. A well executed mosaic plant stand is the kind of piece that guests ask about repeatedly — because it looks expensive, handmade, and genuinely considered.
15. Glass Mosaic Tile Art Panel for a Feature Wall

A large format glass mosaic art panel — designed and executed as a piece of wall art rather than a functional object — is the most ambitious project in this list and also the most visually impactful. Plan a panel in the range of 40 x 60cm as your first attempt at this scale. Larger than that and the project becomes genuinely time intensive; smaller and the design does not have enough space to develop the kind of visual complexity that makes mosaic art compelling. Use a solid MDF board sealed with diluted PVA as your base, or a dedicated mosaic backer board which is lighter and more dimensionally stable.
Sketch your design on the base board before you begin tiling — either freehand or transferred from a paper template using tracing paper and carbon transfer paper. The design does not need to be complex. Some of the most striking glass mosaic art panels are the simplest — a bold abstract composition in three colors, a large-scale geometric, a simple landscape horizon rendered in tile. What matters most at this scale is the relationship between colors and the quality of the tile placement — consistent grout gaps, smooth transitions between color areas, and confident tile cutting at design boundaries.
Install a finished mosaic art panel using a French cleat mounting system rather than standard picture hooks — mosaic panels are significantly heavier than canvas or framed prints of equivalent size, and a French cleat distributes the weight across a longer wall contact point that handles the load safely. Two person installation is strongly recommended for panels over 40cm wide. Once on the wall, a glass mosaic art panel does something that no other wall art quite achieves — it responds to changes in the room’s light throughout the day, shifting in color quality, apparent depth, and visual warmth as the light source and angle change. That living, responsive quality is what makes glass mosaic a medium worth the effort and time it demands.
Conclusion
Glass mosaic tile crafts reward patience with results that genuinely surprise people — including the maker. What begins as a pile of colored glass chips and a plain surface ends as something that catches light, holds color, and carries a handmade quality that mass produced decor simply cannot replicate. The fifteen ideas in this article range from an afternoon coaster set to a weekend art panel, but they all share the same fundamental satisfaction: the moment the grout is wiped clean and the tiles emerge fully revealed, the result almost always exceeds expectations. Glass mosaic craft is one of those rare creative skills where the learning curve is short, the materials are accessible, and the finished pieces are genuinely beautiful. Choose your first project, gather your tiles, and start placing.
Frequently Asked Questions
Q: What type of adhesive works best for glass mosaic tiles? A: For most indoor glass mosaic projects on wood or MDF, a dedicated white mosaic adhesive works well — it stays white when dry, which matters for translucent tiles where a dark adhesive shows through. For outdoor projects, use a water resistant tile adhesive. For glass on metal or for outdoor applications with significant temperature variation, two part epoxy adhesive gives the most durable bond.
Q: Do glass mosaic tiles need sealing after grouting? A: The tiles themselves do not need sealing — glass is naturally non porous. The grout does need sealing, particularly for functional surfaces like coasters, plant saucers, outdoor tables, and kitchen backsplashes. Apply a penetrating grout sealer after full grout curation for indoor projects, and an epoxy grout sealer for outdoor or high moisture applications. Reapply sealer annually on heavily used surfaces.
Q: What grout should I use for glass mosaic tile projects? A: Use unsanded grout for gaps of 3mm or less and sanded grout for larger gaps. Unsanded grout is standard for most decorative mosaic work where tiles are placed close together. For outdoor projects, exterior sanded grout handles freeze and thaw cycles better. For kitchen or bathroom projects, choose a grout specifically rated for wet area use and seal it after curing.
Q: Can I cut glass mosaic tiles at home without professional tools? A: Yes. A pair of wheeled tile nippers is the standard home mosaic cutting tool — they score and snap glass tiles into irregular shapes and are inexpensive to purchase. For cleaner, more precise cuts, a wheeled glass cutter and running pliers produce straight lines and controlled curves. Neither tool requires significant skill to use effectively — a short practice session with spare tiles builds enough confidence for most project cuts.
Q: How long does a glass mosaic project take to complete? A: A small project like a coaster or jewelry dish takes two to three hours of tiling followed by 24 hours of curing before grouting, then another hour of grouting and cleanup followed by 24 to 48 hours of grout curing before sealing. A medium project like a mirror frame or tray takes a full day of tiling. A large panel may take a full weekend of tiling. Factor in curing time for each stage rather than trying to rush the process.
Q: Is glass mosaic craft suitable for complete beginners? A: Absolutely. Start with a flat surface, small tiles, and a simple random placement rather than a complex geometric pattern. A beginner mosaic coaster or a small plant saucer teaches all the fundamental skills — adhesive application, tile spacing, grouting, and cleanup — in a contained project with a short time investment. Build toward more complex projects and larger surfaces as your confidence grows with each finished piece.
Q: What is the best surface to use as a base for glass mosaic projects? A: Sealed MDF, solid wood, and concrete are the most reliable mosaic bases for home projects. Avoid hollow or thin surfaces that flex — flexing causes adhesive to crack and tiles to lift over time. For outdoor projects, use concrete, exterior grade plywood sealed with waterproof primer, or dedicated mosaic backer board. Always prepare the surface by cleaning thoroughly and, for wood bases, sealing with diluted PVA or a dedicated primer before tiling.
Q: Where can I buy glass mosaic tiles for craft projects? A: Specialist mosaic supply shops — both physical and online — offer the widest range of glass tile types, colors, and sizes. Art and craft supply stores carry a more limited range but are useful for getting started. For outdoor rated vitreous glass tiles, look for suppliers that specifically describe their tiles as frost resistant or suitable for exterior use. Buying in small sample packs before committing to larger quantities lets you assess color accuracy and tile quality before your full project purchase.