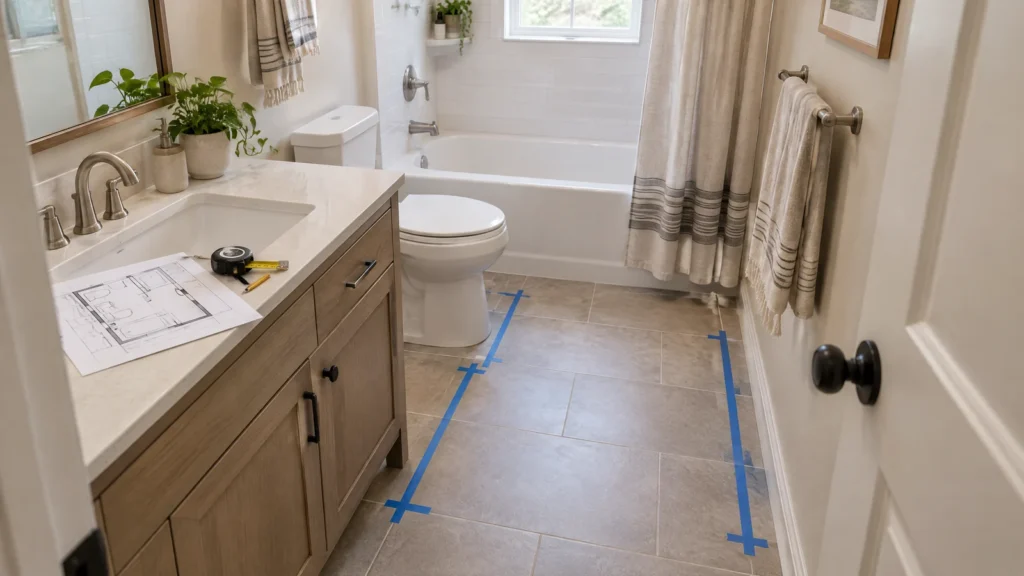
A bathroom can have enough square footage on paper and still fail in use. Useful bathroom layout dimensions must account for more than room width and length. The door arc may hit the vanity, a deep cabinet may pinch the toilet approach, the shower entry may land under a window, or an existing drain and vent stack may make a seemingly simple move much more involved. The useful answer is not one universal room size. It is a repeatable fit test.
Start with the finished wall-to-wall shell, not a fixture catalog. Record the room at several points, draw every opening and obstruction, place the actual fixture envelopes from manufacturer cut sheets, and reserve space for the way each person enters, turns, sits, washes, showers, stores supplies, and opens doors. Then mark the questions that need local code, permit, manufacturer, or trade verification before demolition.
This guide uses original arithmetic and four hypothetical plans for that purpose: a 5 by 8 hall bath, a 5 by 10 narrow bath, a half bath, and an awkward room. For your own measurements, download the bathroom room-shell worksheet. The worksheet is a planning aid, not a permit set or code certification.
Start with the finished room shell, not the fixture catalog
Measure the walls you will actually finish
“Five by eight” may describe framing, a nominal plan, or the clear area after finishes. Those are not interchangeable. Label the plan as finished inside dimensions when possible, measuring from final wall face to final wall face. If the walls are open, record the wall-build-up assumption instead of treating stud-to-stud space as finished.
Measure width and length at the floor, waist height, and near the ceiling, then compare the readings. Record ceiling height, soffits, beams, radiators, ducts, access panels, structural walls, floor level, and any sloped-ceiling limitation.
Photograph each wall, ceiling, floor, opening, plumbing connection, cleanout, and concealed clue before removal. Include a tape measure in key photos.
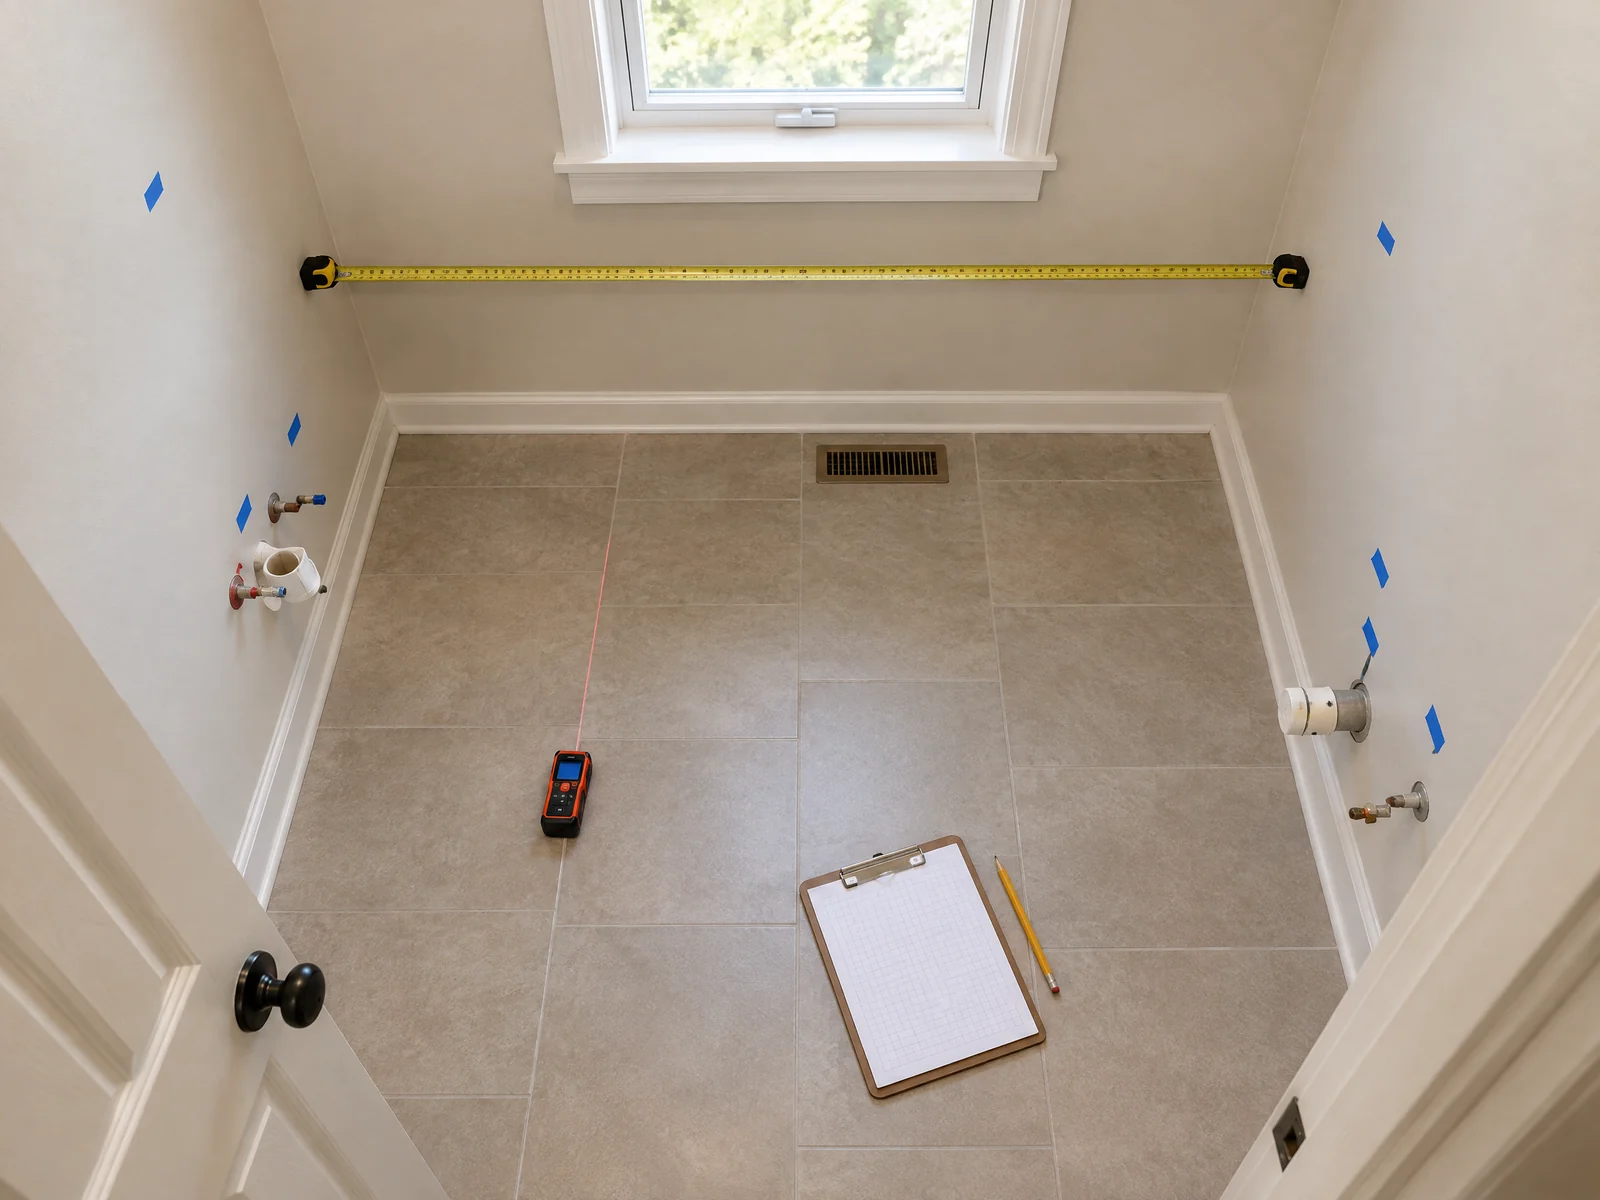
What to record before drawing a plan
Use a page for each wall and mark:
- finished width and length at several points, plus ceiling height;
- wall thickness or the assumed finished build-up, including tile and backer where relevant;
- door leaf, casing, threshold, hinge side, swing direction, clear opening, and possible pocket-door wall;
- windows, sill heights, casing, privacy needs, and the relationship to a wet zone;
- supply lines, drains, vent stack, cleanouts, shutoffs, access panels, and the existing plumbing wall;
- joist direction, slab conditions, structural walls, posts, chases, soffits, and ducts;
- outlets, switches, light locations, exhaust fan, duct route, and panel limitations, without guessing current electrical clearances;
- household users, bathing needs, storage needs, privacy priorities, and future adaptability goals; and
- the model number or link for each proposed fixture and its cut sheet.
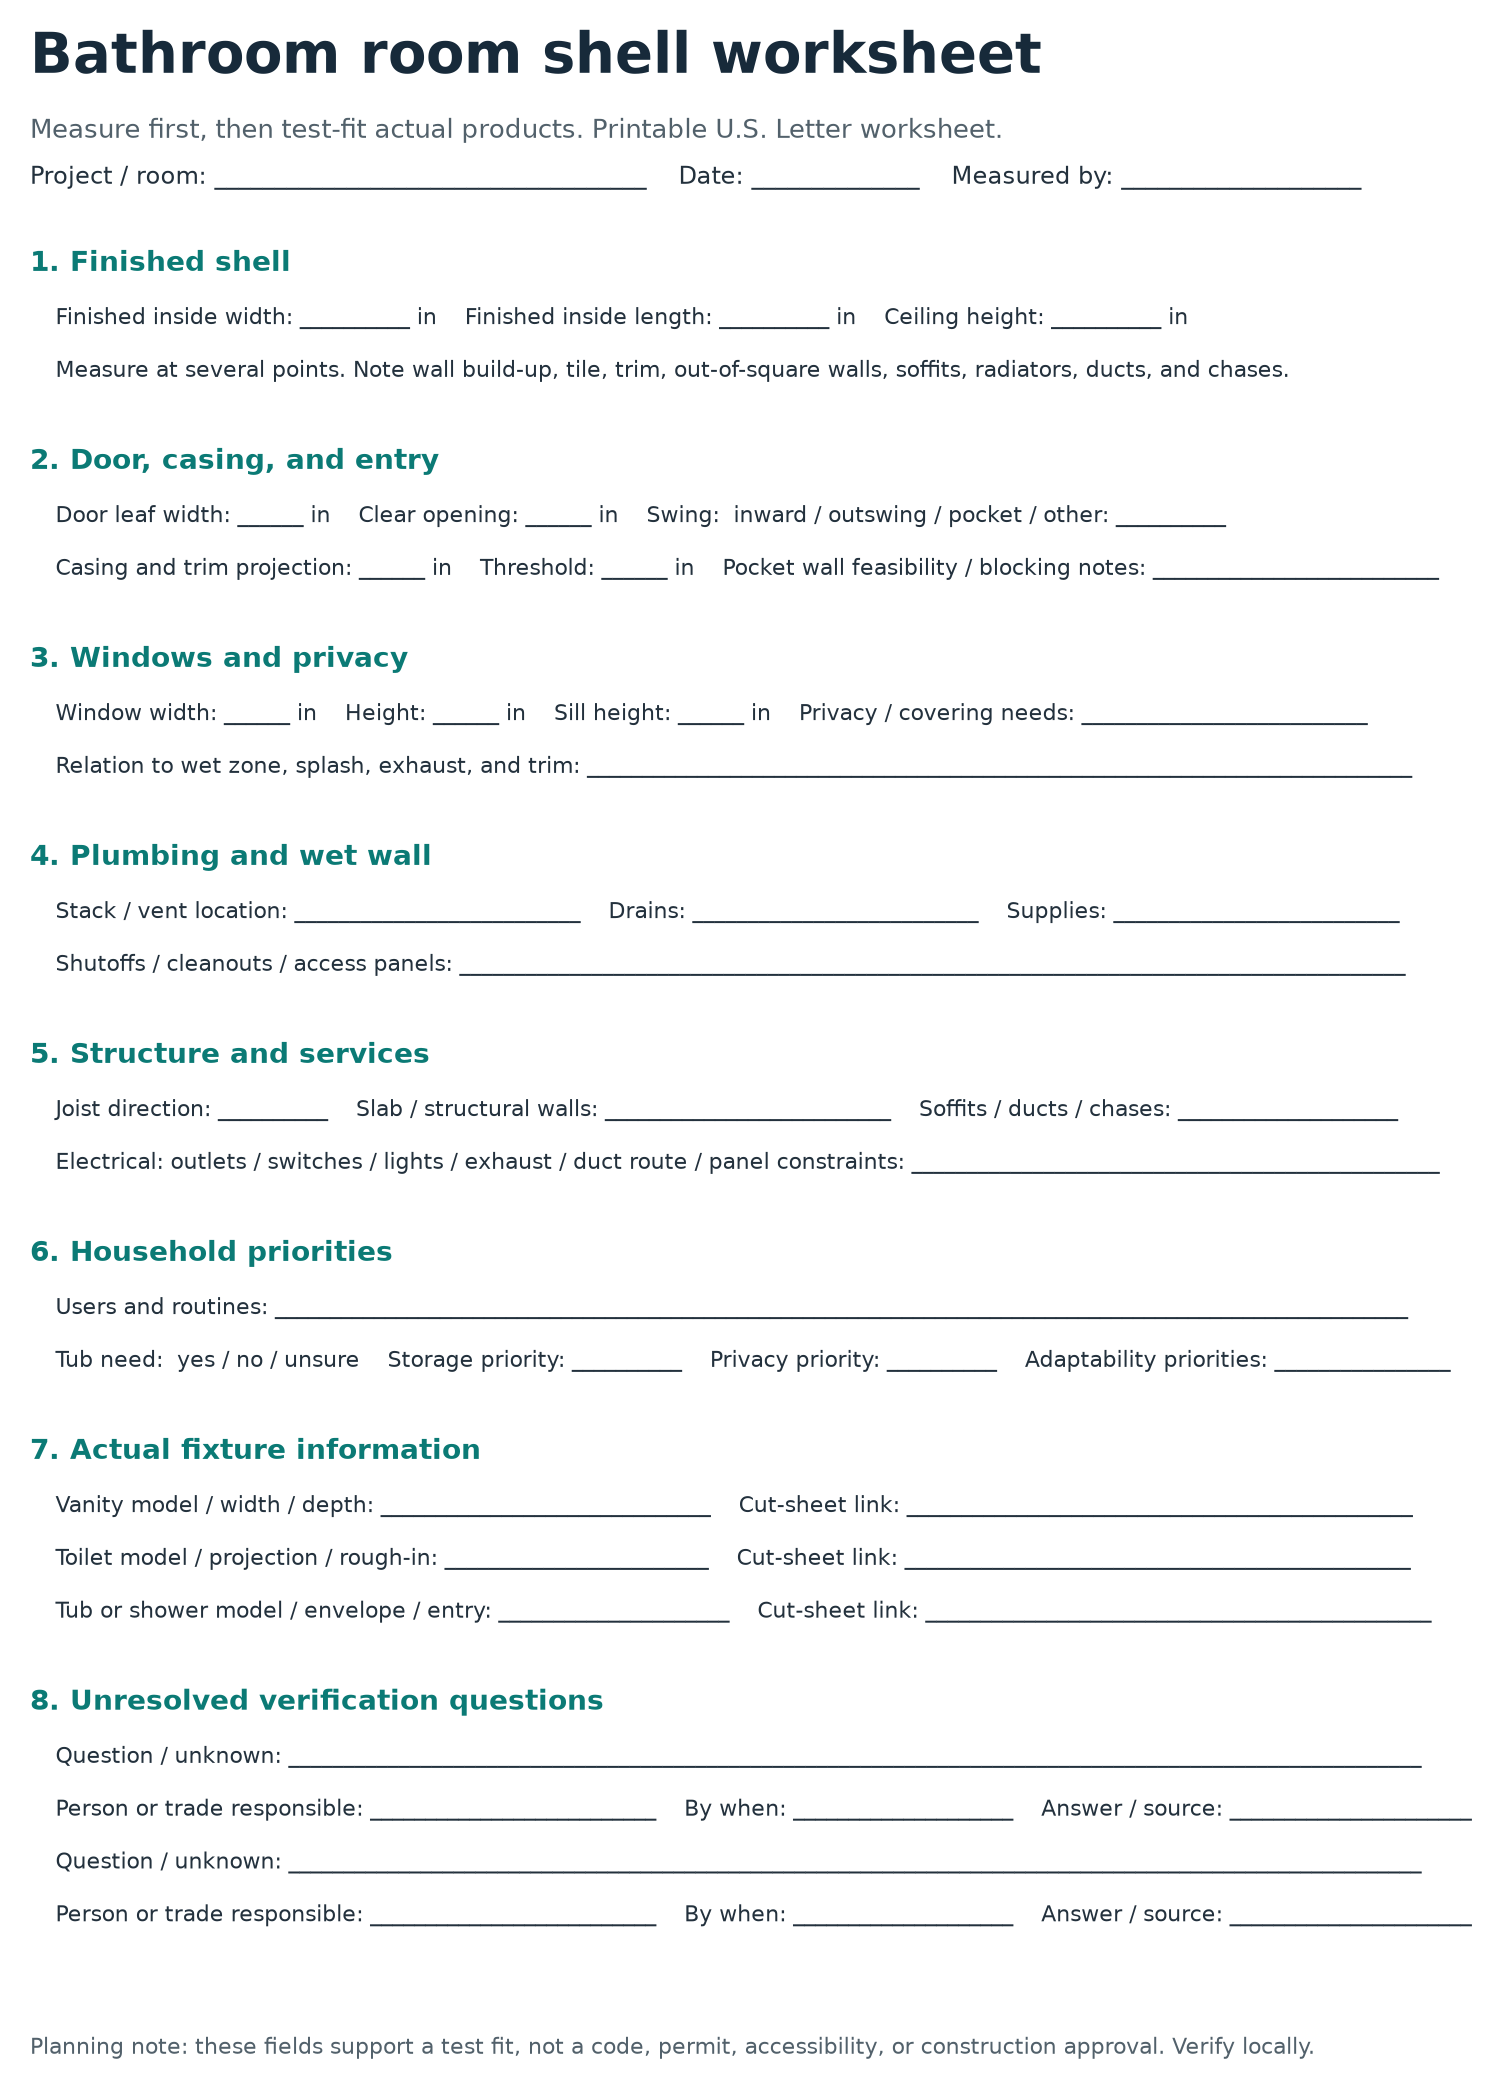
Draw the room at a stated scale, or label it not to scale. Mark the full door sweep, window, plumbing wall, trim returns, glass channels, drawer travel, and access panels. Keep the worksheet useful in plain text with a field, value, basis, and unresolved-question column.
Bathroom types are fixture programs, not fixed room sizes
A bathroom label describes what the room does. It does not establish a universal footprint. Local requirements, existing structure, fixture models, door operation, and user needs all change the fit.
| Bathroom type | Function and contents | Illustrative planning envelope | Best use | Main trade-off to test |
|---|---|---|---|---|
| Quarter bath | Toilet only, usually no lavatory | No national size claim. Test a toilet envelope, entry, privacy, and a handwashing plan elsewhere only if appropriate | Very limited service or utility use | It may not meet the practical handwashing needs of guests or household users |
| Half bath or powder room | Toilet and lavatory | A compact rectangle may work, but test the door, toilet approach, lavatory depth, and storage rather than copying a minimum | Guests and quick use near living areas | Privacy and door operation can matter more than adding floor area |
| Three-quarter bath | Toilet, lavatory, and shower | Shape depends on shower entry, wet-wall location, and door | Secondary bath or compact primary bath | A shower can consume the circulation needed by the other fixtures |
| Full bath | Toilet, lavatory, and tub or shower, sometimes both | A 5 by 8 finished shell is a useful test case, not a guarantee | Hall bath and family use | Tub, shower, storage, and circulation compete for the same space |
| Primary bath | One or more lavatories, toilet, and shower or tub, with storage | Often planned by routine and zoning rather than a single standard size | One or two regular users | Two lavatories may reduce open floor and cleaning access |
| Jack-and-Jill bath | Shared bath between bedrooms, often with separated lavatory or toilet zones | Test both doors, privacy, latch operation, and simultaneous use | Children or shared bedrooms | More openings create more collision and privacy questions |
| Wet room | Waterproofed room or zone with shower drainage and other fixtures in the same area | The envelope depends on waterproofing, slope, drainage, glass or curtain, and dry-zone protection | Space-efficient or highly adaptable concept | More detailed waterproofing and drainage coordination is required |
| Accessible or universal-design pathway | Layout designed for a particular user, route, transfer, reach, and future need | No one-size-fits-all private-home plan. Consult the applicable standard and a qualified professional | A covered facility or a home planned around mobility needs | Turning, approach, knee space, controls, backing, and door maneuvering may require more area |
A room can be called a full bath and still be uncomfortable for two people, while a half bath can be generous yet expose the toilet from the hall. Labels help choose the fixture program; they do not solve the layout.
Why square footage alone is misleading
Two rooms with the same area can behave differently. A long room may protect a central path if fixtures stay on one side, while a square room may offer turning options but less wall length for a tub. Door location, windows, fixture depth, and the plumbing wall can each change the fit.
The order of operations matters. First establish the shell and fixed constraints. Next choose the fixture program. Then test product footprints, use zones, door operation, and sight lines. Storage and decorative choices come after the footprint works. For the next step, see these space-saving storage ideas for tiny bathrooms, rather than allowing storage pieces to dictate an unworkable plan.
Fixture footprints versus the space a person needs to use them
A product envelope is the object’s physical size. A use zone is the space needed to approach, operate, clean, transfer, open, or share that object. They overlap in some plans and compete in others. Never add a table value to a product order without checking the cut sheet and the actual room.
| Fixture | Product-envelope example | Use or approach zone to test | Common conflict | Label and verification status |
|---|---|---|---|---|
| Toilet | Use the model-specific width, depth, tank or carrier, supply location, and service space from the cut sheet | Test forward approach, side access, cleaning reach, privacy sight line, and door relationship | Vanity, door leaf, wall, or a window that exposes the seat | Product example: model-specific. Planning assumption: draw the full envelope. Verify locally |
| Vanity or lavatory | Illustrative shallow depth: 18 inches. A deeper product may be 21 to 24 inches or another cut-sheet value | Test standing or seated use, drawer and door opening, mirror reach, cleaning access, and the route past the cabinet | Door arc, toilet, window trim, towel location, or another user | Planning assumption: 18 inches in examples. Product cut sheet controls |
| Shower | Use the interior clear size, wall thickness, curb or threshold, glass, door, controls, and trim from the product and installation system | Test entry, dry standing area, controls, towel reach, cleaning, seat or transfer needs where applicable | Glass swing, toilet approach, window, and storage | Comfort target: a more generous interior may help. Accessibility pathway: use the applicable standard, not this example |
| Tub | Use the actual tub footprint, deck or apron, faucet reach, access panel, and installation clearances | Test entry, bathing, cleaning, controls, and service access along the required side | Vanity, door, window, platform, or a toilet sight line | Product example: model-specific. Manufacturer instructions control |
| Storage cabinet | Draw the actual depth, door or drawer travel, handles, and wall attachment | Test reach, opening, cleaning, and whether contents project into the path | Wet zone, door arc, window, or ventilation path | Design recommendation: keep storage out of required or needed movement zones |
A clearance shown in an example is a planning prompt, not a universal code requirement. Before making a construction decision, verify the locally adopted rules, the project’s accessibility scope, and the chosen manufacturer’s instructions.
For a covered facility or a project designed to an accessibility standard, review the applicable standard for route continuity, maneuvering, transfer or roll-in shower provisions, backing, reach ranges, and lavatory knee and toe space. A 60-inch circle alone does not make a bathroom accessible. Accessibility requirements are scope-specific and are not a universal private-home plan.
The clearance arithmetic that makes or breaks a plan
These calculations are original illustrative planning math. They are not code findings, product recommendations, or construction drawings. Substitute your actual finished measurements and cut-sheet dimensions.
Width arithmetic for a 5 by 8 example
Assume the finished shell is 60 inches wide. On one wall, draw a reduced-depth vanity with an 18-inch projection. On the opposite side, reserve a 21-inch planning band for the toilet’s fixture and side approach in this particular overlay. The uncommitted strip between those bands is:
60 - 18 - 21 = 21 inches
Now test a 24-inch vanity in the same overlay:
60 - 24 - 21 = 15 inches
The six-inch difference can change whether the door arc, vanity user, and toilet approach coexist. The 21-inch band is a planning assumption, not a code number. Show the actual bowl, tank, centerline, trim, casing, and approach.
If your overlay reserves a more generous 30-inch planning band on the opposite side, the central strip becomes:
60 - 18 - 30 = 12 inches
That result may call for a different door, projection, or fixture package. The calculation reveals the conflict before tile is ordered.
Length arithmetic for a 5 by 10 example
Assume a finished length of 120 inches. An end tub may have a 60-inch product example envelope. Add a 30-inch toilet use band, an 18-inch entry and door-landing assumption, and 4 inches of combined wall-build-up or trim allowance:
120 - 60 - 30 - 18 - 4 = 8 inches remaining
Eight inches is not a promised aisle. Casing, a chase, a tub apron, or the difference between nominal and finished dimensions may absorb it.
Now substitute a 48-inch shower product example and reserve 30 inches for the toilet use band, 24 inches for the entry and vanity transition, and 4 inches for wall build-up:
120 - 48 - 30 - 24 - 4 = 14 inches remaining
The larger remainder is not automatically a comfortable path. Draw the shower entry, glass or curtain, door swing, vanity opening, and drain. Protect the central corridor instead of filling both long walls.
Door-swing arithmetic
A 30-inch door leaf with the hinge at a corner sweeps a quarter-circle with an area of approximately:
3.14 x 30 x 30 / 4 = 706.5 square inches
That is a mathematical illustration, not a door-clearance rule. The sweep changes with the actual leaf, casing, stops, hinge position, and opening angle. The key point is that the arc is floor occupied during operation. If the arc reaches an 18-inch vanity projection, its drawers may be inaccessible while the door is moving. If it crosses the toilet approach, the room may fail the routine even if the door technically opens.
Draw the complete arc in a different color. Then draw an outswing or pocket-door concept without assuming either is automatically permitted. An outswing affects the hall and privacy. A pocket door needs a suitable wall cavity, hardware, blocking, latch, and service review. Door maneuvering and accessibility requirements are scope-dependent, so verify them locally.
Door swing and plumbing decisions
| Decision | Often helps when | Benefits to test | Trade-offs and verification |
|---|---|---|---|
| Inward swing | The entry corner is unobstructed and the room has an arc that does not cross fixtures or approaches | Familiar operation and no door leaf in the hall | Consumes interior floor area and can collide with a vanity, toilet, or shower glass. Check local maneuvering and safety requirements |
| Outswing | The room is too tight for an interior arc | Preserves more interior floor area and can improve the paper fit | Uses hall space and raises privacy, circulation, egress, and local-rule questions. Do not switch without checking the adjoining path |
| Pocket door | A clear, non-structural wall has enough pocket length | Removes the swing arc and can free a narrow entry | Requires pocket length, track and latch review, blocking, privacy, and service planning. Confirm the wall is suitable |
| Barn or sliding door | Existing conditions or a specific aesthetic drive the choice | Avoids an interior swing | May provide a weaker privacy seal and can conflict with wall hardware or trim. It is not a default solution |
| Keep fixtures on the existing wet wall | The existing drain, vent, and supply route serves the proposed arrangement | May reduce relocation and coordination work | Joists, slab, slope, venting, access, and labor still determine feasibility. Inspect before assuming |
| Split plumbing walls | A window, chase, room shape, or privacy goal makes one-wall grouping unsuitable | Can improve circulation or separate wet and dry uses | Adds routing, penetrations, coordination, and possible structural implications. Obtain trade input before demolition |
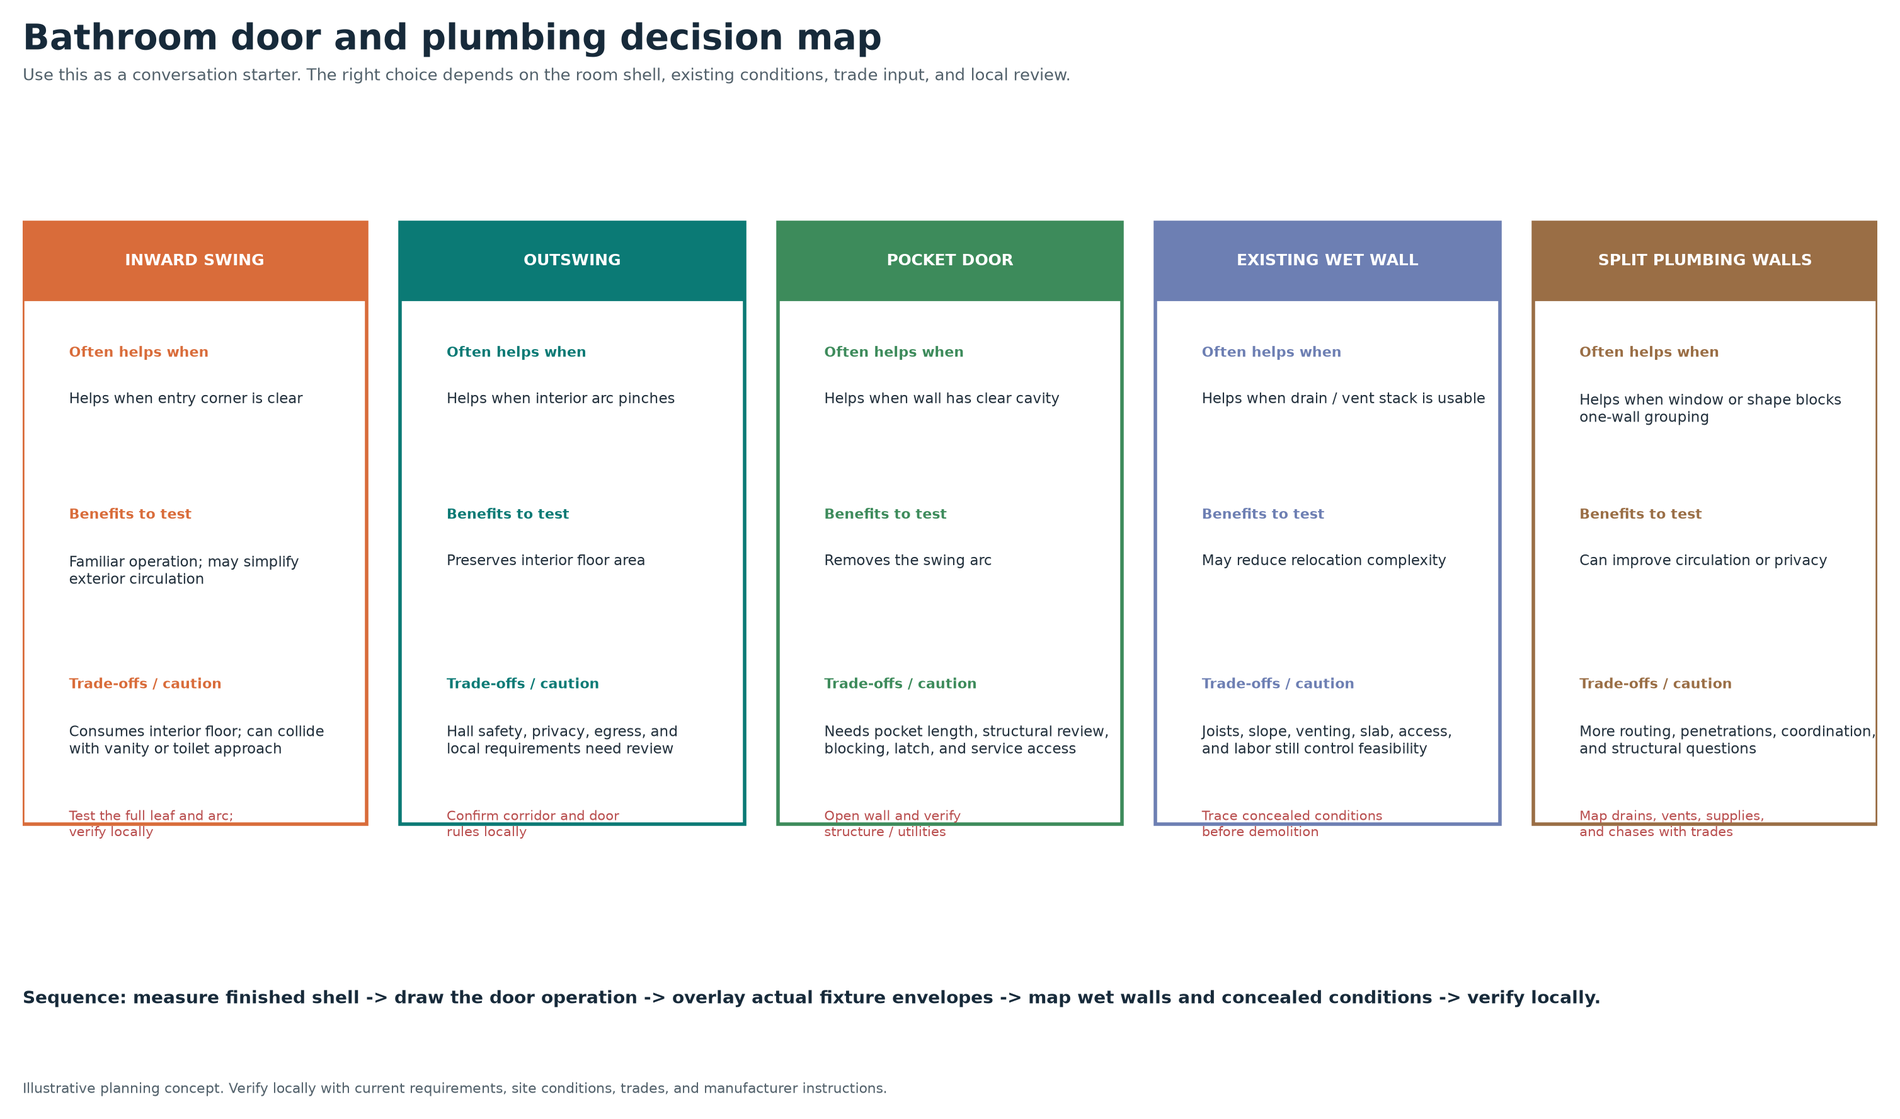
A plumbing wall is a starting clue, not a guarantee. Do not infer that two fixtures can share a wall just because they appear close on paper. The drain route, vent path, joist direction, slab, wall thickness, cleanouts, and access for future service all matter. A layout that keeps fixtures near existing connections may be simpler to investigate, but the article cannot promise a lower cost or easier build without site-specific information.
Four illustrative plans to test, not copy
Each concept below assumes finished inside dimensions unless noted. The descriptions are paired with original diagrams for orientation. Use the same legend on paper: solid rectangles are product envelopes, pale bands are use or approach zones, a curved line is the door swing, and a dashed line is a sight-line or unresolved route. These are illustrative planning concepts, not code-compliant plans, construction documents, or measured client projects.
Plan A: 5 by 8 hall bath, tub-retain and shower-only alternatives
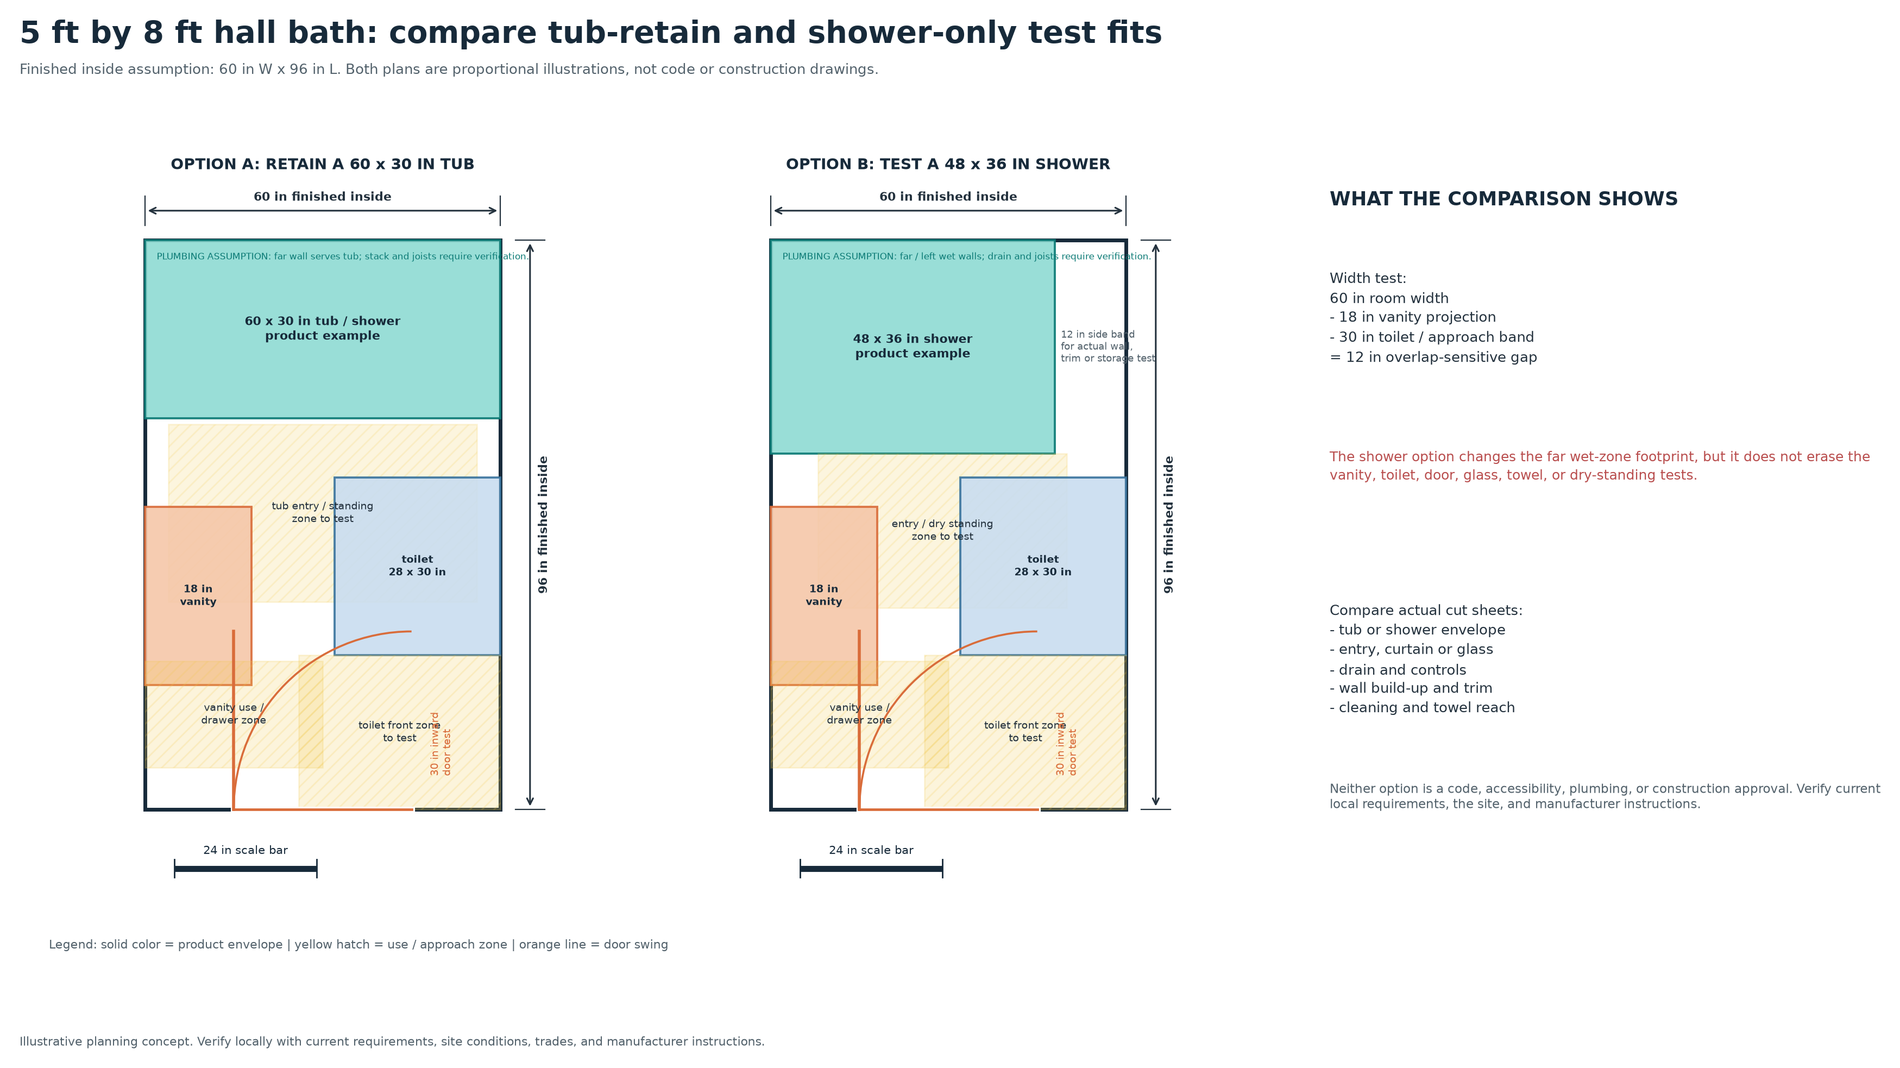
Assume a 60-inch finished width and 96-inch finished length. Place a 60-inch tub or shower envelope at the far end, with the toilet on one long wall and a shallow vanity near the entry. Draw two door positions before choosing the arrangement.
In the tub-retain overlay, assume a 60 by 30 inch tub product envelope. Check the apron, curtain or glass, faucet reach, cleaning access, and storage against the cut sheet. A tub may suit children or users who prefer bathing, but that is a household choice.
In the shower-only overlay, replace the tub with a 48 by 36 inch product example and draw its opening. The change may help the entry transition, but still requires a dry standing zone, controls, towel reach, and a door arc. A larger interior is a comfort target; an accessible design needs separate review.
The width arithmetic explains why an 18-inch vanity may help this shell, but the cut sheet controls. Mark the toilet centerline, drawers, door sweep, and hall sight line. For family use, prioritize a clear, cleanable route and towel reach.
Plan B: 5 by 10 narrow bath, protect the central corridor
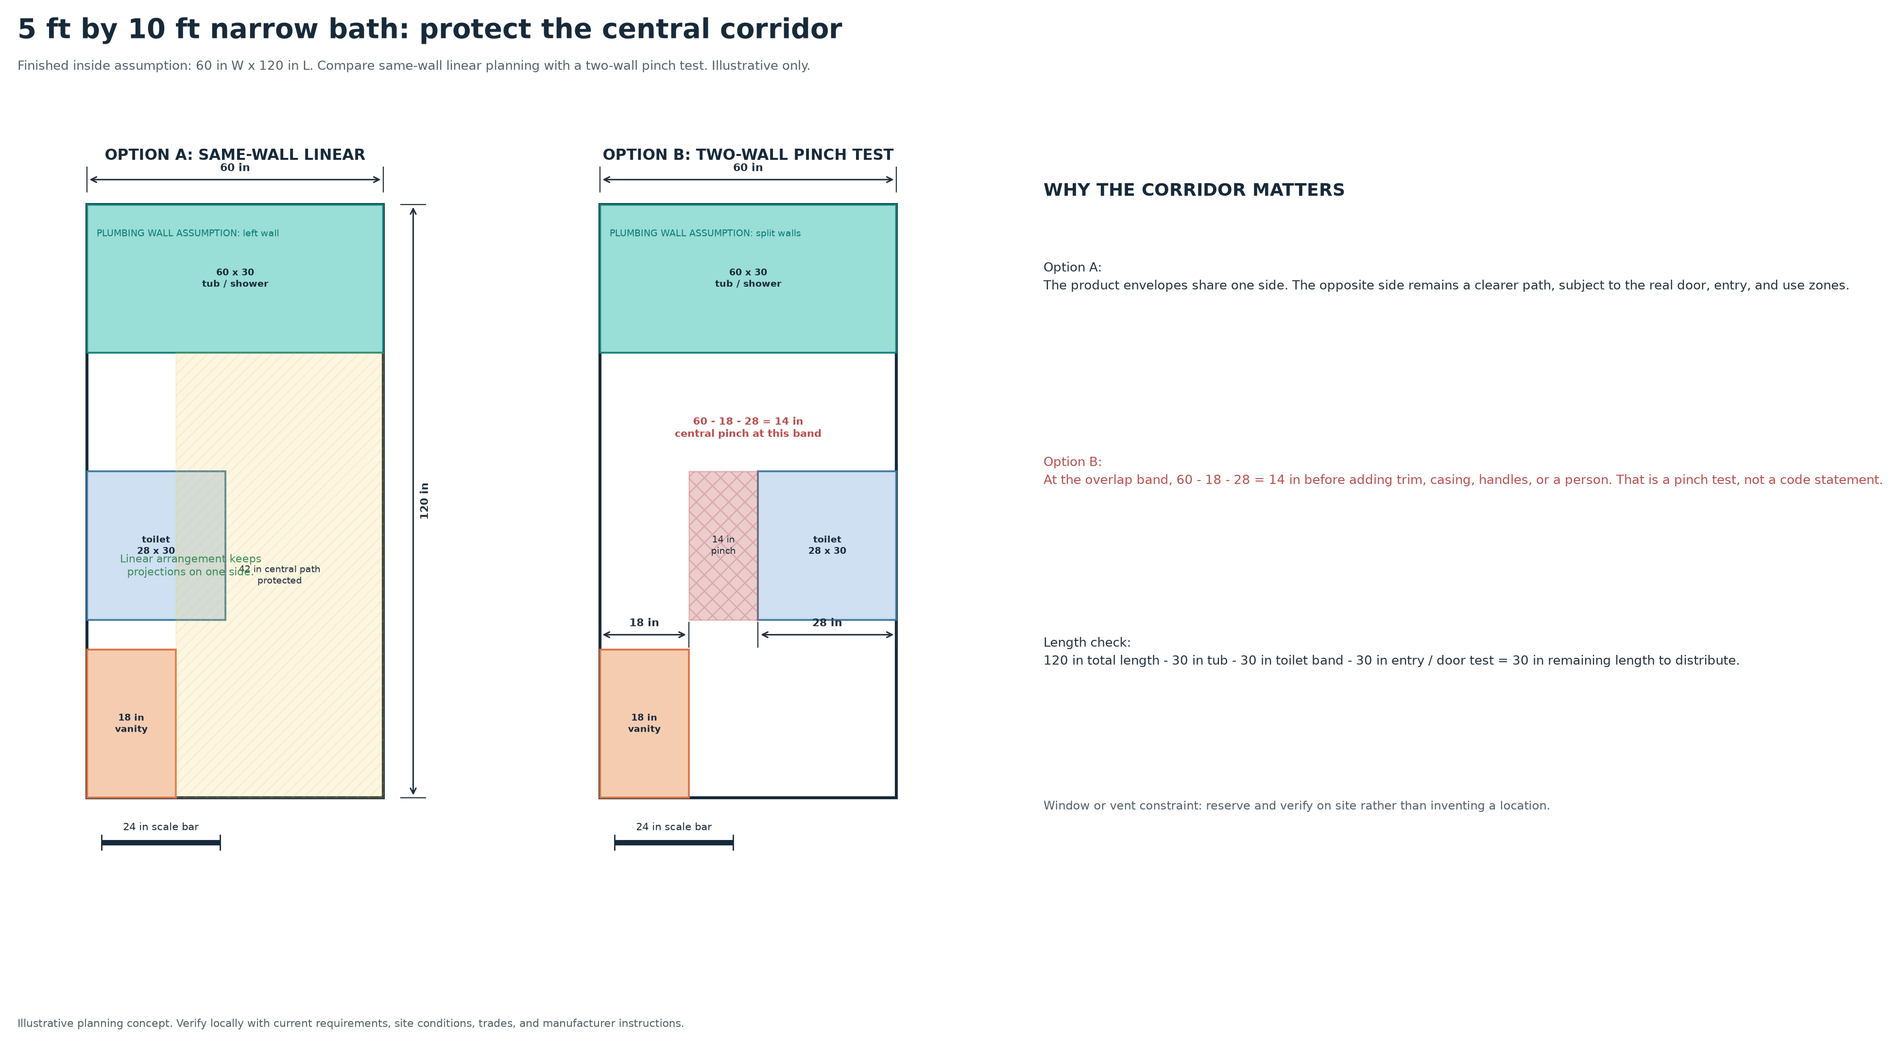
A 5 by 10 room offers more length, but its 60-inch width still limits opposing projections. Test a same-wall linear arrangement, then a two-wall arrangement, while keeping the center clear.
The earlier length math is a warning: a 60-inch tub, 30-inch toilet band, 18-inch entry assumption, and 4 inches for build-up leave 8 inches in a simplified stack. A shower example leaves 14 inches under different assumptions, but neither result is an aisle. Draw the entry, glass or curtain, trim, and openings.
Overlay an 18-inch vanity, then a 24-inch vanity. Across 60 inches, the larger cabinet erases six inches of the central strip, and open drawers project beyond the box. A shallow cabinet is a planning assumption, not a universal recommendation.
Show a hypothetical “window location to verify” or exhaust constraint, not an invented site condition. Reserve sill and casing space, then check privacy, water exposure, ventilation, the wall system, and any joist-bay or soffit route.
Plan C: Half bath or powder room, privacy and door operation first
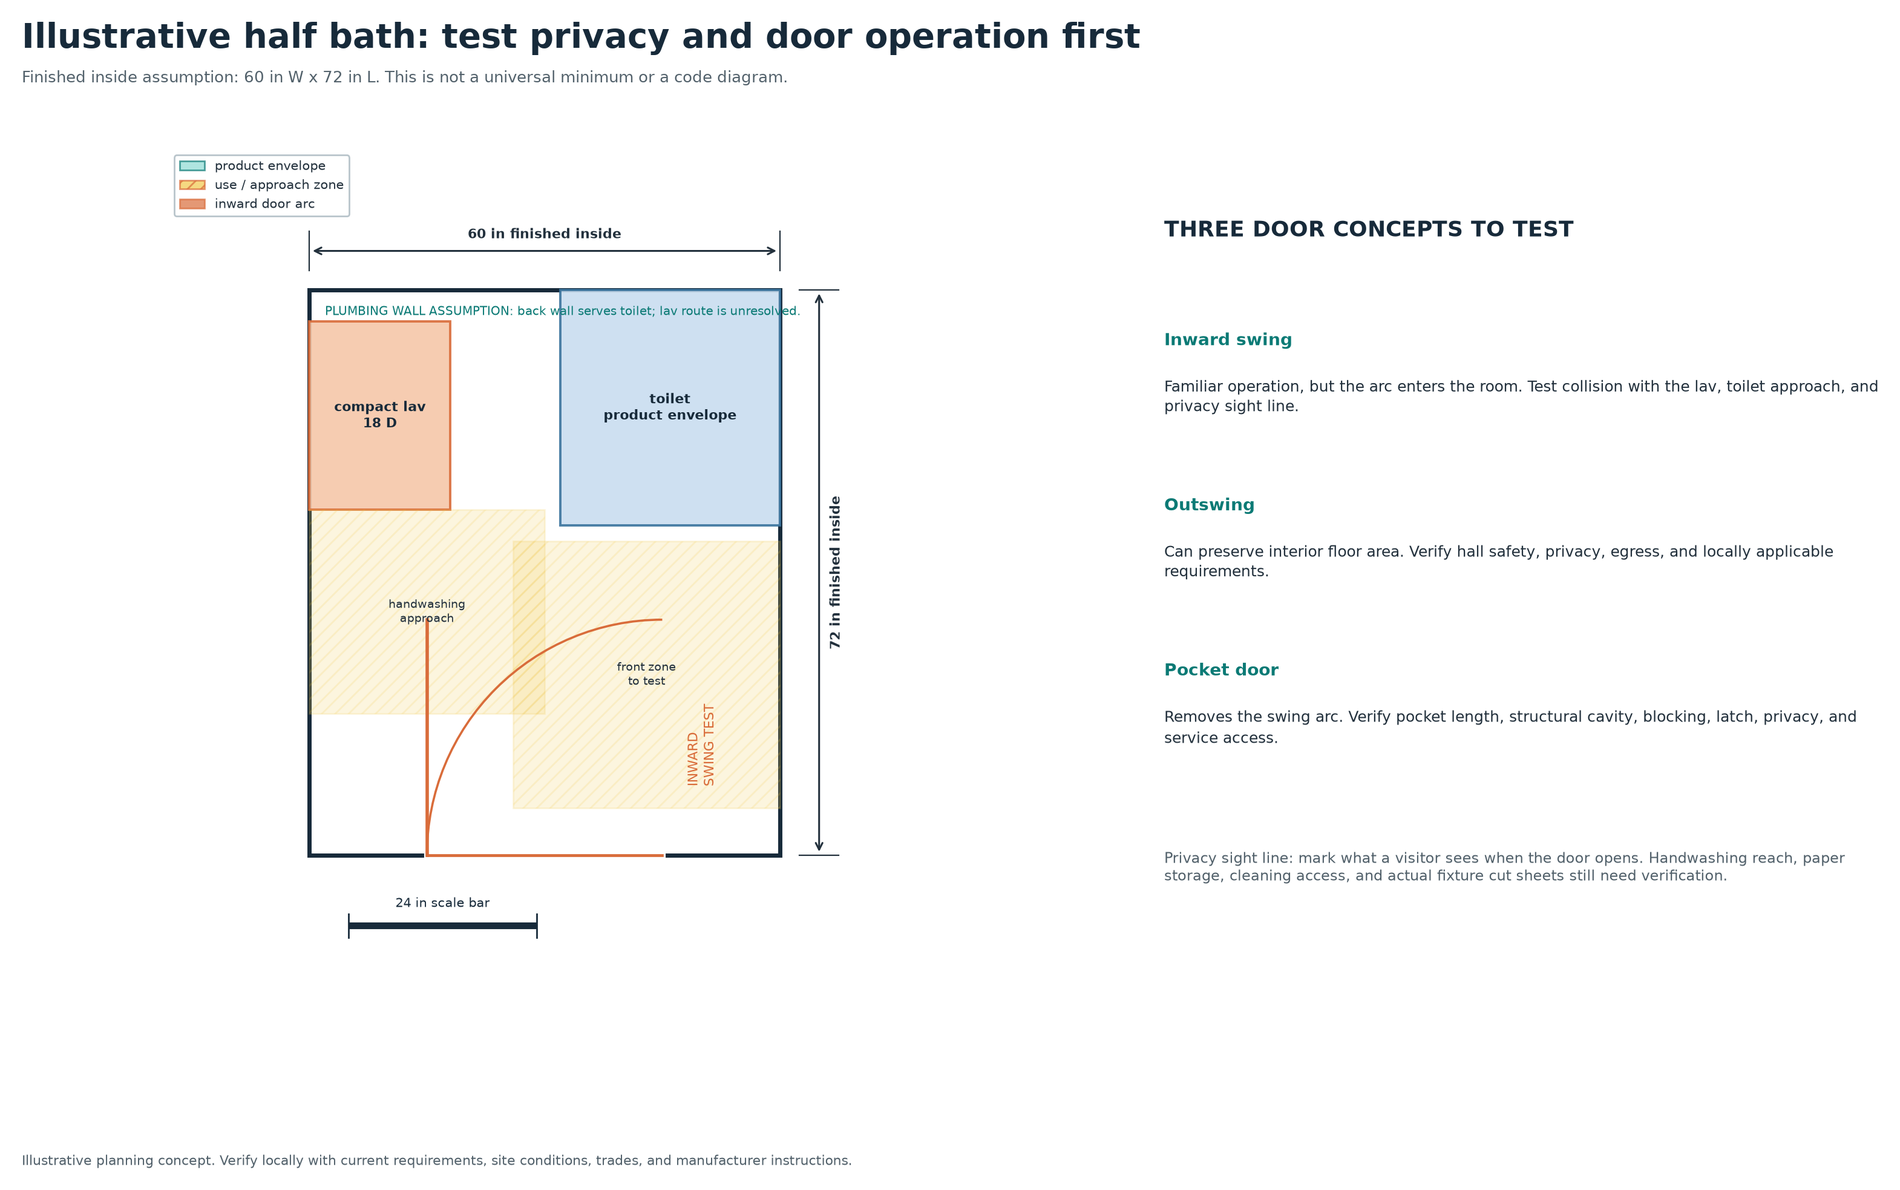
For a half bath, draw the toilet and lavatory first, then treat entry as the primary design problem. Mark a privacy line from the hall and adjust the lavatory or door if it exposes the bowl.
Test inward, outswing, and pocket-door concepts. The first needs a clear hinge corner; the second needs a safe hall; the third needs a suitable cavity and review of structure, plumbing, electrical work, blocking, and privacy.
Draw the faucet, mirror, towel reach, cabinet or pedestal, drawer opening, and cleaning access to the toilet and shutoff. In a visitor room, shallow supply storage may be more useful than a deep vanity. This is a routine choice, not a national dimension rule.
Plan D: Awkward room with an offset door and a window chase
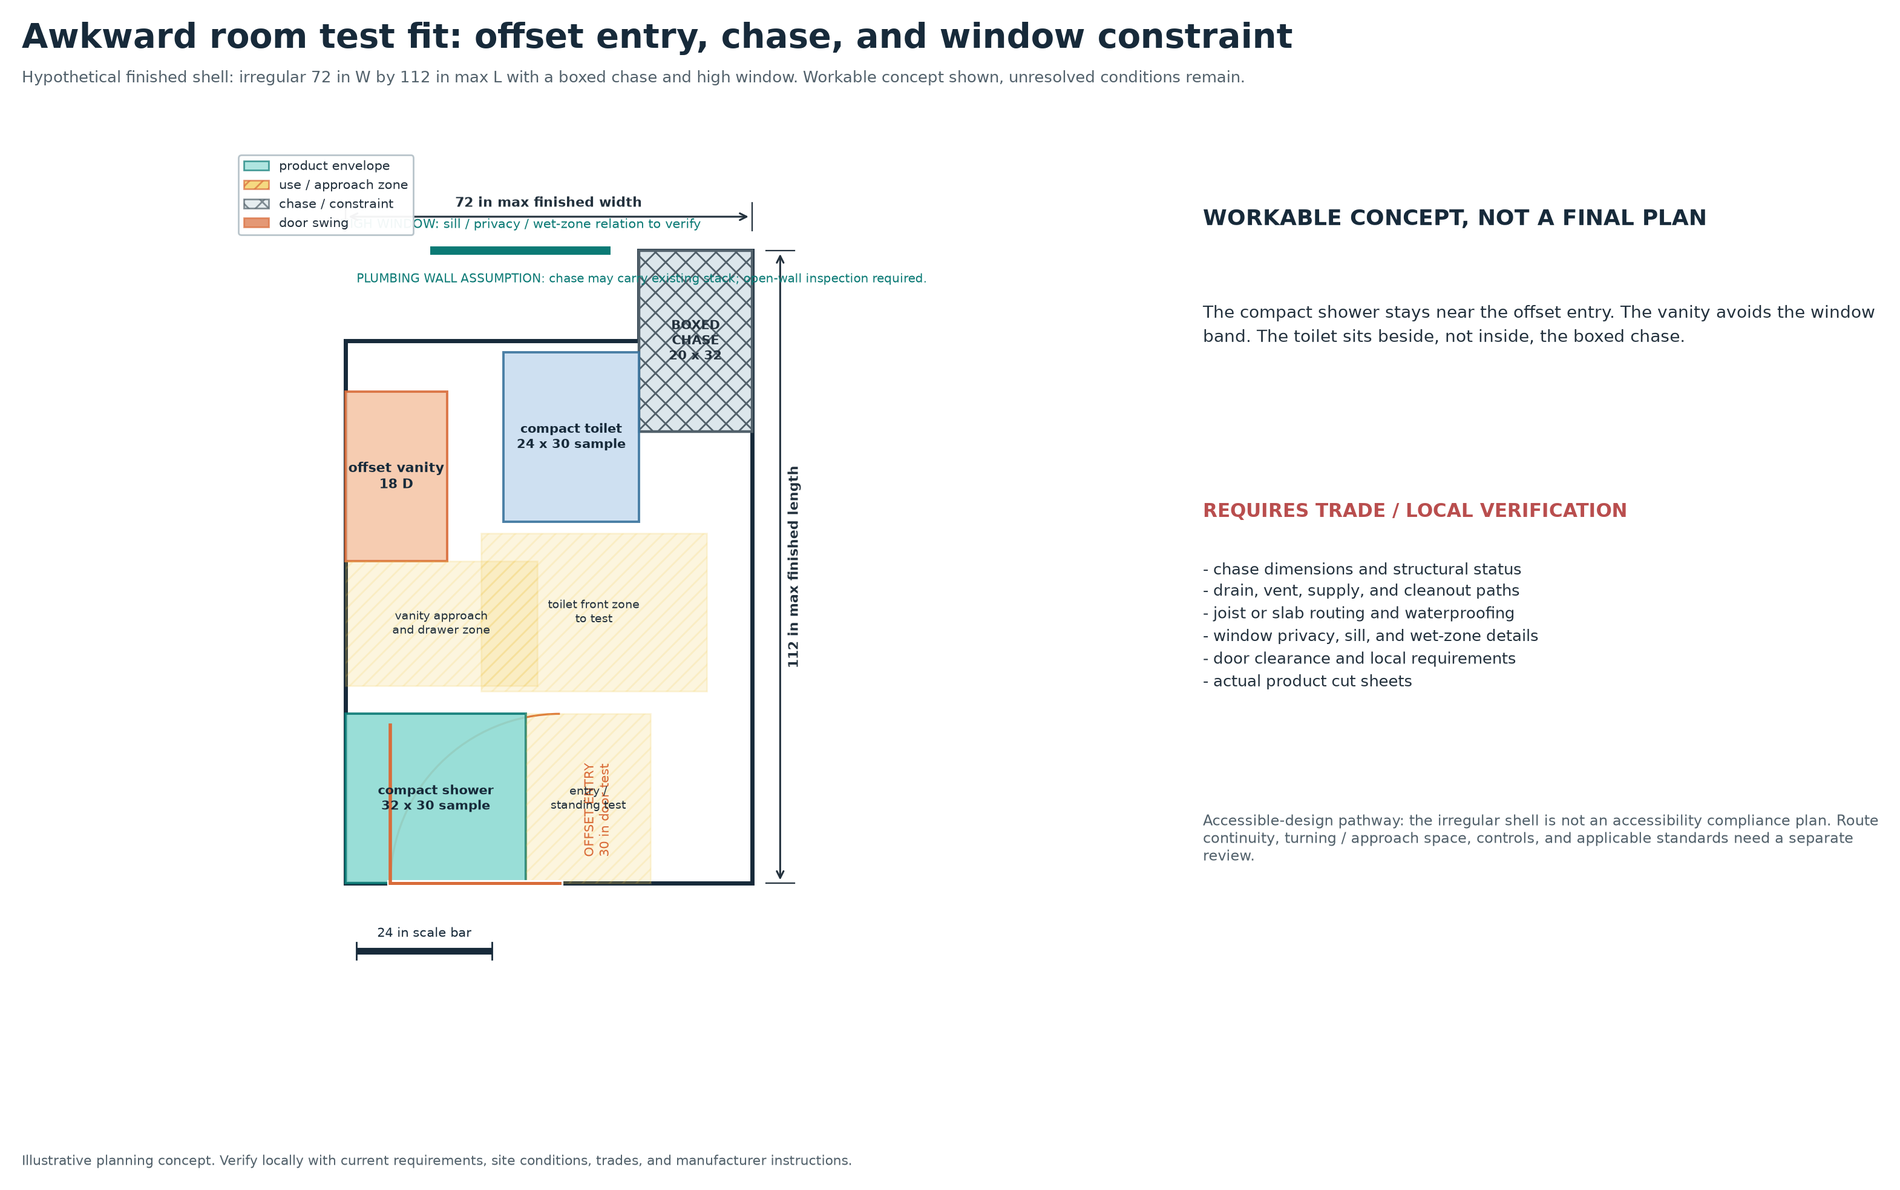
Assume an irregular room with an offset entry, a shallow window chase, and a corner that is not square. Draw the true wall faces and chase depth rather than “squaring up” the room on paper.
One response is an offset vanity that stops short of the chase, a toilet on the longer wall, and a compact shower at the far end. Test the vanity’s faucet, mirror, drawer travel, and side splash. The sill, privacy, splash, and casing remain unresolved.
A partial partition can protect privacy but adds thickness. A glass panel preserves light but adds a product and cleaning envelope. If the drain crosses the chase or joists, mark “trade review” instead of drawing an imaginary pipe.
Measure an awkward room as a polygon or several rectangles, not one average width. The right move may be changing the fixture package.
Choose by household and routine
A good bathroom layout starts with the people and activities, then checks dimensions against them.
Guest or powder room. Prioritize a private entry, quick handwashing, a clear door operation, easy cleaning, toilet-paper storage, and a place for hand towels. A shallow lavatory may leave more usable floor, but confirm that the faucet, basin, and cabinet suit the users.
Children or shared bath. Decide whether a tub is genuinely needed, whether two users need to move at once, and where each person will reach a towel. A partition can improve privacy but also adds thickness. Durable wet-zone surfaces and accessible storage may matter more than a second lavatory.
Aging in place. Plan for future adaptability rather than promising compliance. Discuss a low-threshold or zero-threshold concept, wall backing for future grab bars, seated use, control reach, door operation, and a route that can remain useful if mobility changes. A qualified professional should review the intended user and the applicable standard. Do not label a private-home sketch ADA-compliant.
Wheelchair user or caregiver. Start with the complete route from the hall through the door, then check turning or maneuvering, toilet approach and transfer, lavatory knee and toe space, shower type, seat, controls, and caregiver position. Accessibility requirements are scope-specific and apply differently in covered facilities and defined alteration or construction contexts. Private residential planning should be tailored to the user and checked against any applicable standard, local code, and professional advice.
Narrow bath. Protect the central path first. Test a shallow vanity, a pocket or outswing concept where locally appropriate, and a shower curtain or glass arrangement that does not create a second obstruction. Put storage where it can open without blocking the route.
Primary bath. Decide whether the room serves one person at a time or two people together. Compare two lavatories against open floor, toilet privacy, wet and dry zoning, cleaning access, and storage. A larger room still needs a route that does not require one user to pass through the shower zone.
Jack-and-Jill bath. Draw both doors and their latches at the beginning. Separate a lavatory zone only if both users can pass and the doors do not create a collision. Test privacy from both bedrooms and from the hall. The plan may need a clear household rule for which door is locked when the room is occupied.
Plumbing, structure, ventilation, and windows can overturn a paper plan
Existing plumbing is not just a line on a drawing. Openings, pipe routes, venting, drain slope, joists, slab conditions, cleanouts, shutoffs, wall thickness, and future access can all change the feasible arrangement. Keep a proposed fixture near the existing wet wall only as a planning hypothesis until a plumber or other qualified trade reviews the concealed conditions.
Structural walls, posts, beams, and joists may limit a new drain, a pocket door, a recessed cabinet, or a wider opening. Do not cut, notch, or relocate a structural element based on a paper layout. Mark it as a structural question and obtain the appropriate review.
Ventilation is a moisture and indoor-air-quality issue, not just a fan symbol. Bathroom exhaust should remove moisture to the outside rather than into an attic. Before closing walls, confirm that the fan functions and exhausts outdoors, then verify the actual fan, duct, termination, controls, and local requirements with current authoritative guidance and a qualified professional. Do not invent a fan capacity or electrical location from this article.
Windows affect privacy, splash, condensation, daylight, and the location of tall storage. A window above a tub or in a shower may be possible in one system and unsuitable in another. Record the opening, sill, casing, operability, glazing, and wet-zone relationship, then verify the selected window and local requirements.
If the home is pre-1978, painted surfaces may contain lead. Renovation, repair, or painting that disturbs lead-based paint can create dangerous lead dust. Determine whether lead-based paint is present and use lead-safe practices. The federal RRP rule generally does not apply to a homeowner working only in that homeowner’s own home, but it can apply to rentals, in-home child care, or renovation for resale. Contractors doing covered work need the applicable lead-safe certification. Do not sand, scrape, or demolish suspect painted materials casually.
Electrical and wet-location questions deserve current local code and qualified-trade review. This guide deliberately does not provide electrical dimensions or current-code claims. Manufacturer installation instructions control the fixture rough-in, trim, glass, carrier, tub support, access, and required surrounding conditions.
Field-measure and pre-demolition checklist
Use this list before ordering fixtures or removing walls. Check an item only when it is measured, photographed, or assigned to a responsible person.
- [ ] Confirm finished inside width and length at several points, plus ceiling height, out-of-square conditions, and wall-build-up assumptions.
- [ ] Photograph every wall, ceiling, floor, opening, and obstruction before removal. Include a tape measure in key photos.
- [ ] Mark studs, structural walls, chases, posts, joist direction, slab conditions, drains, vents, supplies, shutoffs, cleanouts, and access panels.
- [ ] Measure the door leaf, casing, hinge side, threshold, swing, clear opening, and the adjoining hall. Draw the complete arc.
- [ ] Measure each window opening and sill. Record privacy needs, operability, casing, condensation signs, and the wet-zone relationship.
- [ ] Record outlets, switches, lights, exhaust fan, duct route, and panel constraints. Ask a qualified professional about current electrical requirements rather than guessing.
- [ ] Look for water damage, mold, rot, uneven floors, leaking joints, damp cavities, and hidden access issues. Pause and obtain qualified advice when suspect conditions are found.
- [ ] For a pre-1978 home, review current lead-safe renovation requirements and determine whether lead-based paint and RRP obligations apply before disturbing painted surfaces.
- [ ] Obtain actual product cut sheets for the toilet, vanity, lavatory, tub, shower, glass, doors, storage, carrier, trim, and rough-in components.
- [ ] Tape or chalk the proposed footprints and door arcs on the floor. Physically test entry, standing, passing, drawer operation, toilet approach, shower entry, towel reach, and cleaning access.
- [ ] Decide which plumbing stays and which moves. Have the proposed drains, vents, supplies, access, joists, slab, and structure reviewed before demolition.
- [ ] Confirm waterproofing, ventilation to outdoors, electrical, permits, inspection sequence, and locally adopted requirements with the appropriate professionals.
- [ ] Keep a dated measurement sheet, plan version, cut sheets, and photographs of concealed conditions before closing walls.
- [ ] Do not order custom or long-lead fixtures until the finished dimensions, rough-ins, openings, and installation conditions are verified.
Local verification box: not code advice
This article is a planning method, not a substitute for the rules that apply to your project. Before construction, confirm the following with your local authority having jurisdiction and qualified professionals:
- The locally adopted residential, building, plumbing, mechanical, electrical, and fire requirements, including amendments and the current code edition.
- Whether the work needs a permit, inspections, licensed trade involvement, or special review.
- Whether an accessibility standard applies because of the building type, project scope, funding, or intended use. Such standards are scope-specific and do not create a universal private-home plan.
- The manufacturer’s installation instructions, product dimensions, rough-ins, trim requirements, glass and door details, service access, and warranty conditions.
- Structural, waterproofing, moisture-management, drain, vent, and ventilation details for the actual building.
- Lead-safe renovation requirements for pre-1978 painted surfaces and any local waste or containment rules.
- Site conditions that cannot be confirmed from a drawing, including concealed plumbing, joists, slab, wall cavities, damage, and access.
Frequently asked questions
What dimensions should I measure first in a bathroom?
Measure finished width and length at several points, ceiling height, wall build-up, door, windows, obstructions, structure, plumbing, ducts, exhaust, and access panels. Use actual cut sheets, not only a nominal room label.
Is a 5 by 8 bathroom enough for a tub, toilet, and vanity?
It may work for some fixture packages, but it is not a guarantee. Test the finished 60 by 96 inch shell with the actual tub, toilet, vanity, door arc, use zones, and plumbing.
How does a 5 by 10 bathroom layout avoid feeling narrow?
Protect a central corridor. Compare a same-wall plan with a two-wall arrangement, measure the vanity and its open drawers, and draw the shower entry, toilet approach, door arc, and window or vent constraint.
When does a pocket or outswing door help?
Either can remove an inward arc, but neither is automatically suitable. An outswing uses hall space. A pocket door needs a suitable cavity, structure, hardware, privacy, blocking, and service review.
How much space does a vanity really use?
Use the product’s full width and depth, then add standing or seated use, drawer travel, reach, cleaning, and passage. The 18-inch example is a planning assumption, not a universal standard.
Should I keep fixtures on one plumbing wall?
Treat it as a hypothesis. Joists, slab, drains, venting, supplies, cleanouts, wall thickness, access, and local requirements control. Obtain trade review before demolition.
Can a half bath have an inward-swinging door?
It can be possible if the arc does not conflict with fixtures, approaches, privacy, or applicable maneuvering requirements. Draw the leaf and arc, then compare other concepts where plausible. There is no universal minimum room size here.
What changes when planning for aging in place or wheelchair use?
Start with the user’s route, approach, maneuvering, transfer, seated lavatory use, shower, controls, backing, and caregiver position. Consult the applicable standard and a qualified professional. Accessibility requirements are not a universal private-home promise.
What should I measure before bathroom demolition?
Record the shell, openings, plumbing, structure, ducts, exhaust, damage, and concealed-condition clues. Photograph everything, get cut sheets, tape the plan on the floor, and verify permits, lead safety, ventilation, waterproofing, and trade questions before removal.
Are these dimensions code requirements?
No. The arithmetic and plans are illustrative planning examples, not code requirements. Requirements vary by jurisdiction, project scope, current code, manufacturer instructions, and site conditions. Verify locally.
Conclusion: turn the plan into a verification packet
A useful bathroom plan is a record of decisions and unanswered questions. Measure the finished shell. Choose the fixture program that matches the household routine. Overlay actual product footprints, use zones, door operation, privacy, and plumbing. Tape the plan on the floor and test it with the people who will use it. Mark every unresolved structural, ventilation, waterproofing, accessibility, permit, and code question. Then collect cut sheets and local verification before demolition or ordering.
Once the footprint works, storage and decor can support the room instead of forcing a bad plan. Keep the worksheet, dated photographs, arithmetic, product documents, and trade notes together as a verification packet. That is more dependable than treating a nominal room label as a promise.