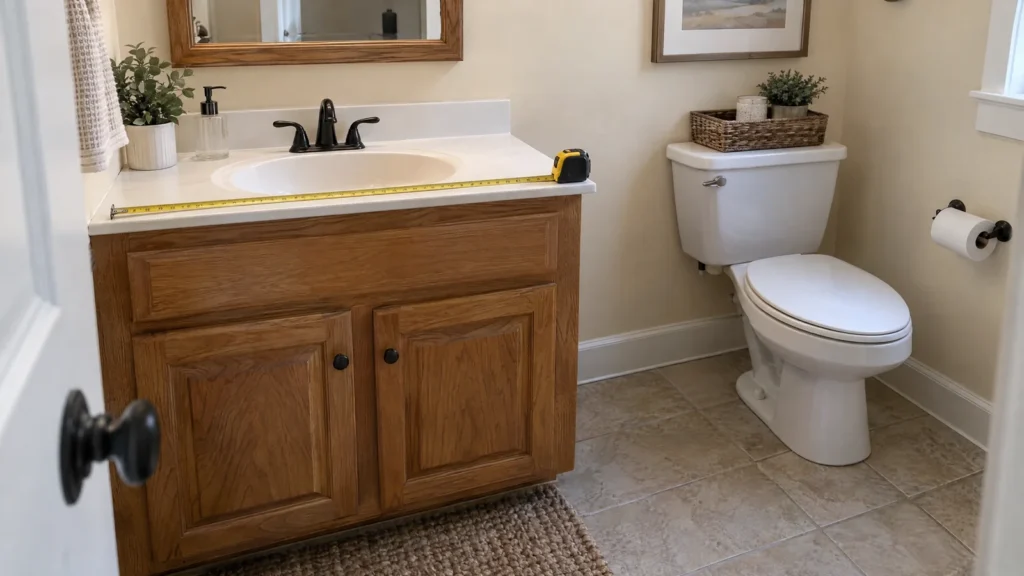
Replacing a bathroom vanity looks like a simple box swap until the box arrives and the countertop, toilet, door, drain, or drawers tell a different story. A listed cabinet width is not the same thing as the installed footprint. The top may be wider, the backsplash may add depth, and a trap can land exactly where a drawer needs to travel.
This guide answers how to measure for a bathroom vanity before you choose a product. It uses three envelopes:
- Room envelope: the finished space left after trim, walls, doors, the toilet, the shower or tub, and other fixed elements are counted.
- Product envelope: the complete cabinet, countertop, sink, backsplash, filler, side panel, and overhang dimensions shown by the manufacturer.
- Service envelope: the room and interior space needed to open doors and drawers, use the sink, reach shutoffs, and satisfy any project-specific clearance or accessibility requirement.
A vanity fits only when all three agree. Measure the finished room, calculate a maximum finished assembly, record plumbing and electrical coordinates, then compare those facts with the exact product drawing. The worksheet below gives you one place to record the result.
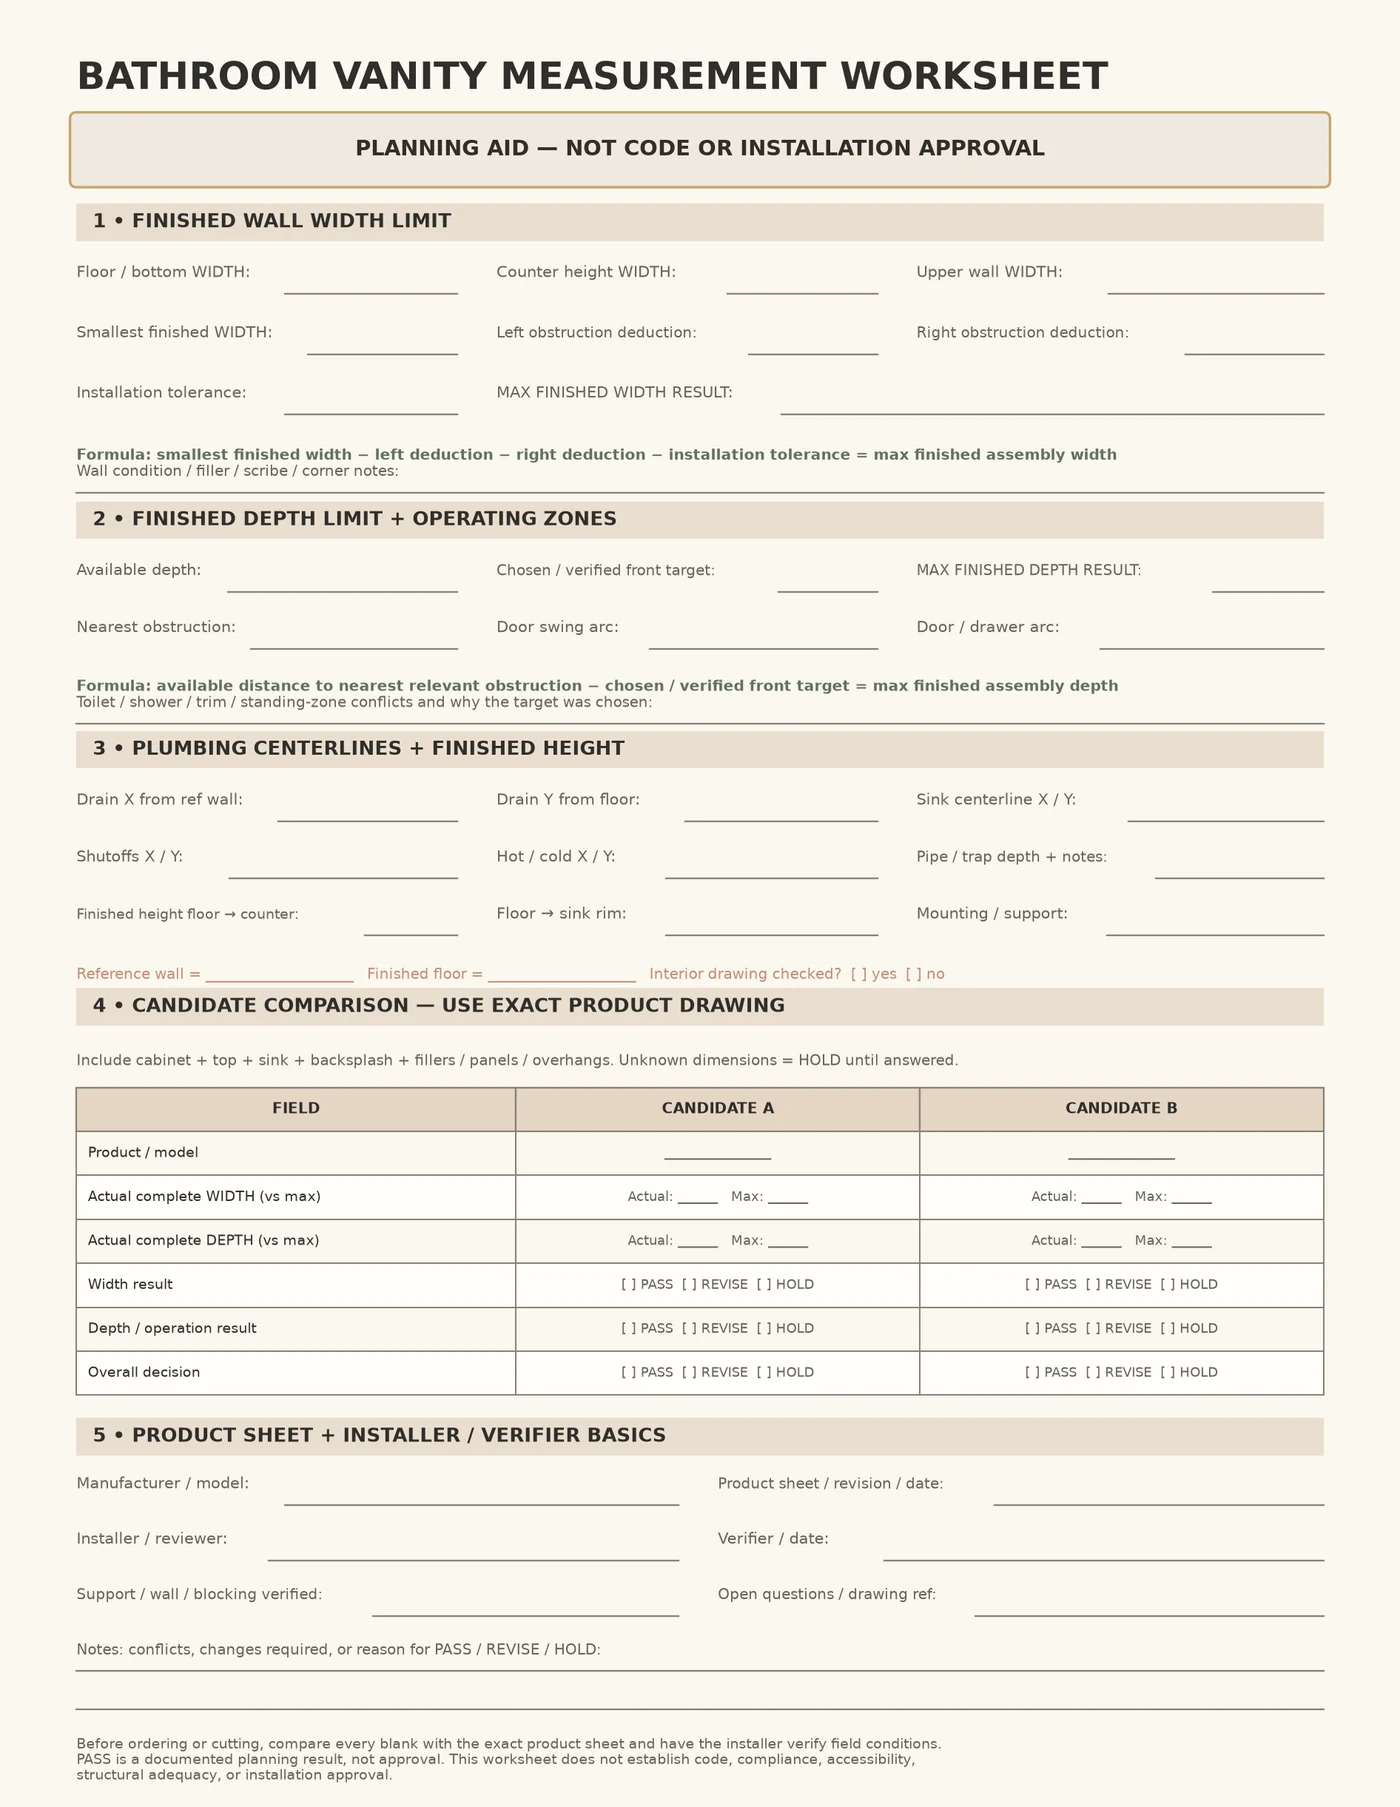
Download the one-page bathroom vanity measurement worksheet
Start with the finished room, not the old vanity
An existing vanity is evidence, not a template. It may have a smaller top, a cut-down back, a modified drawer, or moved plumbing. Measure after finished flooring, wall finishes, trim, and baseboards are in place, or account for what will be added. Use one finished wall as the horizontal reference and the finished floor as the vertical reference so your plumbing sketch matches the product drawing.
Measure width at more than one height
For a wall-to-wall or nearly wall-to-wall installation, take at least three width readings:
- At the floor or the bottom of the cabinet.
- At the intended countertop height.
- At an upper point where the wall, trim, window sill, or another obstruction could affect the top.
Write down each reading instead of keeping only the largest number. Use the smallest finished width as the starting point. Walls can be out of square, and a top that fits at the floor can bind at countertop height.
Record left and right trim projections separately. Note bowed corners, a radiator, pipe chase, return wall, window sill, or any other fixed projection. A photograph can help explain the notes, but does not replace them.
Separate the opening from the assembly limit
There are three different numbers that shoppers often call the vanity width:
- Maximum opening: the smallest usable wall-to-wall distance before deductions.
- Maximum cabinet width: the largest cabinet box that could occupy the opening after the deductions you choose.
- Maximum finished assembly width: the cabinet plus every top, panel, filler, and overhang that will actually occupy the opening.
For a simple wall-to-wall check, use this formula:
Maximum finished assembly width = smallest finished wall width minus actual side projections minus chosen installation tolerance
Your tolerance is a project value, not a universal allowance. The installer, product instructions, wall condition, and whether the unit is freestanding or fitted between walls can affect it. If the wall is out of square, the tolerance may need to be resolved with a filler, scribe, panel, a different top, or a site-specific installation plan. Do not quietly use a retailer’s generic allowance in place of a decision about your actual room.
For a freestanding unit, measure the full footprint and side use zone, not only the cabinet box.
Calculate the maximum vanity width you can actually use
For illustration, a finished top 37 inches wide and 22 inches deep can sit on a cabinet 36 inches wide and 21 inches deep. With aligned rear edges, that leaves half an inch of overhang on each side and one inch at the front. These are example product dimensions, not a universal overhang rule. Other tops may be flush, overhang differently, or include a side splash or backsplash.
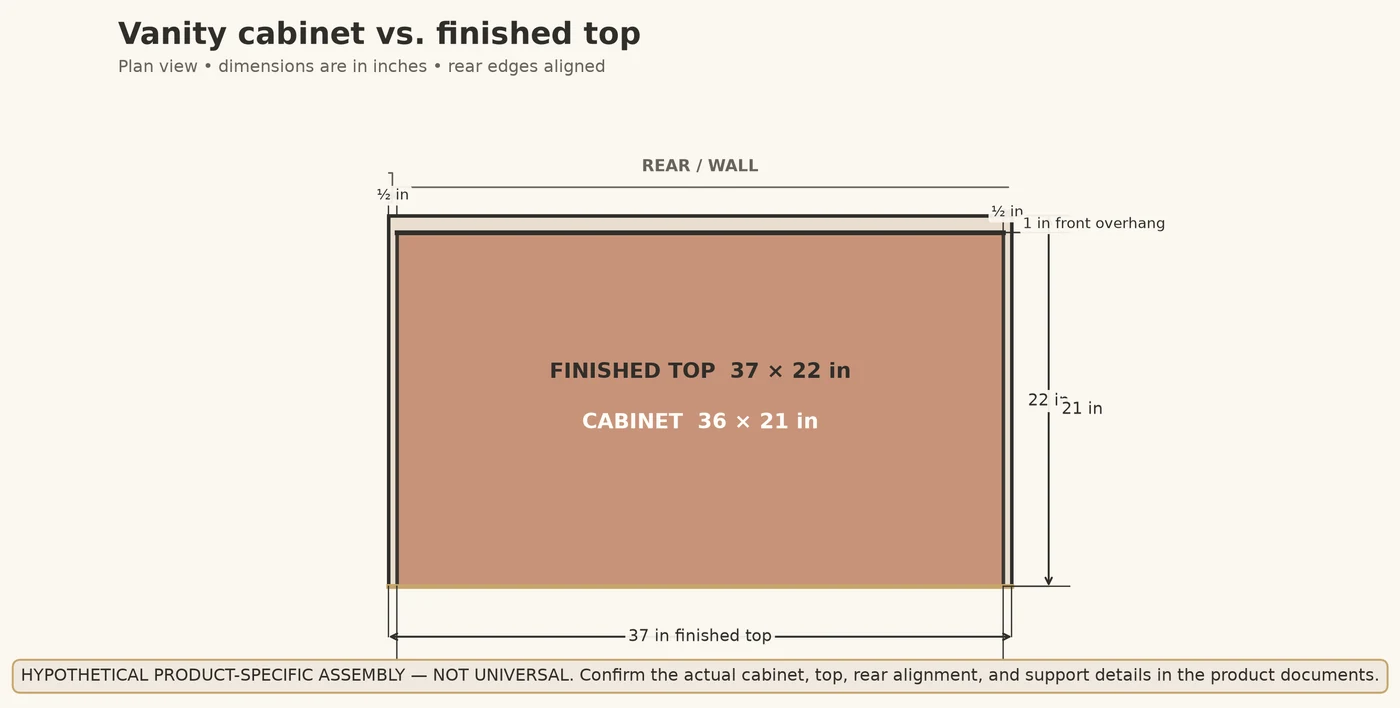
Before shortlisting, find actual cabinet width, legs or attached end panels, countertop width, each overhang, fillers, side panels, side splashes, backsplash, sink or basin projection, and any faucet ledge or rear lip. Add each component in the direction where it occupies space. A top 1/4 inch wider on each side adds 1/2 inch to the assembly. A filler increases the installation width even if the cabinet label does not change.
Worked check A: a 60-inch label does not fit automatically
This fictional replacement example uses an opening that is slightly out of square:
- Floor width: 61 1/4 inches.
- Upper width: 61 inches.
- Countertop-height width: 60 7/8 inches.
- Left side projection from trim: 1/2 inch.
- Right side projection from trim: 1/2 inch.
- Chosen total installation tolerance: 1/4 inch.
Use the smallest reading, 60 7/8 inches:
60 7/8 inches minus 1/2 inch minus 1/2 inch minus 1/4 inch = 59 5/8 inches, or 59.625 inches.
The candidate drawing lists a 60-inch cabinet and a 60 1/2-inch finished top, with a 1/4-inch overhang per side. The complete top is 60.5 inches wide, which is greater than the 59.625-inch finished assembly limit. The cabinet label may sound close, but the top cannot fit under these stated assumptions.
The decision is hold or revise, not buy. Ask about trim treatment, a different top, and the required tolerance. If the product drawing or room changes, recalculate. This is not approval to remove trim or alter the wall.
Find the depth limit from the nearest obstruction
Measure depth from the finished vanity wall to the furthest finished part of the assembly, which may be the top, vessel sink, handle, or decorative front. Record the nearest toilet, shower or tub trim, door trim and open arc, wall, radiator, storage, and user-standing zone. Cabinets around 20 to 21 inches are a common market reference; shallow units may be around 16 to 18 inches. Published cabinet ranges are product offerings, not a national standard. These are shopping patterns, not rules, and the top may be deeper than the cabinet.
Use this practical worksheet equation:
Maximum finished assembly depth = available distance to the nearest relevant obstruction minus your chosen front or service-clearance target
Record why you chose the target and verify any requirement with the applicable local authority, accessibility standard, product instructions, or qualified professional. An online planning number is not a universal legal minimum.
Worked check B: the depth math is only the beginning
Suppose the finished wall to the nearest relevant obstruction measures 48 inches. For this illustration, the reader chooses a 27-inch front-clearance planning target. The calculation is:
48 inches minus 27 inches = 21 inches of maximum finished projection.
A 21-inch finished top is therefore at the limit under this stated assumption. It is not an automatic pass. The bathroom door arc overlaps the first 5 inches of the proposed footprint when open, and the toilet side narrows the passage near the vanity. The result is revise or hold until the door operation, toilet relationship, side geometry, and project-specific requirements are resolved in a plan view.
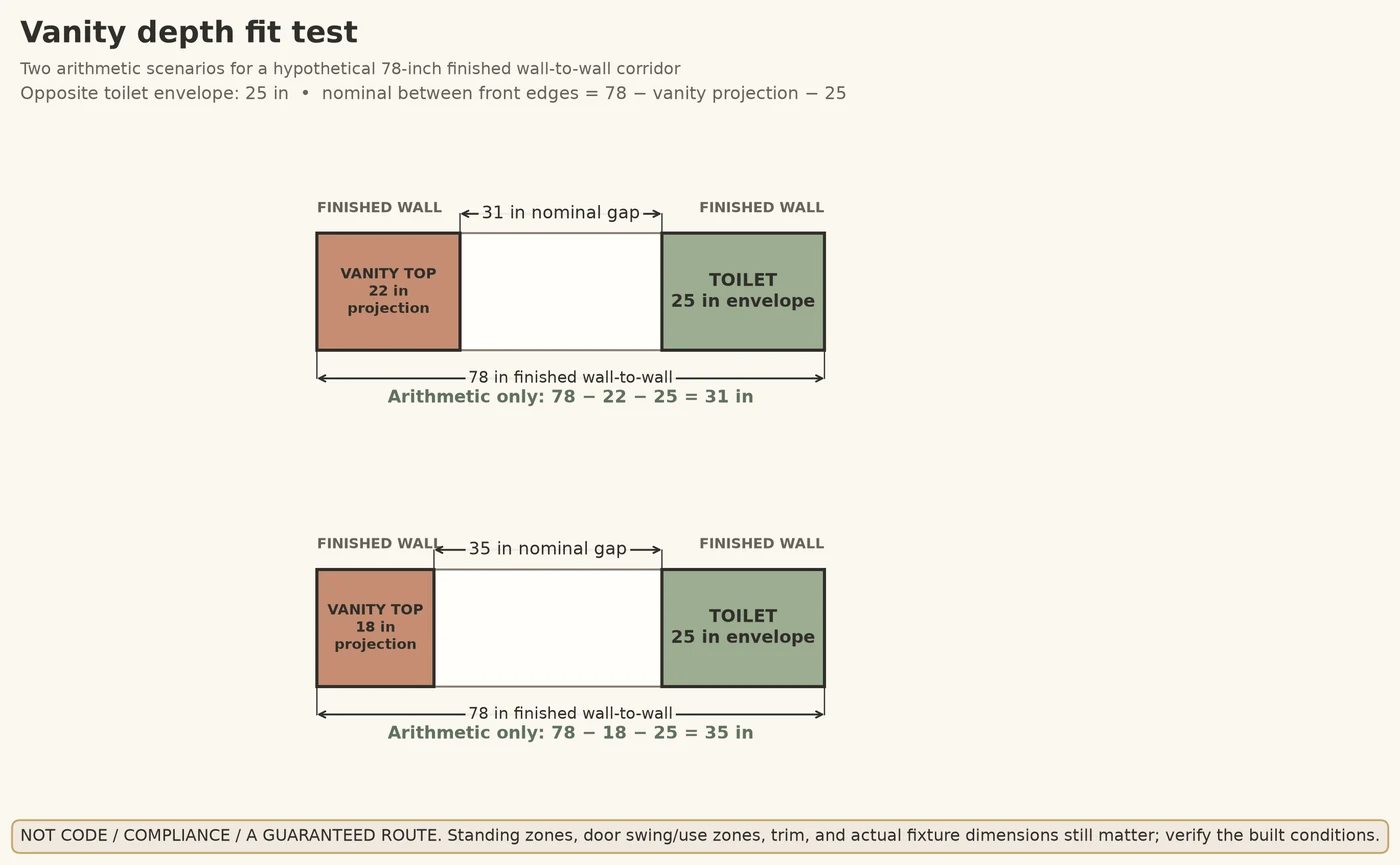
The response may be a shallower top, different sink, door change, or different cabinet location. For another hypothetical comparison, 78 minus 22 minus 25 equals 31 inches, while 78 minus 18 minus 25 equals 35 inches. These demonstrate arithmetic only, not code guidance, and omit door arcs, toilet geometry, handles, and user movement.
Test operation, not an empty rectangle
Tape or draw the finished footprint to scale. Include top, sink, faucet, handles, door fronts, and drawer travel. Open the bathroom door, vanity doors, and drawers, and mark where a person stands. Check the toilet as a whole, shower or tub trim, entry path, mirror, sconce, outlet, switch, vent, and sill. The furthest handle can matter more than the cabinet face. For covered facilities, confirm whether applicable accessibility requirements affect lavatory approach, door maneuvering, or fixture relationships.
For storage beyond the vanity, browse small bathroom storage and decor ideas. First confirm that the vanity footprint works. Storage ideas cannot fix a top that blocks a door or a drawer that hits a toilet.
Measure plumbing and electrical locations before choosing drawers
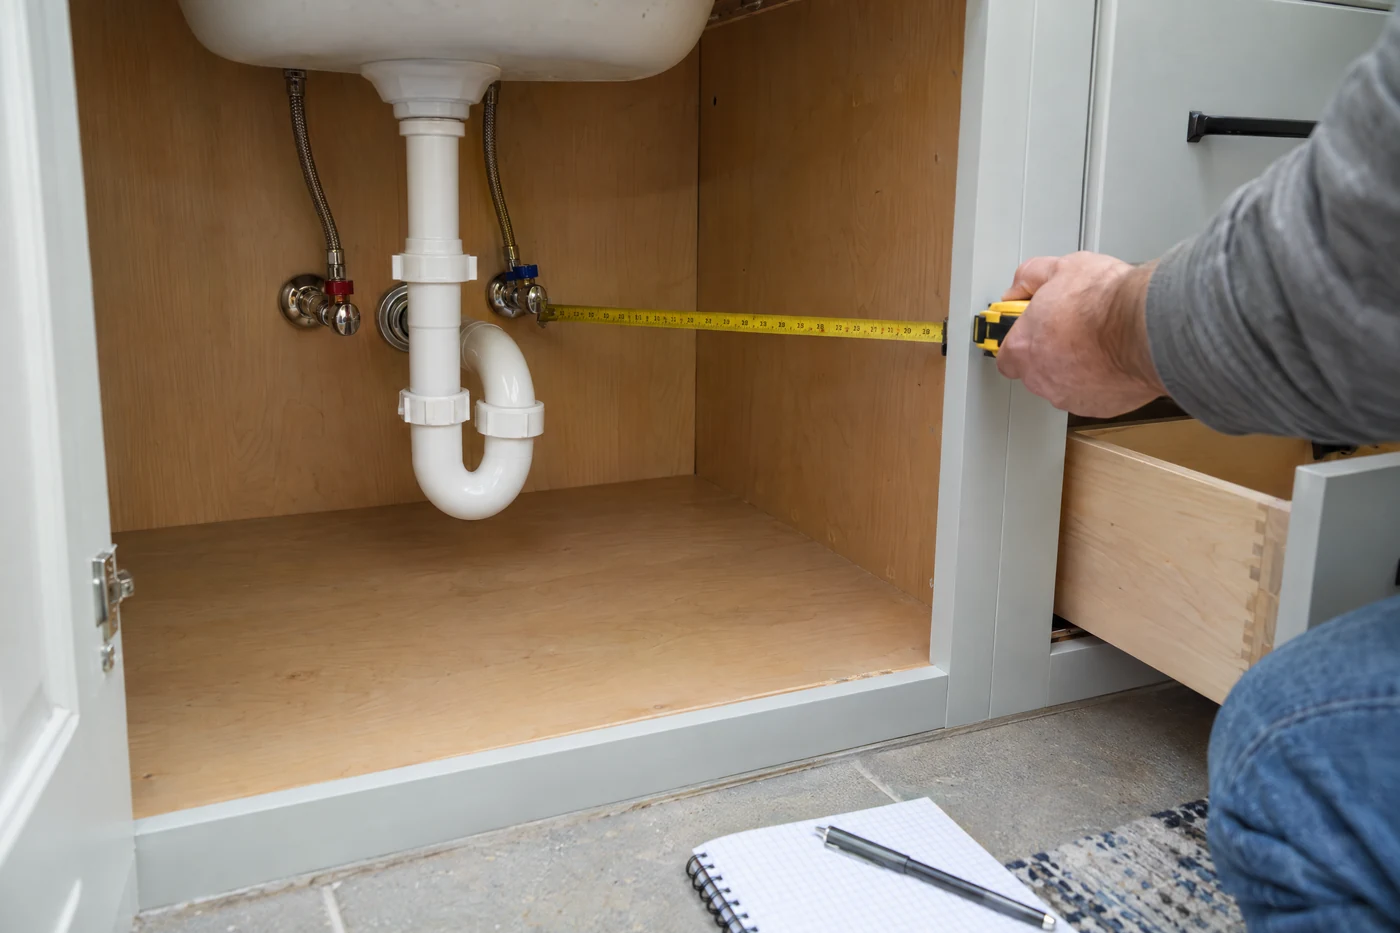
Outside dimensions answer only the room-envelope question. The interior must accept the drain, trap, supplies, shutoffs, sink bowl, and nearby electrical or ventilation constraints. From the same finished-wall and floor references, record drain centerline and height, entry direction, hot and cold offsets and heights, shutoff access, sink centerline, outlet offset and height, nearby switches, sconces, vents, fixed obstructions, and toilet centerline and edge.
Do not assume a drain is centered or that a supply can move because a product photo looks open. Relocating plumbing, cutting a drawer, changing electrical, or mounting a floating unit requires a coordinated plan based on actual site conditions and applicable requirements.
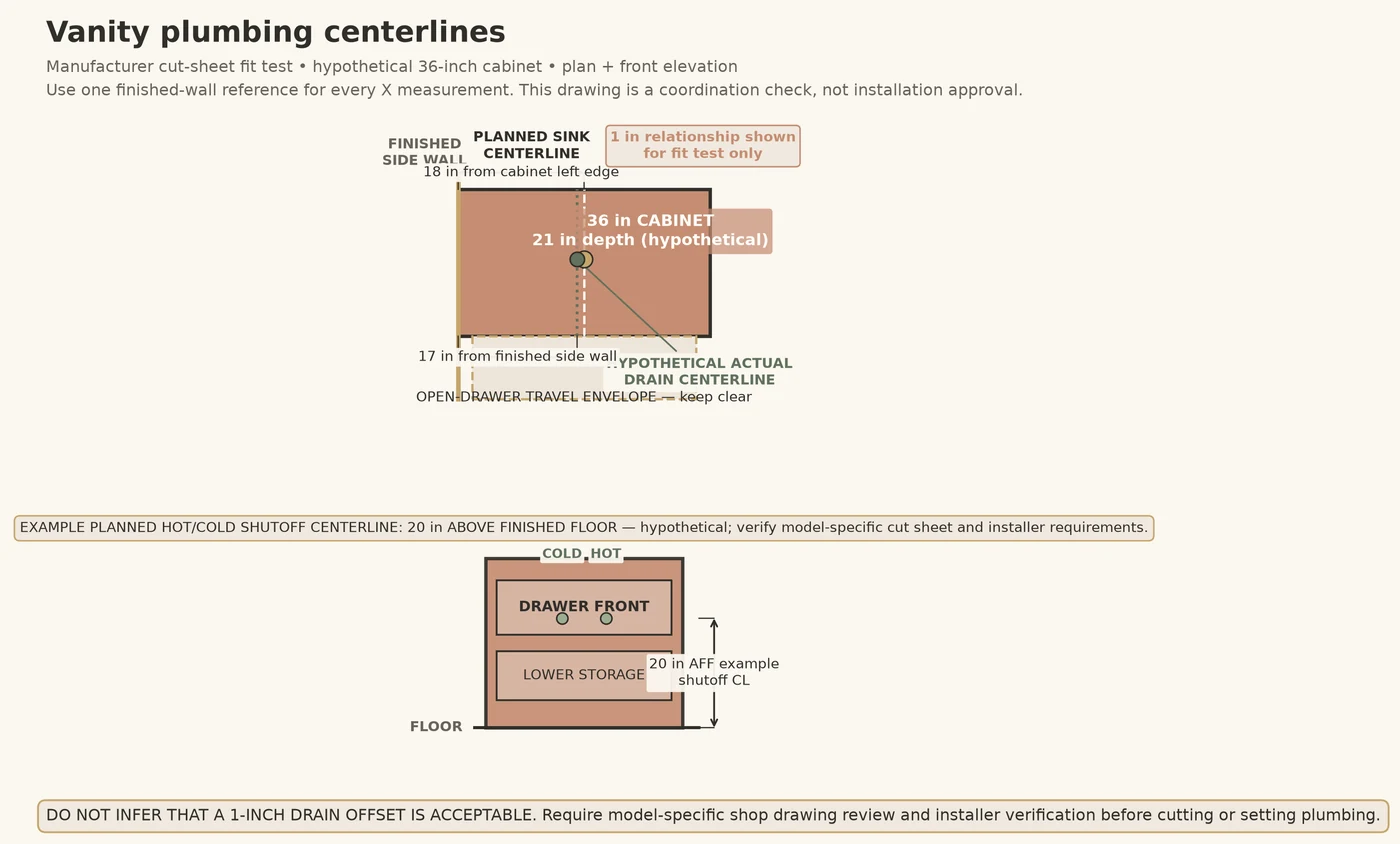
Worked check C: a one-inch sink shift does not approve a drawer stack
A fictional 36-inch single-sink candidate fits the measured room envelope. The existing drain centerline is 17 inches from the left finished wall reference. The planned sink centerline is 18 inches from that same reference, an apparent one-inch difference. The product’s interior drawing shows a center drawer stack occupying the drain and trap zone. The hot and cold supplies are reachable, but the trap would cross the drawer travel path.
The outside-width result is a provisional pass, but the internal plumbing and storage result is fail. The final decision is revise, not approve based on the one-inch shift. An offset sink, open plumbing bay, different drawer arrangement, or approved plumbing plan may be needed. A model drawing must confirm clearance for the trap, bowl, drawer box, and service access.
Choose finished height, not just cabinet height
A cabinet height is not the finished floor-to-countertop or floor-to-sink-rim height. Record floor to countertop, floor to rim, cabinet height including legs or mounting rail, countertop thickness, sink contribution, faucet height, and clearance to a mirror, shelf, or sill.
Lower finished ranges near 30 to 32 inches and comfort-oriented ranges near 34 to 36 inches are orientation only. User height, children, seated use, sink shape, and vessel height change the result. Add a vessel sink’s rim contribution. For a floating unit, record mounting height separately and verify wall, studs, fasteners, plumbing, flooring, and manufacturer instructions.
When comparing drawers with doors, check the actual footprint, plumbing location, door travel, and planned wall-mount height. General shopping advice cannot approve a specific wall or replace the chosen model’s installation instructions.
If accessibility is part of the project, identify the actual project type before choosing a height. Accessibility standards for covered facilities can include provisions related to height, knee and toe space, clear floor space, and exposed plumbing. The applicability and exceptions depend on the facility and project. A 34-inch maximum in an applicable standard is not a universal private-home vanity height. Confirm the applicable standard with the responsible professional or authority.
Single sink or double sink: let the room and users decide
A single sink can leave more counter and storage and may simplify an offset rough-in. A double sink adds simultaneous use but requires two basin and faucet positions, drain strategies, and useful counter. Some product families offer double-sink options around 60 inches and wider, but width labels do not decide the question. Mark sink centers on the wall and drawing. Check bowls, faucets, backsplash, mirror, sconces, drawers, toilet, door path, and side wall. A narrower single sink may have the better service envelope.
Fill out the bathroom vanity measurement worksheet
Use inches or centimeters consistently. Keep raw readings and the product drawing with the worksheet. Blank fields are intentional: a missing number is a question, not a guessed allowance.
Project and finished-room fields
| Field | Notes or blank entry |
|---|---|
| Room or vanity location | ______ |
| Date measured | ______ |
| Measured by | ______ |
| Units | inches / centimeters |
| New installation or replacement | ______ |
| Local code or accessibility review needed? | yes / no / ask professional |
| Finished wall width at floor | ______ |
| Width at countertop height | ______ |
| Width at upper measurement point | ______ |
| Smallest wall-width reading | ______ |
| Left trim or baseboard projection | ______ |
| Right trim or baseboard projection | ______ |
| Filler or installation tolerance reserved | ______ |
| Maximum finished assembly width | smallest width minus actual projections minus chosen tolerance = ______ |
| Finished floor to ceiling, soffit, or window-sill limit | ______ |
| Wall condition | square / out of square / unknown |
Depth, service, and obstruction fields
| Field | Notes or blank entry |
|---|---|
| Finished wall to opposite wall | ______ |
| Finished wall to toilet, shower, tub, or door trim | ______ |
| Deepest obstruction and its height from floor | ______ |
| Available depth used for calculation | ______ |
| Desired front-clearance target | ______ |
| Why this target was chosen | planning assumption / verified requirement / professional input |
| Maximum finished assembly depth | available distance minus chosen target = ______ |
| Door swing crosses proposed footprint? | yes / no |
| Vanity doors and drawers open fully? | yes / no / not checked |
| Toilet, traffic, or nearby storage conflict? | yes / no; notes: ______ |
Plumbing and electrical fields
| Field | Blank entry |
|---|---|
| Drain centerline horizontal offset from reference wall | ______ |
| Drain centerline height from finished floor | ______ |
| Drain entry direction | wall / floor / unknown |
| Hot supply offset / height | ___ / ___ |
| Cold supply offset / height | ___ / ___ |
| Shutoff and service-access concern | ______ |
| Existing or planned sink centerline | ______ |
| Outlet horizontal offset / height | ___ / ___ |
| Switch, sconce, vent, or fixed obstruction offsets | ______ |
| Toilet centerline and nearest edge | ______ |
| Product interior drawing checked? | yes / no |
Finished height and mounting fields
| Field | Blank entry |
|---|---|
| Finished floor to countertop target | ______ |
| Finished floor to sink-rim target | ______ |
| Cabinet height | ______ |
| Countertop thickness | ______ |
| Sink type and rim contribution | ______ |
| Installation type | freestanding / floor-standing / floating / custom |
| Floating wall support, stud, and service plan confirmed? | yes / no / not applicable |
Candidate comparison table
Fill in actual dimensions from each product’s drawing. If a field is not published, write unknown and hold the decision until it is answered.
| Field | Candidate A | Candidate B | Candidate C |
|---|---|---|---|
| Nominal cabinet width | |||
| Actual cabinet width | |||
| Fillers, end panels, and side panels | |||
| Countertop width | |||
| Left and right top overhang | |||
| Finished assembly width | |||
| Cabinet depth | |||
| Top, sink, and backsplash projection | |||
| Finished assembly depth | |||
| Cabinet height | |||
| Top and sink contribution | |||
| Finished top or rim height | |||
| Drain and supply compatibility | |||
| Drawer, door, and plumbing conflict | |||
| Front, side, and toilet clearance result | |||
| Decision: pass / revise / hold | |||
| Open questions and drawing reference |
Final pre-order checklist: pass, revise, or hold
A product is ready for the next purchase review only when the room, product, and service envelopes agree. Use this three-way result instead of forcing a candidate into yes or no.
Pass
Use pass when actual finished width and depth fit the calculated limits, height suits the users and sink, operation is checked, and the drawing answers plumbing, electrical, mounting, and top questions. It is a documented fit result, not installation approval.
Revise
Use revise when a defined change could make it work, such as a different top, shallower sink, shifted centerline, drawer layout, filler, door plan, or coordinated plumbing. Write the change and who must confirm it. Do not order while it remains an assumption.
Hold
Use hold when a critical dimension is unknown or contradictory: a top exceeds the opening, a door arc or toilet relationship is unresolved, wall support is unconfirmed, or the interior drawing is missing where a trap may cross a drawer path.
Before ordering, answer these questions from the product drawing:
- Did I measure the actual finished width at more than one height?
- Are the cabinet, top, overhang, fillers, side panels, backsplash, and side splashes included?
- Does the finished projection preserve the project’s chosen or verified clearance target?
- Can every door and drawer open without striking the wall, toilet, door, or person?
- Do the drain, trap, supplies, shutoffs, and sink bowl fit the interior layout?
- Are outlets, switches, vents, sconces, mirrors, and window sills clear?
- Does the finished top or rim height suit the users and sink type?
- If floating, is wall support and the service plan confirmed?
- Has a local code or accessibility question been escalated before ordering?
If removal, drilling, sanding, or demolition may disturb painted surfaces in a pre-1978 home, follow current lead-safe renovation guidance. Requirements can depend on whether the property is a rental, an in-home child-care setting, or another covered situation. Ask a qualified contractor about the planned work.
Bathroom vanity measurement FAQ
What is a common bathroom vanity width?
Stock products commonly use nominal widths such as 24, 30, 36, 48, 60, and 72 inches. These are market patterns, not room rules. Use the smallest finished wall reading and complete assembly width, then check the countertop, fillers, side panels, and service envelope.
How deep should a bathroom vanity be?
A cabinet around 20 to 21 inches deep is a common shopping reference; shallow products may be around 16 to 18 inches and deeper products may exceed 22 inches. Use the complete finished projection to the nearest obstruction after reserving your chosen target. A shallower top can be more useful in a tight room.
Does vanity depth include the countertop?
Not always. Product pages may list cabinet depth separately from the top, sink, faucet ledge, or backsplash. Use the finished front edge, not the cabinet number alone, and ask for the drawing if the projection is unclear.
How much space should be in front of a bathroom vanity?
There is no single universal private-home number. Record whether your target is a comfort assumption or verified requirement, then check local code or accessibility applicability. Test the open door, drawer, toilet, and user position, not an empty strip.
When should I measure for a bathroom vanity?
Measure after finished flooring, wall finishes, trim, and baseboards are installed. If the room is not finished, record the planned finish thicknesses and do not treat the rough opening as the finished measurement. Recheck the room before ordering if the finish plan changes.
How do I measure for a floating bathroom vanity?
Record the finished floor-to-countertop or sink-rim target, the mounting-rail height, wall studs or blocking, and the drain and supply coordinates. Include the complete top and sink projection and leave the planned floor area accessible below. Verify the model’s mounting and support instructions; do not infer structural capacity from an empty wall or a product photo.
How do I measure for a wall-to-wall bathroom vanity?
Measure at the floor, countertop height, and an upper point. Use the smallest reading, subtract actual projections, reserve the required tolerance, and compare the result with the complete top and cabinet assembly.
How do I measure plumbing for a replacement vanity?
Measure drain centerline, height and entry direction, supply offsets and heights, shutoff access, sink centerline, and nearby outlets or switches from consistent wall and floor references. Compare those coordinates with the interior drawing. A cabinet can fit outside while a trap conflicts with drawers.
Can a 60-inch vanity fit a 60-inch wall?
Not automatically. A 60-inch cabinet may have a wider top, side panels, fillers, or overhang. In the worked check, the opening is 59.625 inches and the top is 60.5 inches, so it does not fit under those assumptions.
What is the difference between cabinet height and finished vanity height?
Cabinet height measures the box or supported cabinet. Finished height runs from the floor to the countertop or sink rim. Add countertop thickness and sink contribution, including legs, rails, or a floating mounting position. A vessel sink can raise the rim above the cabinet top.
How do I check whether a vanity’s drawers will clear the plumbing?
Locate drain, trap, supplies, and shutoffs on the cabinet drawing. Trace their paths through drawer boxes and travel zones. If the drawing lacks detail, mark hold. Outside width alone does not approve a drawer configuration.