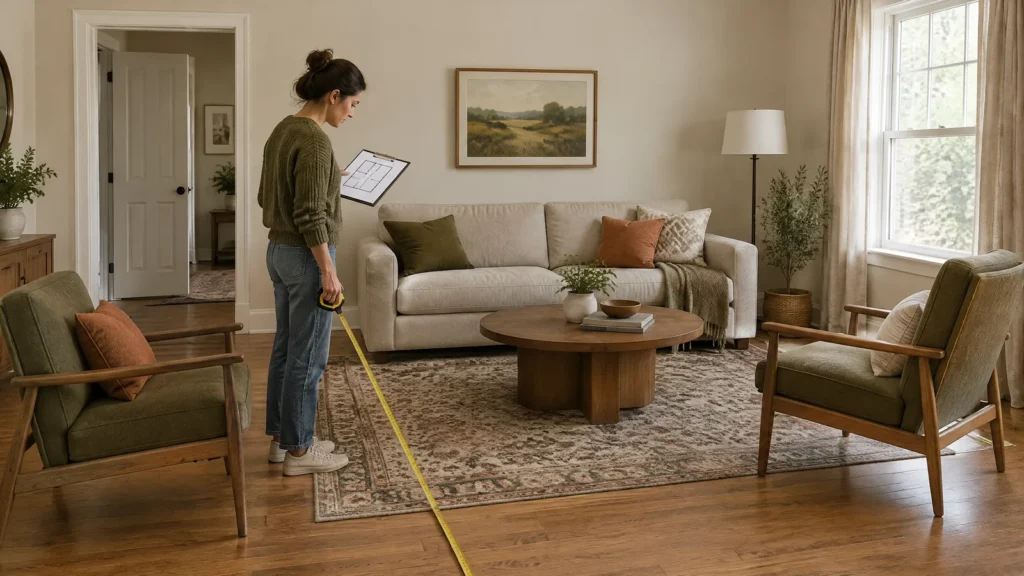
A useful living room furniture layout starts with measurements, not a furniture catalog or a style label. Record the room envelope, door swings, windows, vents, outlets and the full outside dimensions of each piece. Then choose the room’s main activity, draw furniture footprints at one consistent scale and test at least two arrangements against the route people actually use.
This planner gives you a reader-fill worksheet, a simple pass or fail method, five starting layouts and four worked plans. The plans are illustrative measured concepts, not universal templates. They show how to compare furniture footprints, sightlines and circulation before you buy or lift a heavy piece. If a smaller room leaves little choice about furniture size, the small-room plans organized by actual dimensions offer tighter examples to test.
What to measure before arranging living room furniture
Measure the room while it is empty or as close to empty as practical. A wall-to-wall measurement alone is not enough. A door that opens into the seating area, a return grille behind a sofa or a cabinet door that cannot open can make a technically fitting plan unusable.
Record the room envelope and fixed features
Measure finished wall length and width. Note ceiling height if you are considering tall storage, a wall-mounted television or large artwork. On a sketch, mark the exact location and width of:
- every door, including the door leaf and full swing arc;
- windows, trim, sill depth and any access needed to open them;
- fireplaces, hearths, mantels and heat sources;
- built-ins, columns, radiators and baseboard heaters;
- supply registers and return grilles; and
- outlets, switches, cable points and lighting controls.
Also mark the path from the main entry to the next room, closet, exterior door or frequently used window. A route that looks optional on paper may be the route your household uses every day.
Measure furniture footprints, not product labels
Record the widest and deepest outside dimensions of the sofa, loveseat, sectional, chairs, ottoman, coffee table, side tables, media console, bookcase and desk. Include arms, legs, back cushions, a chaise return and any part that projects beyond the main frame.
Measure the operating space too. Draw a recliner fully extended. Open cabinet doors and drawers. Mark the space needed to pull out a storage ottoman or seat at a table. A label such as apartment sofa or compact chair is not a substitute for the actual dimensions of the product you may buy.
For delivery, measure the entry door, hallway, elevator or stair turn separately. A piece that fits the final room can still fail before it reaches the room.
Map openings, outlets and the route people actually use
Use a different pencil color for fixed features, furniture, door swings and routes. Identify which outlets serve lamps or devices and where a cord would need to travel. Keep electrical cords and other obstacles out of walking routes. Flatten or secure loose rugs and correct folds that create trip hazards.
If the room includes children, pets, older adults or anyone who uses a mobility device, include those real movements in the test. This is a household planning step, not an accessibility certification.
Reader-fill measurement worksheet
Copy this table into a note or print it before drawing a plan.
| Input | Reader records |
|---|---|
| Finished room length by width | ___ |
| Ceiling height, if relevant | ___ |
| Door locations and full swing arcs | ___ |
| Windows, sills, fireplace and built-ins | ___ |
| Supply and return vents, radiators and heaters | ___ |
| Outlets, switches and cable route | ___ |
| Entry-to-next-room route | ___ |
| Sofa or sectional outside dimensions | ___ |
| Chair or loveseat dimensions | ___ |
| Coffee table, ottoman and side-table dimensions | ___ |
| Console, bookcase or desk dimensions | ___ |
| Recliner, drawer and cabinet operating space | ___ |
| Required seats and main activities | ___ |
| Primary focal point | ___ |
| Household access and safety needs | ___ |
Turn measurements into a usable floor plan
Pick one scale and use it everywhere
Graph paper is enough. One possible scale is one square for one foot, but you can use a larger scale for a small room or a digital grid if the conversion stays consistent. Draw the room, each opening and each furniture rectangle using the same scale.
For an auditable conversion, an 84 inch sofa becomes 7 feet because 84 divided by 12 equals 7. A 36 inch round table becomes a 3 foot circle. A 30 inch chair depth becomes 2 feet 6 inches. Label the converted dimensions directly on the cutout or plan so the drawing can be checked later.
Make separate paper pieces for the furniture. This makes it easy to test a sofa facing two chairs, a sectional in a corner or a smaller plan with one piece removed. Do not resize one cutout by eye while comparing it with another.
Calculate the usable planning area
Use this simple planning model:
Usable planning area = room envelope minus fixed projections minus door-swing zones minus required routes minus furniture and opening conflicts.
This is not a building-code or fire-code calculation. It is a way to keep the drawing honest. A deep sectional reduces the open zone. An open door removes part of the floor. A dining chair that must pull out consumes more space than the table rectangle alone. A vent, heater or built-in may make a seemingly empty strip unavailable.
Start with the non-negotiable features and route. Then place the largest seating piece. Add only the tables and seats that support the stated activity. If the last chair consumes the route, the chair is not free space just because it fits inside the wall dimensions.
Use the must-clear, should-test and preference method
This three-level method keeps design preferences from overruling practical constraints.
Must remain clear:
- door swings and the route needed to enter or leave;
- required accessible routes where a covered project applies;
- supply registers, return grilles, radiators and manufacturer-specified clearances;
- safe cord paths, outlets and controls; and
- doors, drawers, windows and furniture that must open or operate.
Should be tested:
- the gap between seating and a coffee table or ottoman;
- the primary sightline to a television, fireplace, window or view;
- glare at different times of day;
- chair angles and side views;
- window access and cabinet openings;
- recliner extension;
- the rug edge and any transition into a route; and
- whether the plan works with the household’s real movements.
Preference:
- symmetry and centered borders;
- matching furniture;
- whether the sofa floats or touches a wall;
- equal spacing around a table; and
- a particular style balance.
A preference should not win a conflict with a must-clear item. If symmetry blocks a door, keep the door usable and accept the asymmetry.
Choose the main activity and focal point
Name one primary activity before arranging every piece. A room can support more than one use, but a layout without a priority often leaves every seat pointed in a different direction.
Conversation first
Face seating toward one another around a reachable center. The sofa may face two chairs, or chairs may angle toward a sofa and a view. A television can be secondary on an adjacent wall. Keep the entry route visible instead of making people walk through the middle of the conversation group.
Television first
Place the primary seat from the actual viewing position, then check screen height, side angles, glare, power, console depth and anchoring. Keep the focus on the whole furniture layout. If a TV rests on furniture, choose a piece designed for its size and weight, and follow the television and furniture manufacturers’ instructions for anchoring and anti-tip restraints.
Do not mount above a fireplace by default. Check the fireplace, television and mount instructions for the exact installation, including heat and viewing-height issues.
Fireplace, window or view first
An architectural feature or view can be the focal point when it supports the way the room is used. Check heat instructions around a fireplace, access to the window, daylight glare and ventilation before treating the feature as the center of the room. A feature can be visually important without requiring every chair to face it directly.
Two activities or an open plan
Define the living zone without consuming the main cross-traffic route. A sofa back, rug, console or lighting can mark a zone, but the primary route should remain legible when people are seated. For a combined room, compare these decisions with the living and dining room zoning examples after the living furniture footprint is solved.
In a studio, use the same measured method and let the sofa, rug and lighting separate functions without blocking the room. Check the everyday route between living, sleeping and work zones when each piece is in use.
Compare five starting layouts
Use the smallest number of pieces that supports the room’s stated activity. Do not add a chair merely to complete a symmetrical picture.
| Starting layout | Best when | Main benefit | Main trade-off to test |
|---|---|---|---|
| Sofa plus two chairs | Conversation and flexible seating matter | Chairs can angle toward the sofa or focal point | The group needs width and may conflict with windows or routes |
| Sofa facing two chairs | A clear conversation group fits | Creates a balanced face-to-face relationship | Chairs may interrupt a television or view behind them |
| Two sofas facing | A broad room needs seating for a larger social group | Strong conversation capacity | Depth and end routes can become tight |
| Sectional plus movable chair or ottoman | One corner or lounging side is useful | Seats many people while defining a zone | A chaise or return can consume circulation space |
| Sofa plus compact table or ottoman | A small or mixed-use room needs flexibility | Fewer hard corners and an adaptable center | Less formal seating and less surface or storage |
These are starting categories, not rules. A sofa plus one chair may be better than a crowded sofa plus two chairs. A sectional is not efficient if its return blocks the only everyday route.
Four worked living room furniture layout plans
Each plan below uses the stated room and furniture assumptions. The dimensions are illustrative planning choices. Verify the actual room, furniture, openings, vents, routes and manufacturer instructions.
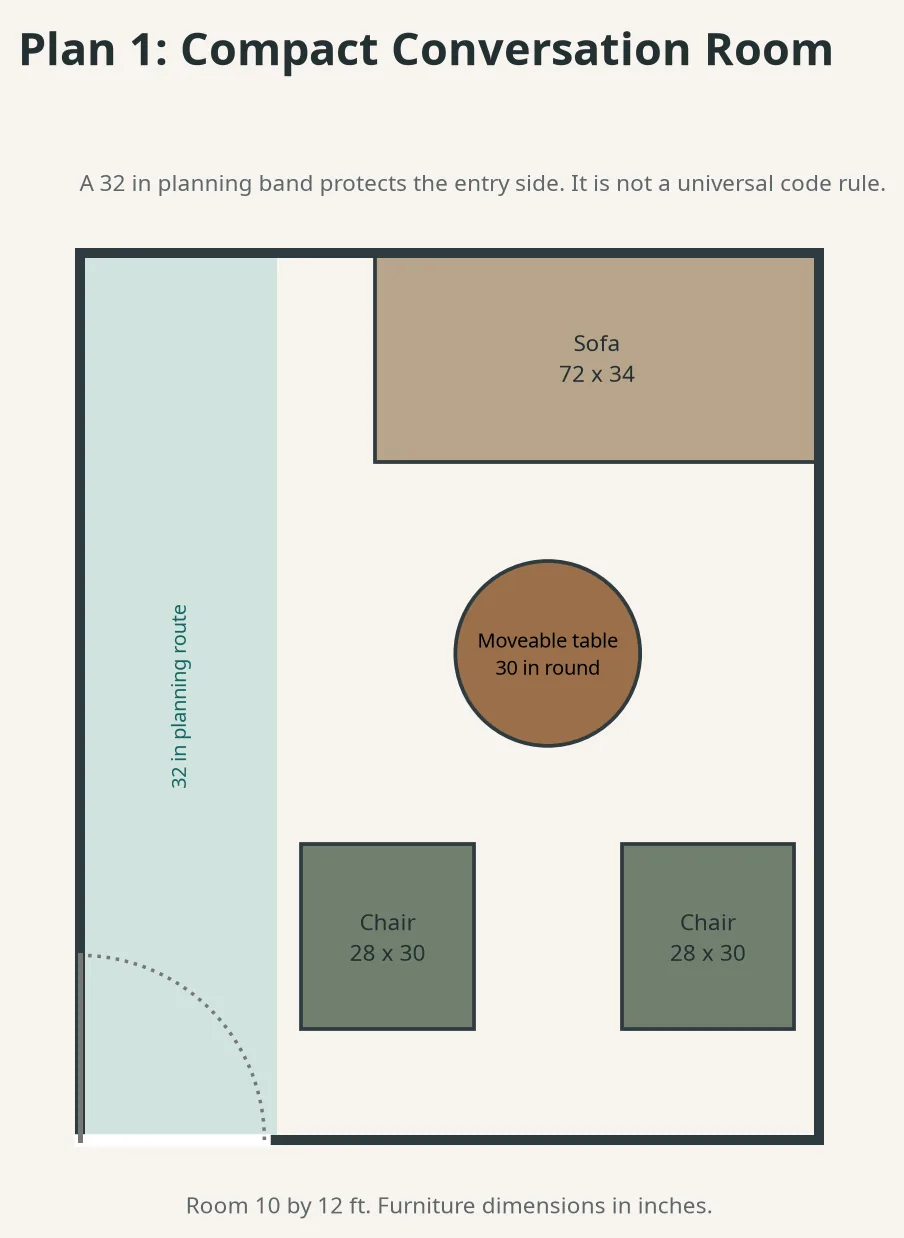
Plan 1: 10 by 12 foot conversation room
This plan uses a 10 by 12 foot room. Place a 72 by 34 inch sofa on the 12 foot wall. Use two chairs measuring 28 by 30 inches, opposite or angled toward the sofa. The center surface is one 30 inch round movable table. The main entry route is shown as a 32 inch editorial planning band, not a universal code rule.
The sofa consumes 6 feet of the 12 foot wall. The round table has a 2 foot 6 inch diameter. Because the table is movable, it can shift toward the active conversation group or move aside when the route needs to carry more traffic. The two chairs can angle toward the sofa rather than sitting squarely opposite it.
Draw the door swing first. Keep the 32 inch band outside that swing and outside the chair footprints. If the actual doorway enters near one chair, remove or relocate that chair before narrowing the route. The goal is a conversation group with a visible entry path, not a perfectly symmetrical diagram.
Illustrative measured concept. Verify the actual room, furniture, openings and manufacturer instructions.
What to test: Sit in both chairs, turn them toward the sofa and walk the entry route while another person is seated. If the chair backs crowd the route, test the same plan with one chair removed. That is a deliberate alternative, not a failed decorating choice.
Plan 2: 12 by 14 foot balanced seating with a side route
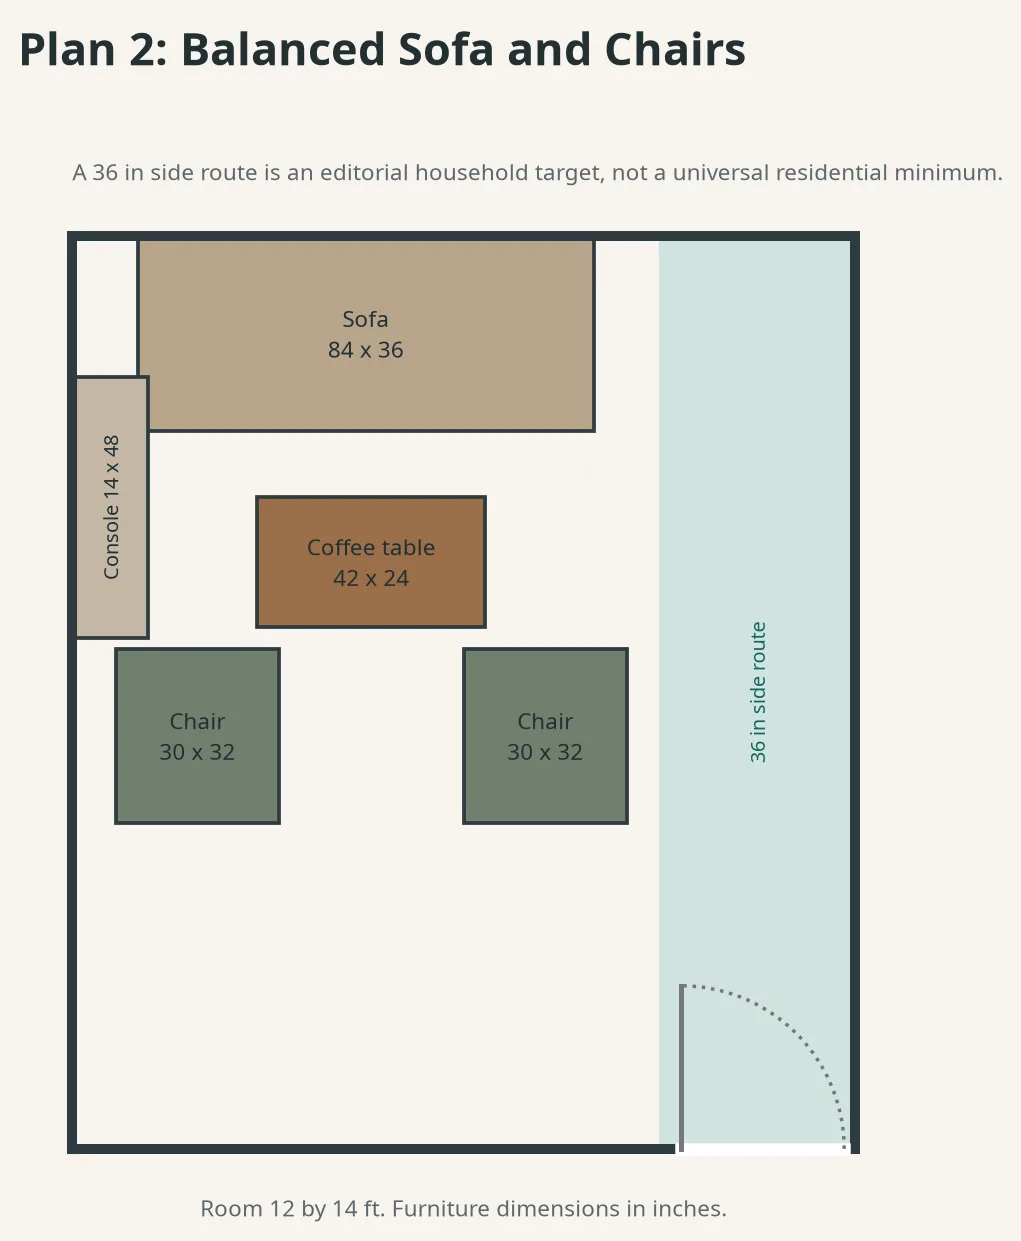
This plan uses a 12 by 14 foot room, an 84 by 36 inch sofa, two 30 by 32 inch chairs, a 42 by 24 inch coffee table and a 48 by 14 inch console. Show a 36 inch side route as a household planning target, not a universal residential minimum.
The sofa is 7 feet wide and 3 feet deep. Each chair is 2 feet 6 inches wide and 2 feet 8 inches deep. The coffee table is 3 feet 6 inches by 2 feet. Place the console on a wall where its doors and drawers can open without consuming the side route. Angle the chairs toward the sofa and leave the route on the less interrupted side of the room.
The 36 inch band is a planning target for ordinary household movement in this example, not a code requirement. If someone needs an accessible route, check that household member’s actual turning and passing needs and the requirements that apply to the project. A diagram here does not certify accessibility.
Illustrative measured concept. Verify the actual room, furniture, openings and manufacturer instructions.
What to test: Pull open the console doors, sit in the chair nearest the route and walk from the entry to the next room. If the chair interrupts the route, rotate it, remove it or move the whole group. If the coffee table is reachable but makes people weave around it, it is occupying a route rather than serving the seating group.
Plan 3: 12 by 16 foot room with two facing sofas
This plan uses a 12 by 16 foot room. Place two sofas, each 78 by 36 inches, facing across a 48 by 24 inch coffee table. Use an end route of 36 inches as a planning target. Use this plan only if both door swings and the actual household needs fit.
Each sofa is 6 feet 6 inches wide and 3 feet deep. The coffee table is 4 feet by 2 feet. Two sofas facing one another create a strong conversation arrangement, but the furniture depth is substantial. The end route must be checked at both ends because an offset doorway, open closet or window may make one end more important than the other.
Do not assume the room’s 12 by 16 foot envelope automatically provides two usable 36 inch end routes. Draw both door swings, any furniture opening and the route to the next room. If the household needs a clear path through the end of the room, the coffee table may need to be smaller or removed. If the second sofa is used infrequently, a sofa plus two movable chairs may preserve more flexibility.
Illustrative measured concept. Verify the actual room, furniture, openings and manufacturer instructions.
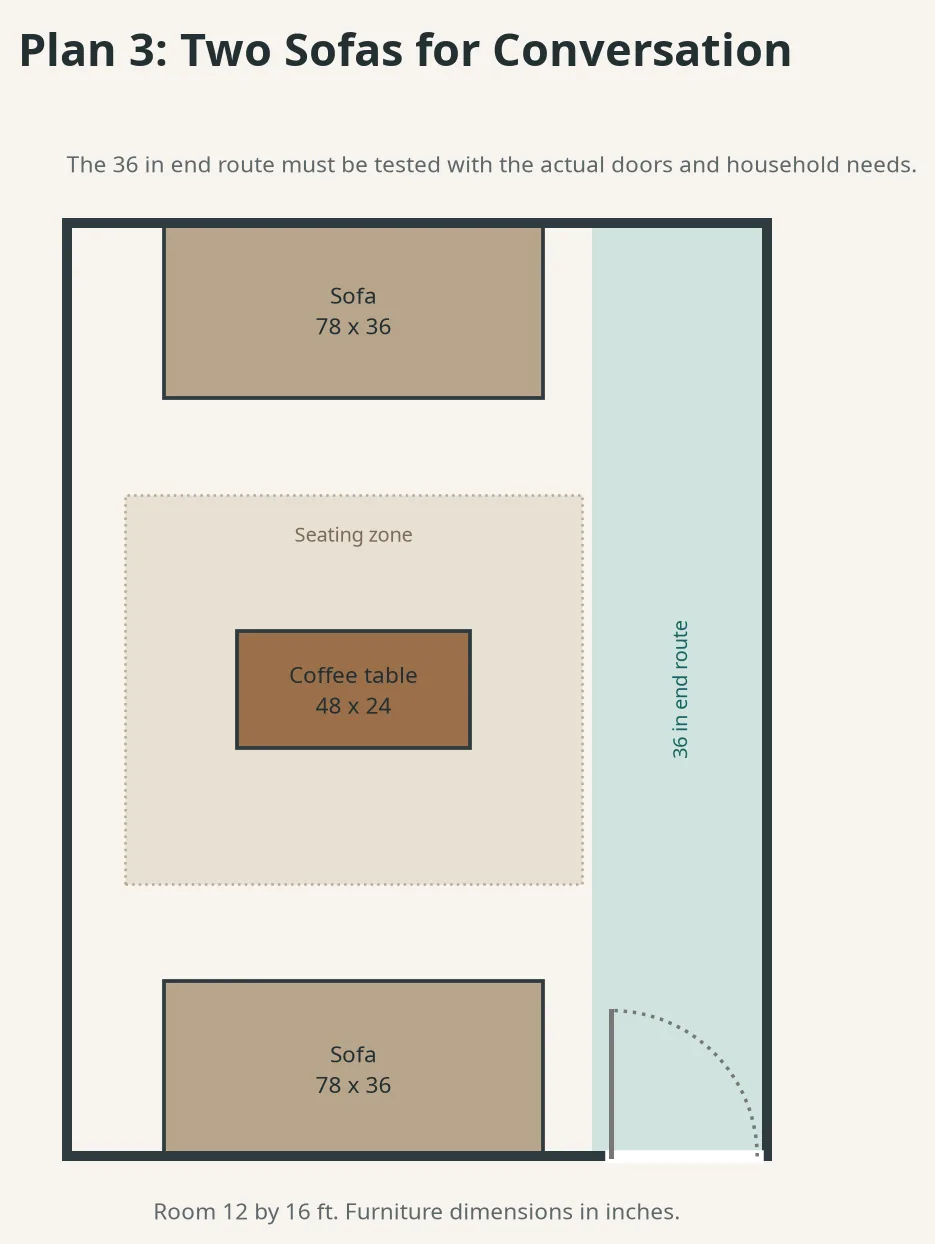
What to test: Open both doors fully, walk each end route while carrying a basket and sit on every sofa. Check whether the coffee table remains reachable without becoming the only way through the room. If either door swing conflicts, reject the plan rather than treating the conflict as a small styling issue.
Plan 4: 14 by 18 foot sectional with a swivel chair
This plan uses a 14 by 18 foot room. Place an L shaped sectional with a 108 by 36 inch long side and an 84 by 36 inch return. Add one 32 by 32 inch swivel chair and a 36 by 24 inch ottoman. Show an outside route of 36 inches as an illustrative planning band.
The sectional’s long side is 9 feet and its return is 7 feet. The swivel chair is 2 feet 8 inches square. The ottoman is 3 feet by 2 feet. Place the sectional so the return defines the lounging zone without closing the door, window or main route. A swivel chair can turn toward the sectional or a separate focal point, but it should not be left in the route simply because it fits on the drawing.
Before using this concept, check the door swing, window access, supply and return vents, outlets, furniture delivery path and all anchoring instructions. A sectional can be top-heavy or difficult to move depending on its construction. If a television or storage piece is included later, apply its manufacturer instructions and appropriate anti-tip guidance rather than relying on the plan alone.
Illustrative measured concept. Verify the actual room, furniture, openings and manufacturer instructions.
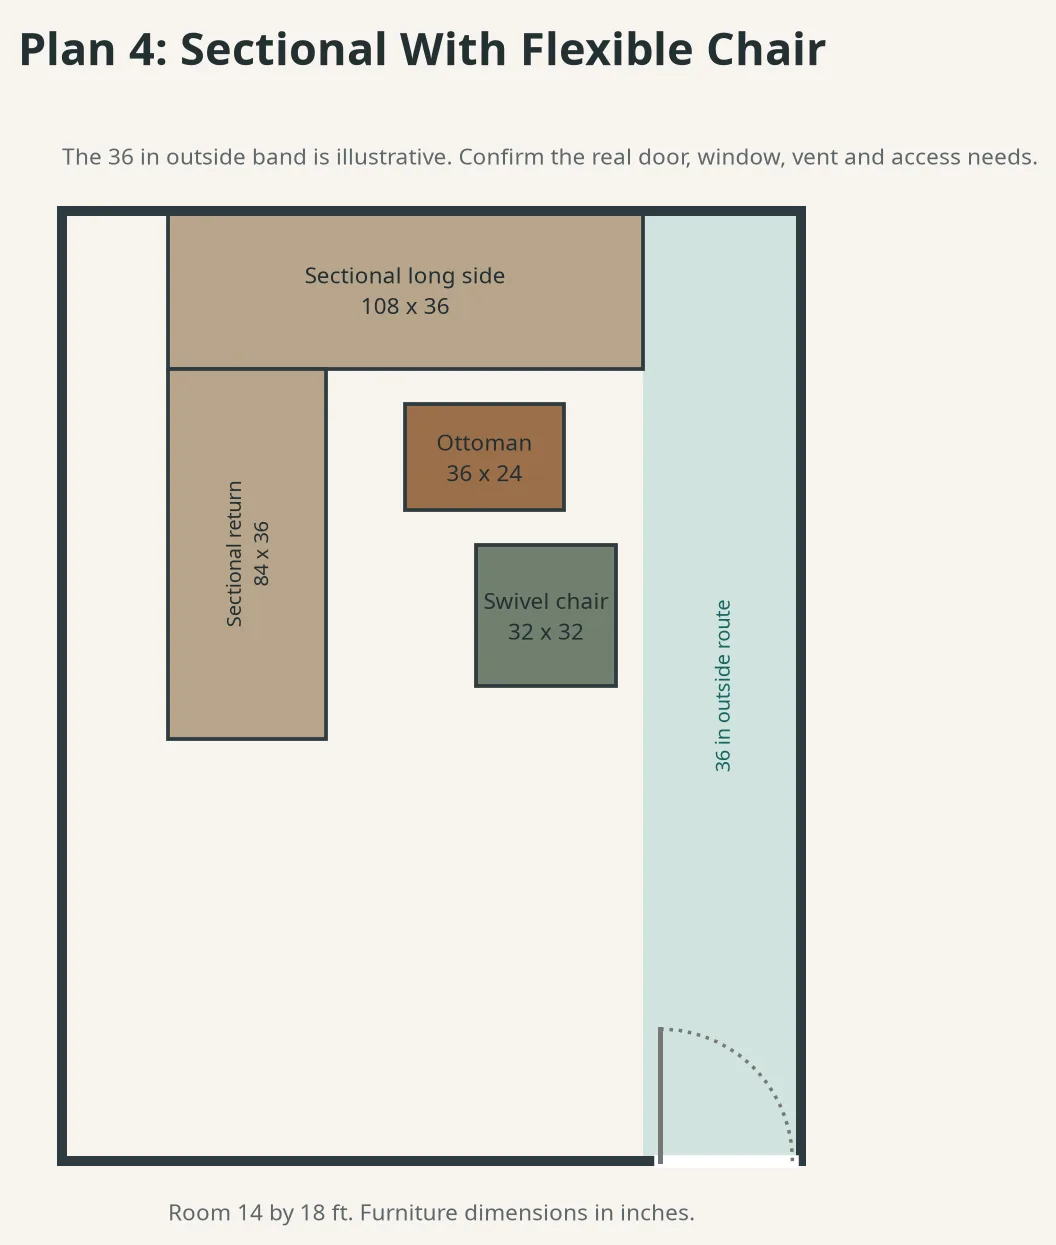
What to test: Tape the full 108 by 36 inch long side and 84 by 36 inch return, not just the visible cushions. Turn the chair through its useful range, walk the outside route and open every nearby door. If the chaise or return narrows the route, try a sofa with a movable ottoman instead of forcing the sectional to fit.
How much clearance should you leave?
There is no single living room clearance that suits every home. Furniture depth, door swing, HVAC, accessibility scope, manufacturer instructions, household movement and local requirements can change the answer. The distances in the worked plans are transparent editorial assumptions so you can test a drawing, not promises of a universal minimum.
| Planning check | How to use it | What overrides it |
|---|---|---|
| A reach gap between seating and a coffee table | Treat the gap as a starting comfort test. It should let a seated person reach the surface without turning the table into the main route. | Actual arm reach, table depth, mobility needs, children, pets and the route through the room |
| A 32 or 36 inch editorial route band in a worked plan | Use it to compare alternatives consistently. It is a planning target, not a residential code rule. | Door swings, turning needs, household access, furniture openings and any applicable project requirements |
| Clear walkways and secure rugs | Keep cords, tables, plant stands and loose or folded rugs out of the route. | The actual household route, floor condition, rug system and mobility needs |
| Manufacturer clearances | Follow current fireplace, television, mount, furniture, HVAC and lighting instructions for the exact product. | The product instructions, installation conditions and qualified advice |
| Rug and furniture relationship | Choose the rug after the furniture footprint passes, then tape the rug outline and test doors, vents and routes. See the living room rug size guide for the next sizing decision. | The delivered rug size, door swing, vents, floor finish, pad instructions and route |
Do not treat a retailer’s clearance suggestion as a legal requirement. Use each gap as a starting point, then test it with the actual furniture, door openings and people who use the room. Applicable requirements for the particular property still take precedence.
Test the layout before moving or buying
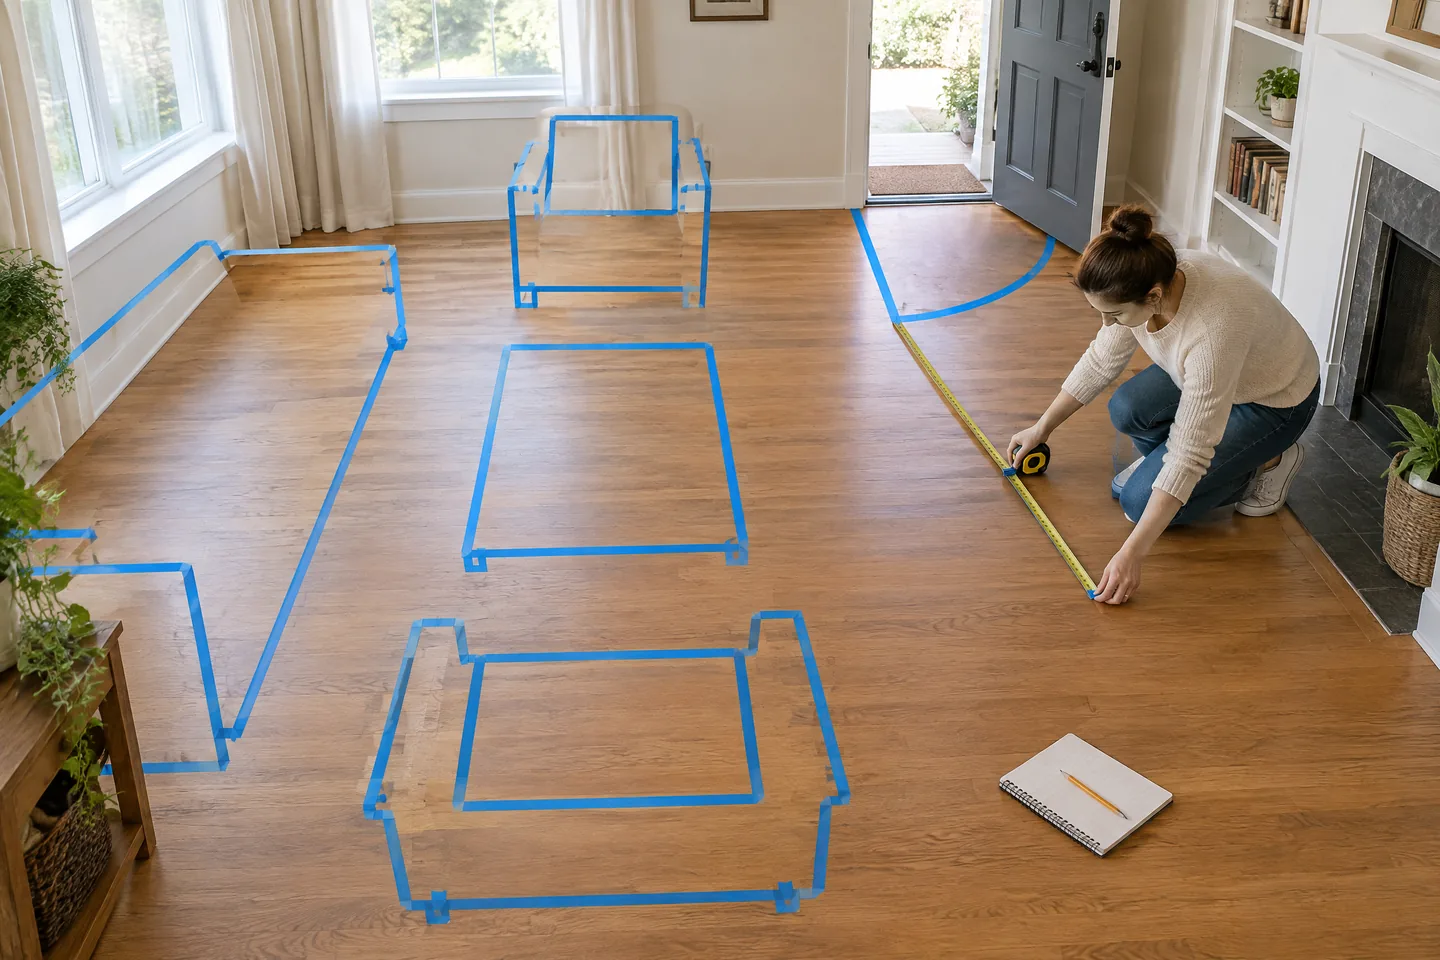
Use painter’s tape on the floor
Tape every furniture footprint to the finished floor, including the arms and deepest projection. Mark the door swing, the coffee table, console and the route. If you are planning a wall-mounted television, tape the complete screen rectangle on the wall. If you are considering a rug, tape its complete outline only after the furniture footprint is in place.
Open doors, drawers and cabinets. Pull out a recliner. Turn the swivel chair. Pull out dining chairs if the room is part of a larger space. Sit in the primary seats in daylight and after dark. Walk the route with a basket, laundry, a child, a pet or a mobility aid when relevant to your household. Do not claim that this test certifies an accessible route. It reveals whether the arrangement works for the people who use it.
Make paper cutouts or use a simple grid
Create cutouts labeled sofa, chair, sectional, table, ottoman, console and door swing. Draw a small arrow for the intended route. Compare two or three options and write the trade-off beside each one. A room-planning app can help visualize a footprint, but it cannot verify the dimensions of a product you have not measured, a lease permission, a structural condition or a safe installation.
Save a photo of each taped option. Mark the plan that fails and why. A failed plan is useful evidence because it prevents the same conflict from returning after a purchase.
Ask these five-minute review questions
- Can the main route be walked without weaving through the seating group?
- Can doors, drawers, windows and vents be used as intended?
- Is the primary seat comfortable for the selected focal point?
- Is the coffee table or ottoman reachable without becoming the route?
- Do cords, lamps and outlets have a safe, accessible path?
- Does the plan still work when children, pets, guests or a mobility device are present?
- Can the furniture be delivered and assembled without damaging the route or walls?
Only after a layout passes these checks should you compare rugs, lighting, storage or decorative layers.
Common layout failures and fixes
Buying the sofa before measuring the route
Failure: The sofa fits the wall but blocks the entry or delivery path.
Fix: Measure the room, openings, delivery route and full sofa footprint before ordering. Tape the shape on the floor and mark the door swing.
Pushing every piece to a wall
Failure: The seating group fragments and everyone faces a different direction.
Fix: Place the largest seating piece first, then angle smaller pieces toward the main activity. Float a piece only after checking the route behind it, power and lamp placement.
Floating a sofa without planning the space behind it
Failure: The sofa looks intentional in a sketch but creates a narrow passage or a cord crossing.
Fix: Make the route a must-clear item. If the room cannot support it, return the sofa to a wall or select a shallower arrangement.
Using a deep sectional in a narrow room
Failure: The chaise or return consumes the only useful center area.
Fix: Tape the complete outside footprint. Compare a sofa with movable ottoman or a smaller sectional before reducing the household route.
Centering furniture on the whole open plan
Failure: The living group drifts into the dining, kitchen or cross-traffic zone.
Fix: Center the furniture relationship on the living zone. Stop the rug and seating before the route, even if that creates an intentionally uneven border.
Blocking a door, vent, return or window
Failure: The drawing works only with the door closed or the vent covered.
Fix: Mark each fixed feature before placing furniture. Change the orientation, use fewer pieces or leave the opening exposed. Do not invent a small gap around an opening when the product or HVAC guidance says otherwise.
Choosing the rug before solving the furniture footprint
Failure: The rug is too small to connect the group or too large for the door, vent or route.
Fix: Pass the furniture plan first, then choose how the rug will sit with the furniture and tape that outline before ordering.
Mounting a television above a fireplace by default
Failure: The screen is too high, exposed to unsuitable heat or installed without product-specific clearance checks.
Fix: Check an adjacent wall or low console first. Follow the fireplace, television and mount instructions for the exact installation.
Treating a room planner object as proof
Failure: A catalog object fits a digital grid but the real product has wider arms, a deeper chaise or different door openings.
Fix: Replace catalog assumptions with measured outside dimensions. Include the delivery route and operating space.
Filling every seat
Failure: The room holds more furniture but is harder to use.
Fix: Start with the smallest number of pieces that supports the primary activity. Preserve an open route and add seating only when the plan still passes.
Frequently asked questions
How do I start planning a living room furniture layout?
Measure the finished room and fixed features first. Draw door swings and the everyday route, record the full furniture footprints, name the primary activity and test at least two scaled arrangements before moving or buying anything.
What measurements do I need before moving furniture?
Record room length and width, doors and swings, windows, fireplace, vents, radiators, built-ins, outlets, route locations and the complete outside dimensions of every piece. Also measure recliner extension, cabinet and drawer openings, and delivery access where relevant.
Should a living room sofa face the television or a conversation area?
Let the main activity decide. A television-first room needs a comfortable sightline and safe power plan. A conversation-first room can face chairs toward the sofa while the television remains secondary. Do not force every seat toward a screen if that harms the room’s main use.
How do I arrange furniture in a narrow living room?
Use the long axis when it protects the route, reduce furniture depth and remove the coffee table before narrowing a required path. Tape the sofa, tables, openings and route at full size. A smaller arrangement that is easy to walk through is usually more useful than a crowded one.
Can I use a room-planning app instead of graph paper?
Yes, as a visualization aid. Keep one scale, enter actual furniture dimensions and still verify the real room with tape. An app cannot certify a delivery path, lease permission, product installation or household safety.
When should I choose a sectional instead of a sofa and chairs?
Choose a sectional when its complete outside footprint defines the zone without blocking doors, windows, vents or the everyday route. Choose a sofa and movable chair or ottoman when you need more flexibility or the sectional return consumes the room’s usable area.
How do I know whether a layout really fits before buying?
Tape the full footprints, mark the door swings and route, open every door and drawer, sit in each primary seat, check glare and cords, and walk through the room under normal household conditions. Recheck the product’s actual dimensions and delivery measurements before ordering.
Final living room layout checklist
Use this list before moving heavy furniture or placing an order:
- [ ] The finished room envelope is measured.
- [ ] Every door leaf and swing arc is drawn.
- [ ] Windows, fireplace, vents, radiators and built-ins are marked.
- [ ] Outlets, switches and the cable route are recorded.
- [ ] Full sofa, sectional, chair, table, ottoman and console dimensions are recorded.
- [ ] Recliner, drawer, cabinet and dining-chair movement is tested.
- [ ] The primary activity and focal point are named.
- [ ] At least two scaled arrangements are compared.
- [ ] The main household route remains usable.
- [ ] Sightlines, glare, cords and controls are checked.
- [ ] Manufacturer instructions and any applicable local or accessibility requirements are reviewed.
- [ ] The rug is selected only after the seating footprint passes.
- [ ] Product, delivery and assembly measurements are rechecked before purchase.
A good layout is the one that supports the way the room is actually used. Measure first, protect the route, test the focal point and let style preferences come after the plan works.