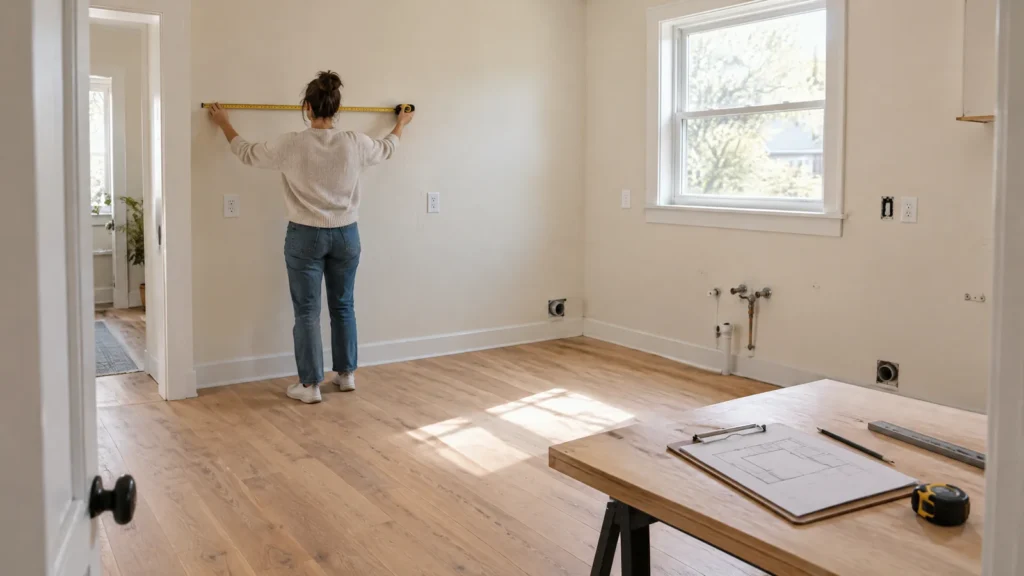
Kitchen layout planning works best as a short decision process, not a cabinet shopping exercise. Measure the room, record fixed conditions, map cooking and traffic, compare fitting layout families, and score each candidate before ordering or demolition. Use this worksheet with graph paper, a spreadsheet, or a digital kitchen layout planner worksheet.
What this kitchen layout planning worksheet helps you decide
By the end, you should have a measured room shell, a household workflow map, a shortlist of fitting layout families, a Pass or Needs work or Unknown scorecard, and a verification list for manuals, local requirements, permits, accessibility scope, and professional review.
This is a planning aid, not construction documentation, an inspection, a permit, or a guarantee of code compliance. A visual plan can reveal conflicts early, but it cannot confirm a wall is nonstructural, certify an electrical circuit, approve gas work, establish ventilation performance, or prove that an appliance opening meets its installation instructions.
If you want broader decisions about finishes, lighting, color, and the design process after the layout is selected, use the broader kitchen design guide as a separate next step. Keep those styling decisions downstream of the room and workflow tests in this article.
Start with the room shell, not the cabinets
Draw the room before adding cabinets. Use finished wall to finished wall where that surface exists, and label each value as a rough opening, framing dimension, cabinet opening, or manufacturer required clearance. Record floor, counter, and ceiling levels when walls bow or projections affect tall cabinets and exhaust routing. Mark openings with width, swing, trim, sill height, and remaining usable wall. A doorway that looks wide enough may still conflict with an open refrigerator or dishwasher door.
Mark fixed conditions as Measured, Assumed, To verify, or Not movable without professional review. The last category includes possible structural elements, services, exterior openings, gas routes, and ducts.
The fifth edition of the NKBA Planning Guidelines is the current professional reference and was updated in 2026. It covers passageways, activity centers, equipment, ventilation, electrical planning, and accessibility. Do not transfer an older number into a construction promise without checking the current edition, jurisdiction, and project scope.
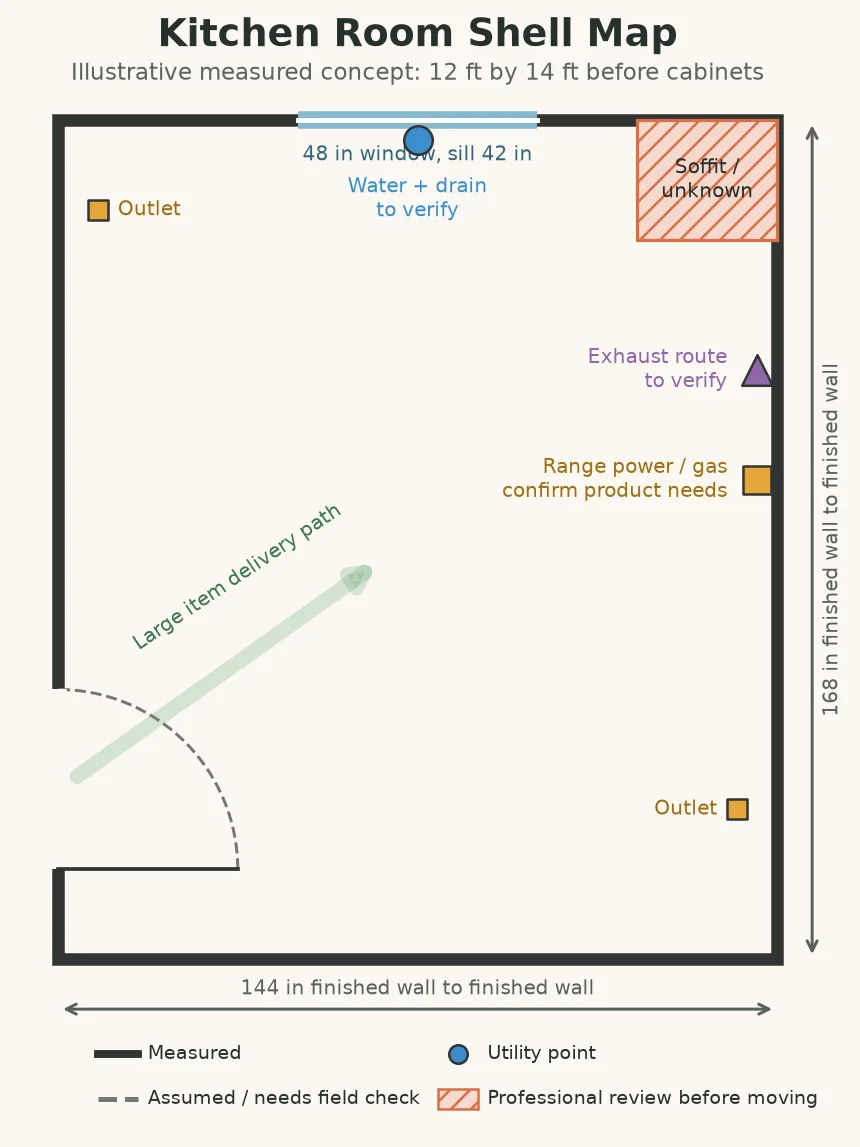
The room shell map should include the delivery route
A refrigerator, range, countertop, or tall cabinet has to reach the kitchen. Measure the route through doors, halls, turns, stairs, and the kitchen entrance. Record the narrowest opening, tight corners, trim, and door stops. Mark household traffic too, since the shortest route may cross active work.
Do not assume that a service is easy to move
A sink move can depend on drain slope, venting, supply lines, access, and local requirements. A range may depend on gas, electrical capacity, anti-tip hardware, ventilation, and its manual. A hood route, structural wall, beam, or concealed service may not be visible. Write “unknown” rather than drawing a confident line. That identifies what to investigate before ordering.
Copy this measurement worksheet before drawing a layout
Print or copy this table into a notebook or spreadsheet. Measure twice, preferably on different passes, and record the date. For each line, note the measurement type and the source of the information. If you measured a wall at floor level but a cabinet must fit at counter height, write that distinction down.
| Item to record | First measurement or note | Repeat measurement or source | Status and measurement type |
|---|---|---|---|
| Room length, finished to finished | Measured, assumed, or to verify | ||
| Room width, finished to finished | Floor, counter, and ceiling level if different | ||
| Ceiling height | Include slope, soffits, beams, and duct drops | ||
| Baseboard and wall trim | Width, height, and removable or fixed | ||
| Columns, radiators, vents, pipes, and projections | Mark depth and whether movement is possible | ||
| Door opening width and height | Rough opening or finished opening | ||
| Door trim and swing | Hinge side, handle side, and usable wall space | ||
| Window opening width and height | Include trim and centerline | ||
| Window sill height | Finished floor to sill, checked twice | ||
| Window swing, shade, or obstruction | Note whether a faucet or cabinet could conflict | ||
| Plumbing points | Supply, drain, vent, and known or unknown | ||
| Gas point | Appliance location, shutoff access, and verification owner | ||
| Electrical receptacles and circuits | Location, height, and circuit information if known | ||
| Lighting and switch locations | Ceiling, task, under cabinet, and control notes | ||
| Exhaust or hood route | Existing duct, recirculating condition, or unknown | ||
| Refrigerator footprint and door swing | Use the exact model manual when selected | ||
| Range or cooktop footprint and clearances | Use the exact model manual when selected | ||
| Sink and dishwasher footprints | Include doors, drawers, and standing positions | ||
| Other appliance footprints | Microwave, wall oven, freezer, or small appliance zone | ||
| Finished floor, transitions, and level changes | Note flooring that will be removed or retained | ||
| Photos and sketch references | Photo number, direction, and date | ||
| Delivery path | Narrowest opening and tight turns | ||
| Unknowns and professional questions | Owner, document, or trade needed |
Use a measurement note that prevents false precision
Label each important number as finished to finished, rough opening, cabinet box, door leaf, or manufacturer required. Do not scale a listing photo, assume walls are square, or treat a nominal cabinet run as proof. Keep a dated photo log of openings, utility points, transitions, and the delivery route.
Scope box: A room sketch is not a permit drawing or a code review. Local building, electrical, plumbing, mechanical, gas, fire safety, and accessibility requirements vary by jurisdiction and project scope. Ask the authority having jurisdiction what applies before demolition or ordering. Appliance manuals control product specific openings, clearances, ventilation, electrical or gas requirements, and installation conditions.
Map the work before choosing a shape
A kitchen is a set of activities and routes, not just a triangle between refrigerator, sink, and cooking surface. Mark grocery drop off, pantry storage, prep, cooking, dirty dishes, waste and recycling, and serving.
The traditional work triangle remains a quick diagnostic. Draw a line between the refrigerator, primary sink, and main cooking surface, then notice whether the route is short, crossed by a door, or interrupted by an island. It can be helpful in a simple one cook kitchen. It is not a universal law, a current code requirement by itself, or a complete description of a kitchen used by several people.
Work zones include arrival and storage; prep; cooking; cleanup and waste; serving; and non-cook circulation for children, guests, pets, laundry, patios, or anyone getting a drink. Mark each zone and its standing position on the map.
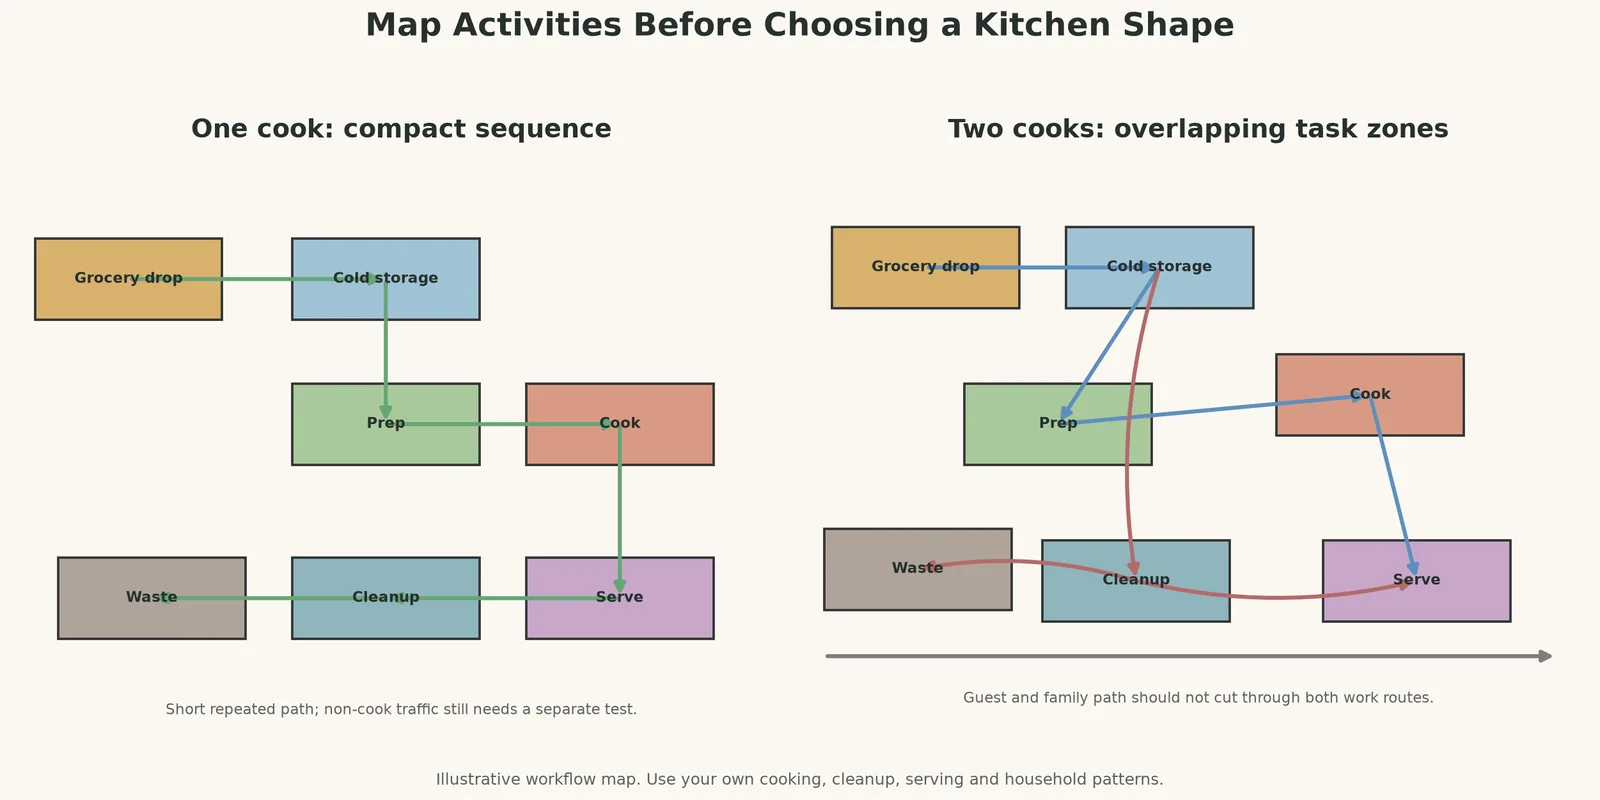
Draw two versions of the workflow
For one cook, draw grocery to storage and refrigerator to prep to cooking to cleanup. For two cooks, assign each person a task and standing position, then mark where an open door, shared sink, or narrow aisle forces a stop.
If guests pass through, draw that route in another color. A quiet cooking route may fail when people move between a front door, dining area, patio, and refrigerator. For visual ideas after confirming fit, see these open kitchen visual examples. They are inspiration, not clearance or code references.
Note landing space, not only appliance locations
A landing area is where a bowl, pan, groceries, or hot item can wait. Its amount and location depend on the appliance, current planning reference, manual, and local requirements. Label intended landing surfaces beside the refrigerator, sink, and cooking surface. Also mark storage frequency and test daily-use doors and drawers against the main route.
Build a short list of layout families that fit your constraints
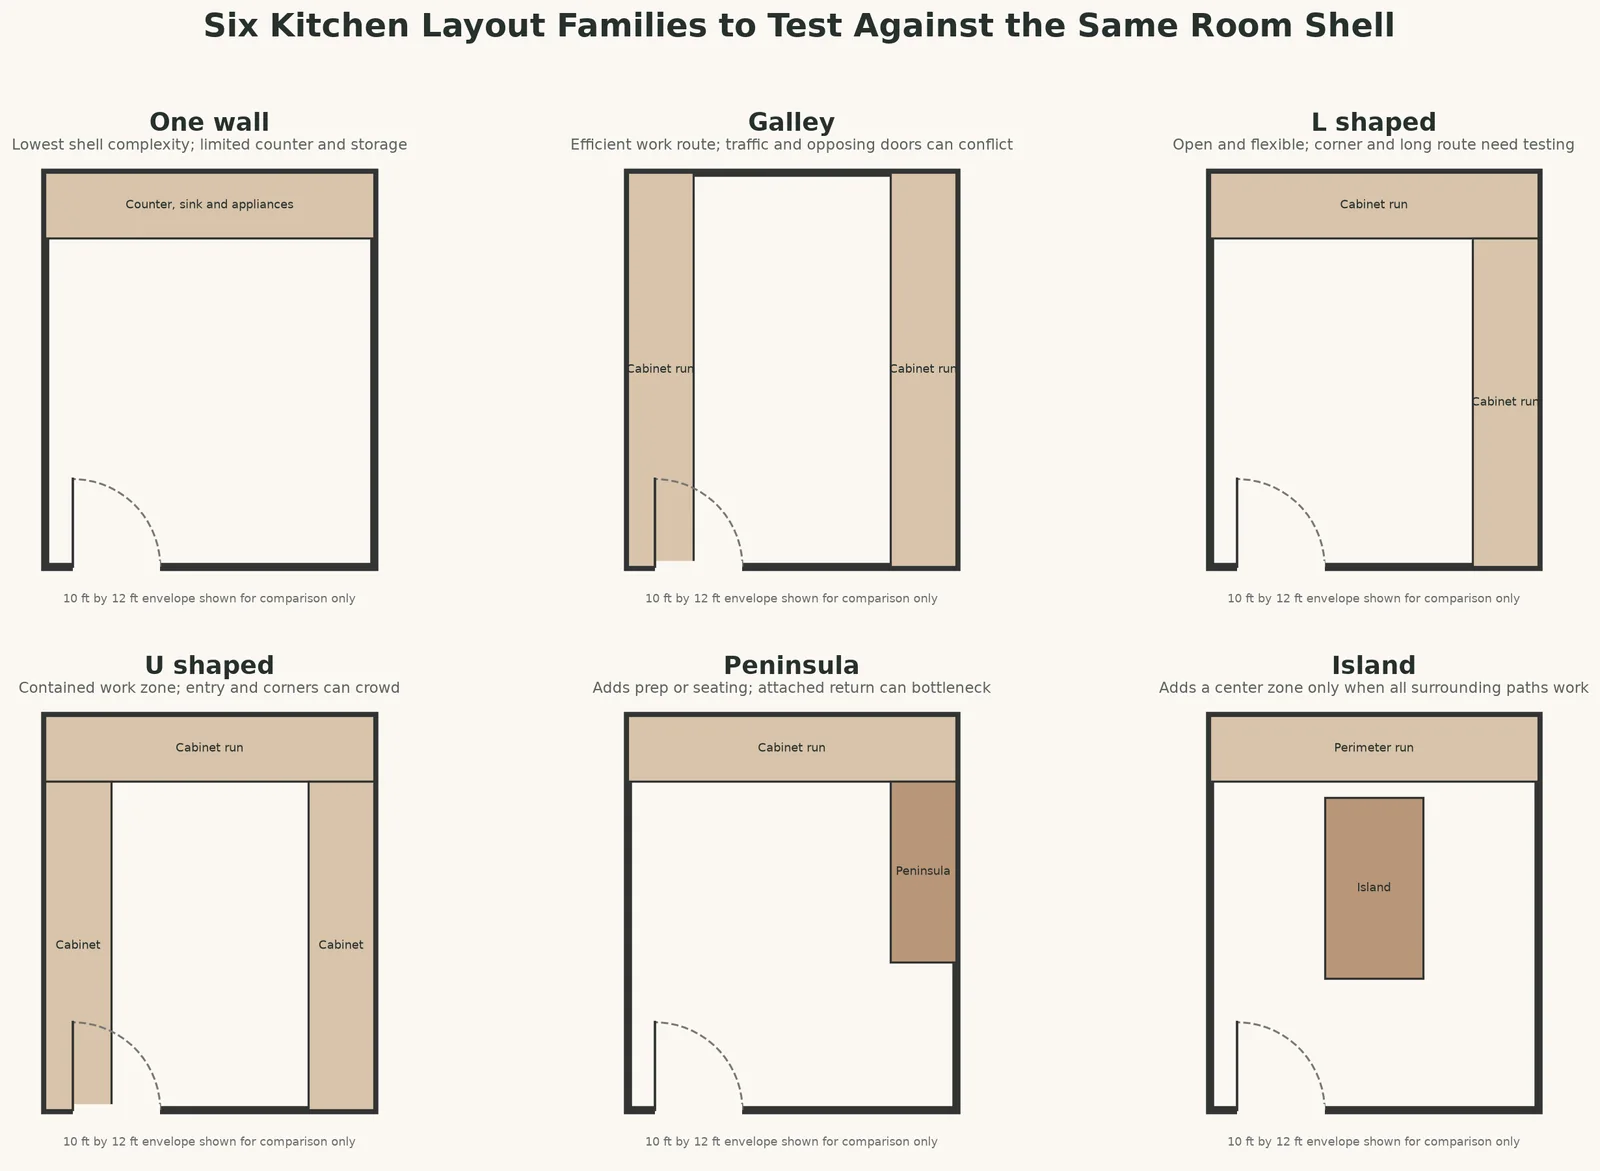
Use the room shell and workflow map to eliminate shapes that cannot fit. Then compare the remaining families by their tradeoffs. The categories below describe tendencies, not verdicts.
| Layout family | Tends to work when | Main test before shortlisting |
|---|---|---|
| One wall | Services can stay on one run and the household accepts limited separation between tasks | Confirm enough prep surface, storage, landing space, and a route that does not cut through the work line |
| Galley | Two usable walls face each other and the room is not the household’s main passage | Open opposing appliance doors and test whether one or two cooks can move without blocking the entry |
| L shaped | An open center or connection to an adjacent room matters | Measure the corner, the longest work route, and any island or dining furniture considered for the center |
| U shaped | Three sides can contain work without trapping the entry | Test corner access, full appliance openings, and the usable entry while someone is standing at a task |
| Peninsula | An attached surface solves prep, serving, or seating without a freestanding island | Draw the route around its end and check whether it narrows the room entrance or an appliance approach |
| Island | The room shell preserves useful space on every working and household side | Test the no island version first, then measure every side of the smallest island that solves a named problem |
One wall
A one wall kitchen can limit utility movement, but it puts storage, prep, cooking, and cleanup on one line. The work route may be long, counter and pantry capacity may be limited, and non-cook traffic may pass directly through it. It may suit one cook or a compact room, but may frustrate a household that cooks in stages or needs two people at once. For a true kitchenette or very small footprint, compare small-space kitchenette inspiration after measuring, not as a dimensions authority.
Galley
A galley can create an efficient compact path, but it becomes difficult when it is the only route between rooms, two cooks need to pass, or opposing doors open into one another. Test refrigerator, dishwasher, and oven doors in full operation. It suits two long walls and controlled entry better than a busy corridor.
L shaped
An L shaped layout can leave the center open for dining or living, but its corner and longer work route need testing. An oversized island can erase its advantage. Check refrigerator access, corner storage, end panels, and the return near any doorway.
U shaped
A U shaped layout can contain tasks around three sides, but entry width, corner access, and trapped appliance doors can create congestion. Test it with all openings active and with the actual number of cooks.
Do not label a U shaped arrangement accessible merely because it looks spacious on paper. The U.S. Access Board ADA kitchen and kitchenette provisions give dimensions for facilities within ADA Standards scope, including clearances and clear floor space at appliances. Those requirements do not automatically apply to every private home. Ask which accessibility rules, if any, apply to the project and the intended users.
Peninsula
A peninsula adds prep, serving, or seating without a freestanding island, but its attached return can narrow an entry or create a bottleneck. Test seating, appliance doors, the outside edge, and the route to the nearest opening.
Island
An island is worth testing only after the room shell shows enough space for work aisles, household paths, landing surfaces, seating access if needed, and appliance door operation. “It fits” is not the same as “it improves the room.” An island that forces a refrigerator door into a work aisle or turns a dining route into a squeeze point may add storage while reducing function.
Test a no island version first. Then test the smallest island that solves a named problem, such as prep surface, seating, storage, or separation between cooking and serving. If the only reason for the island is that the center looks empty, leave that as an open question rather than forcing furniture into it.
An open or closed kitchen is a room relationship, not a separate layout shape. The same L, U, galley, or one wall arrangement behaves differently depending on its connection to a dining room, hallway, family room, or exterior door.
Score each candidate instead of choosing by appearance
Copy this table for every serious candidate. Pass means the test works with measured information and stated assumptions. Needs work means a visible conflict may be revised. Unknown means a missing measurement, manual, utility check, accessibility review, or local requirement prevents a decision. Write one reason for every status.
| Test | Pass, Needs work, or Unknown | Reader note |
|---|---|---|
| Room shell fit | Does the arrangement fit the measured envelope at the relevant height? | |
| Door, drawer, and appliance opening conflicts | Test every opening, including handles and opposing doors. | |
| Main walkway and work aisle operation | Identify whether any dimension is a historical recommendation, accessibility guidance, manufacturer condition, or local question. | |
| Prep landing and usable counter | Is there a practical place to set ingredients beside the task? | |
| Refrigerator access | Can a non-cook reach it without crossing active work? | |
| Cleanup route | Consider sink, dishwasher, waste, recycling, and dish storage together. | |
| Storage reach and frequency | Are daily items reachable without awkward or unsafe access? | |
| Seating and serving conflict | Does seating block work, doors, drawers, or a traffic route? | |
| Lighting and ventilation feasibility | Mark fixture, hood, duct, and control questions for verification. | |
| Accessibility and household fit | Consider reach, approach, turning, children, older adults, and mobility needs. | |
| Remodel complexity and scope | Flag utility moves, structural changes, trade work, and permit triggers. | |
| Delivery and installation path | Can large items reach the room without an untested turn or opening? |
How to use the statuses
A Pass is not a code approval. It means the candidate currently survives the test with the information you have. A Needs work status tells you what to change, such as reversing a door swing, shrinking an island, moving a waste pullout, or creating a separate guest route. An Unknown status means you should not order or demolish based on that part of the drawing.
If two candidates have the same number of Pass results, compare the reasons. One may preserve existing utilities while the other requires a new circuit, duct, drain, structural opening, or complicated delivery route. A scorecard makes that scope visible without pretending to calculate a project price or guarantee an outcome.
Three worked planning examples
The following examples are hypothetical and illustrative, not professional plans or code approvals. Their arithmetic shows how to test and revise a concept. Chosen dimensions do not replace code, manuals, accessibility review, or local guidance.
Example 1: Compact one wall kitchen with no island
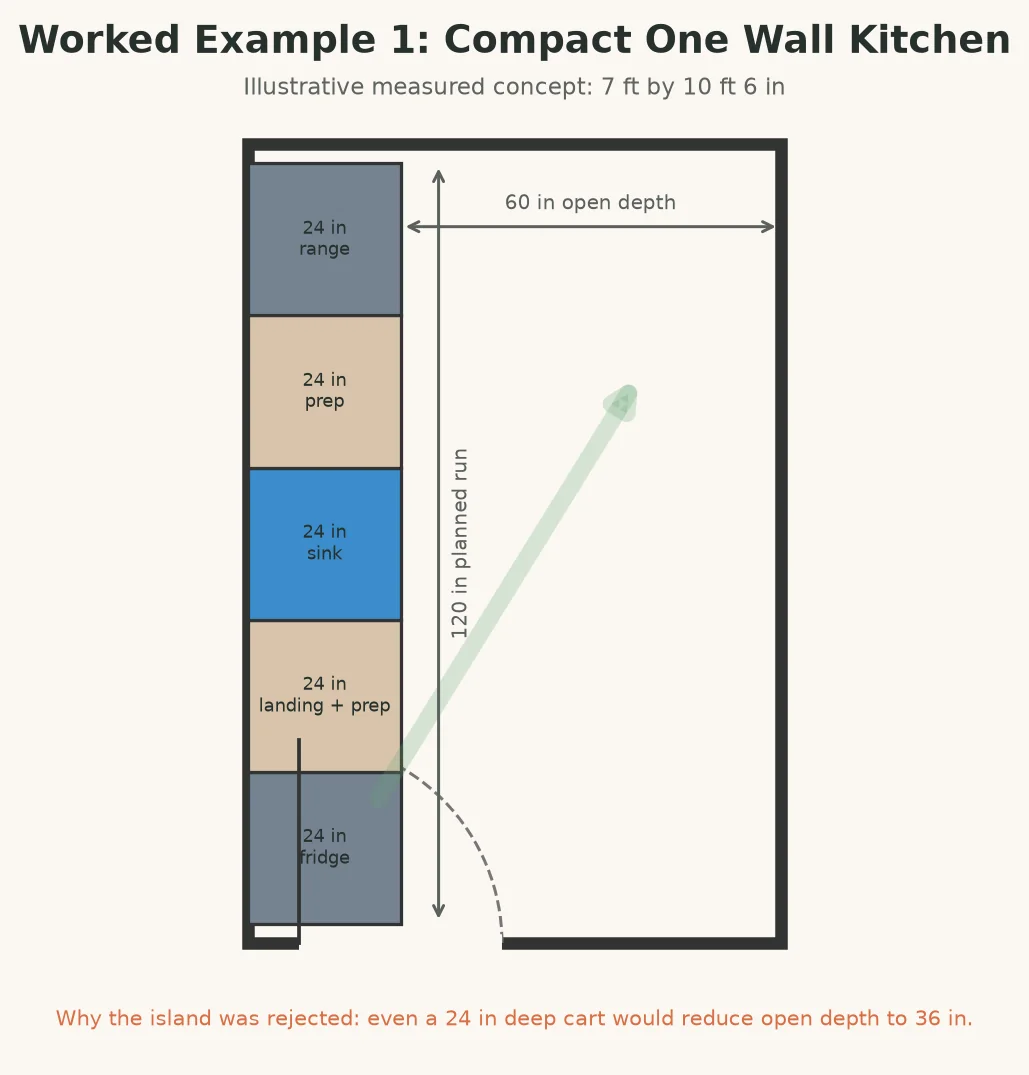
Hypothetical and illustrative assumptions: The room measures 7 feet by 10 feet 6 inches, or 84 inches by 126 inches. A one wall run is 120 inches long. The base cabinet and counter zone is treated as 24 inches deep for this planning sketch, while the selected products would need their own manuals checked. The entry and window are fixed, and utility movement is limited.
The width arithmetic is 7 feet multiplied by 12 inches, which equals 84 inches. Subtracting the 24 inch cabinet depth leaves 60 inches of open floor depth. The long wall has 126 inches. Subtracting a 120 inch cabinet run leaves 6 inches of residual wall length, so the end conditions, trim, filler, and appliance requirements need close checking rather than being treated as spare cabinet space.
The first draft places a 24 inch deep island in the open floor. The remaining depth would be 84 minus 24 for the wall run, minus 24 for the island, which equals 36 inches. That reduces the open area from 60 inches to 36 inches before accounting for any overhang, handles, seating, or door operation. The older public NKBA planning document describes 42 inches as a historical planning recommendation for a one cook work aisle and 48 inches for multiple cooks. It is based on the 2015 IRC and ICC A117.1-2009, so it is not a current universal legal requirement. Even as a screening reference, the island draft needs work because it consumes the room’s useful open depth.
The revised version preserves 60 inches of open depth and limits utility movement until the exact appliances and services are verified. It may suit one cook, but needs another strategy if two people cook or the 120 inch run cannot accommodate landing surfaces. After checking fit, compare these small kitchen examples after you have checked fit. The linked page is inspiration, not a clearance authority.
What this example does not prove: It does not prove that a 60 inch floor area is a required clearance, that a 24 inch depth suits your appliances, that an island is never appropriate in a small room, or that a one wall layout is best for every household.
Example 2: Medium L shaped room with three center options
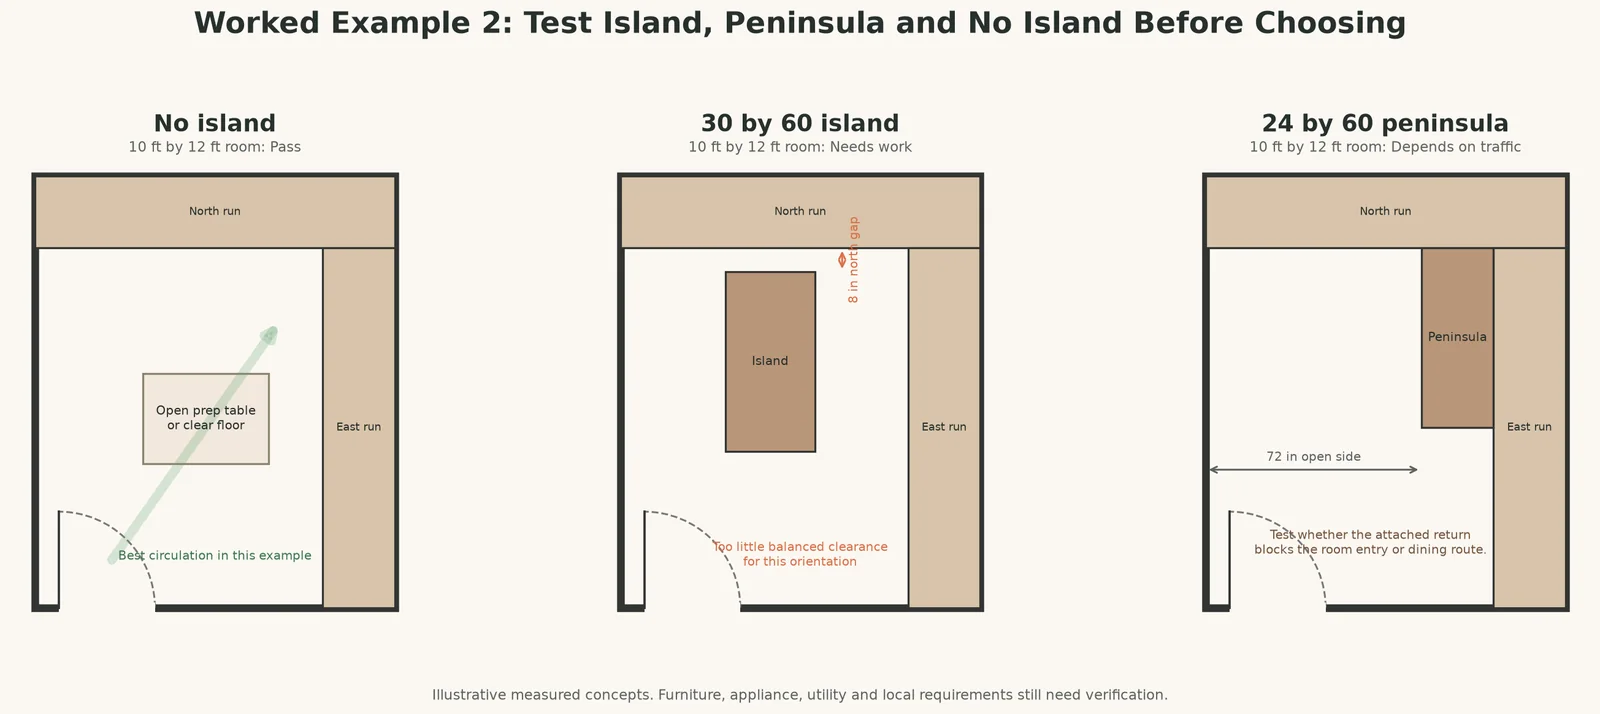
Hypothetical and illustrative assumptions: The room shell is 10 feet by 12 feet, or 120 inches by 144 inches. The north and east cabinet runs are each shown as 24 inches deep. The household has one primary cook, occasional guests, and an open route to an adjacent room. The exact appliances and utility positions are not established.
Start with the no island version. The north run reduces the room depth from 144 inches to 120 inches, while the east run reduces the room width from 120 inches to 96 inches. The open center is not a promise that every inch is usable. Handles, door swings, trim, standing positions, and the actual corner still need to be plotted. This version gives guests the most flexible route and leaves the cook more room to change position.
The second draft adds a 30 by 60 inch island in the position shown. Its west edge begins 35 inches from the west wall, and its east edge sits 31 inches from the face of the east cabinet run. More importantly, its north edge is only 8 inches from the face of the north cabinet run. That single conflict is enough to mark the draft Needs work. The arithmetic shows why an island can look acceptable by footprint while failing when each side is measured.
The third draft tests a 24 by 60 inch peninsula attached to the east run. Its west edge leaves a 72 inch open span across the room, and its south end leaves 60 inches to the south wall before the doorway and door swing are considered. The peninsula avoids the island’s 8 inch north gap, but its attached end can still redirect traffic toward the room entry. Its status remains Needs work until the entry route, seating if any, and appliance doors are drawn at full opening.
The no island concept currently has the cleanest traffic logic. The peninsula may work if it serves the dining room and guests can route around its end. The island needs a smaller footprint, a different position, or more verified separation.
What this example does not prove: It does not establish a universal aisle minimum, an island size rule, a seating requirement, or code compliance. The numbers are screening arithmetic for three concepts in one hypothetical shell.
Example 3: Two cook room with a separate household route
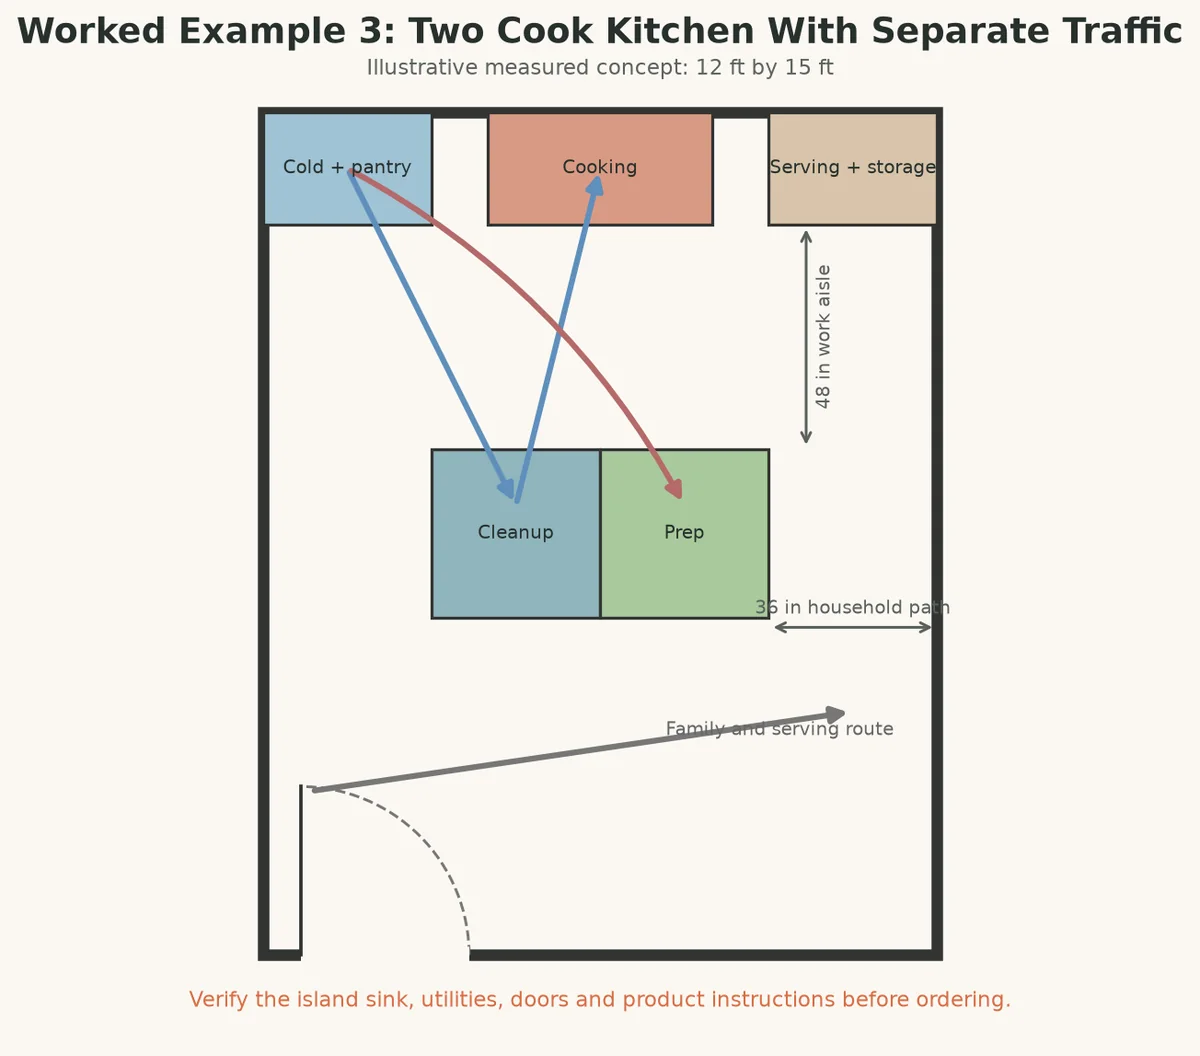
Hypothetical and illustrative assumptions: The room measures 12 feet by 15 feet, or 144 inches by 180 inches. One long wall holds storage and refrigerator access. A central prep surface is planned, and an outside route connects the dining area to a patio. Two people cook at overlapping times. The route and equipment footprints are illustrative, not selected products.
The first draft uses a single central work route for everything. The refrigerator, prep surface, cooking surface, sink, dishwasher, dining room, and patio all feed into that path. The triangle between refrigerator, sink, and cooking surface looks compact, but the workflow map shows a problem: a person walking to the refrigerator crosses the prep position, while the second cook carries a hot item across the same standing area.
The revision gives the two cooks a work route and keeps household traffic along the outside edge. Along the room depth, 180 inches minus the 24 inch north cabinet run, minus the 48 inch work aisle, minus the 36 inch island depth leaves 72 inches south of the island. Across the room width, 144 inches minus the 72 inch island length leaves 72 inches. Centering the island divides that into 36 inches on each side. The east side can therefore be tested as a separate 36 inch household path, but the actual doorway, handles, seating, trim, and appliance doors still have to be drawn.
The point is the route separation, not a universal formula. The historical public NKBA PDF identifies a 48 inch work aisle for multiple cooks and a 36 inch walkway as planning recommendations, but those figures come from an older document and must be checked against current guidance and local conditions. The current NKBA fifth edition was updated in 2026, and the relevant project may also involve accessibility and adopted code provisions.
The revised workflow keeps the refrigerator accessible from the household lane, gives the prep cook a standing zone outside the pass-through, and places cleanup without blocking the cook. If equipment cannot preserve those routes, the candidate returns to Needs work or Unknown.
What this example does not prove: It does not prove that every two cook kitchen needs two lanes, that the cited planning recommendations apply to your home, or that a triangle is irrelevant. It shows why a route map can reveal a conflict that three appliance points alone do not show.
Where dimensions, manufacturers, and local code take over
Use four labels whenever you write a number on the plan.
- Design convention: a choice used to compare concepts, such as the 24 inch cabinet depth in a hypothetical example.
- Measured example: a dimension taken from this room shell or chosen for arithmetic, such as 7 feet by 10 feet 6 inches.
- Manufacturer instruction: an opening, clearance, vent, electrical, gas, anti-tip, or support condition supplied for a specific product.
- Legal or accessibility requirement: a provision that applies only within a stated code, jurisdiction, facility, or project scope.
If you use a number from the older public NKBA kitchen planning guide, label it as a planning recommendation, not a universal code rule. Check the current guidance and your local requirements before you order cabinets or move an appliance.
Accessibility needs its own check. The U.S. Access Board kitchen guidance applies to spaces covered by the ADA Standards; it does not automatically apply to every private home. Plan around the actual household’s needs and ask which requirements apply to your project rather than treating an illustrative floor plan as an approval.
Before ordering an appliance, read its exact model’s installation instructions for the opening, door swing, clearances, utilities and ventilation. If the model is not selected yet, mark that part of the layout Unknown instead of treating a generic footprint as proof that it fits.
If the plan includes a freestanding range, add an anti-tip check to the installation list. The U.S. Consumer Product Safety Commission’s guidance explains why the bracket must be present and engaged. Follow the range manual and qualified installation instructions rather than using this worksheet as an installation guide.
Ask for appropriate review before:
- Removing or altering a wall that may be structural.
- Moving gas, adding a circuit, changing a panel, or relocating plumbing.
- Routing or terminating exhaust ducting.
- Changing a window, exterior opening, or required ventilation condition.
- Installing an appliance where the manual gives special clearance or support requirements.
- Planning for a user who needs accessible reach, approach, transfer, or turning space.
- Starting demolition, ordering custom cabinets, or scheduling work that depends on a permit.
A local code official or qualified professional may need to review the project before construction. A polished drawing is not enough. Unresolved conditions need documented answers and assigned reviewers.
Choose your next tool or professional checkpoint
Graph paper is enough for a first pass, and a spreadsheet helps preserve versions and score reasons. A digital kitchen layout planner can visualize cabinet faces and appliance footprints, but it does not verify field measurements, manuals, utilities, permits, or code.
A cabinet visualization may help communicate an order, but ask what its review includes. An independent designer may help with workflow and coordination, while qualified trades may be needed for structural, electrical, plumbing, gas, ventilation, or installation questions. Choose the checkpoint based on unresolved risk, not drawing polish.
Bring the dated worksheet, repeat measurements, room photos, delivery route, workflow maps, candidate layouts with score reasons, appliance model information, known utility details, and assigned questions.
Kitchen layout planning questions to answer before ordering
Is an island necessary?
No. Test the no island version first. An island is useful only when it solves a specific prep, storage, serving, or seating problem while preserving workable circulation, openings, and household routes.
Is the work triangle required?
Not as a universal rule. It can be a quick diagnostic for refrigerator, sink, and cooking surface relationships. Work zones and traffic routes are more informative when several people cook, guests pass through, or cleanup and serving happen at the same time.
How much should I measure?
Measure the full room shell, each opening, trim and projection, every known utility, the delivery path, and the exact appliance requirements when models are selected. Measure twice and label the type of every measurement.
When should I ask for professional review?
Before demolition or ordering when a structural wall, gas line, new circuit, plumbing move, exhaust route, appliance installation condition, permit question, or accessibility need is unresolved. A professional review is also sensible when the scorecard contains Unknown results in the room shell or technical sections.
Final pre-order and pre-demo checklist
Use this as the last gate before a cabinet order, appliance order, demolition, or irreversible utility work.
- Room length, width, height, trim, projections, and floor conditions were measured twice.
- Doors and windows include opening sizes, trim, swing direction, sill height, and usable wall space.
- The delivery path was measured at its narrowest points and through its turns.
- Plumbing, electrical, gas, lighting, HVAC, and exhaust conditions are labeled known, assumed, or to verify.
- Appliance manuals were checked for the exact model, or the layout is marked Unknown until models are selected.
- Every door, drawer, refrigerator door, dishwasher door, oven door, and seating position was tested open.
- Prep and cooking landing surfaces are identified beside the relevant tasks.
- Refrigerator access, cleanup, waste, recycling, serving, and non-cook routes were drawn.
- The no island, island, and peninsula options were compared where an island is under consideration.
- Each candidate has a reason beside every Pass, Needs work, and Unknown status.
- Range anti-tip hardware and the exact installation condition are assigned for verification where relevant.
- Accessibility questions were scoped to the intended user, facility, jurisdiction, and applicable standards.
- Structural, electrical, plumbing, gas, exhaust, permit, and local authority questions have an identified reviewer.
- Quotes or proposals, if any, describe scope and exclusions clearly. This worksheet does not establish a price or guarantee an outcome.
- A qualified professional review is complete where the project requires it.
Take the worksheet, room-shell map, and top two scored layouts to the person who can answer your largest Unknown, such as the manufacturer, local authority, or qualified trade professional. Resolve it before refining finishes or ordering materials.